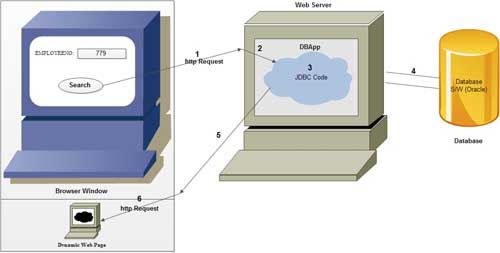
Accessing data in a database or in any other data sources is a significant operation in web programming. Data access from JSPs and servlets is done through Java Database Connectivity (JDBC).
There are two packages in JDBC 3.0-java.sql and javax.sql. The java.sql package is often referred to as the JDBC core application programming interface (API) and is sufficient to do basic data manipulations. The javax.sql package is the JDBC Optional Package API which provides additional features, including connection pooling, which will be discussed in another chapter. The following subsections will discuss the four most important members of the java.sql package-the DriverManager class, the Connection, the Statement, and the ResultSet interfaces.
To make Servlet Program gather input from database table and save the result to database table, we need Servlet-to-Database Software Communication. For this we need to place JDBC code in Servlet Program.
Example
In e-mail ID registration the web resource program should gather collected detail database table as record. There are three approaches to place JDBC code in servlet program.
Approach 1
Create JDBC Connection obj in init() method
• Use JDBC connection object to create other JDBC object and write JDBC persistence logic in service(-,-)/doXxx(-,-) method
• Close JDBC con object in destroy()
*Here JDBC Connection object must be taken as an instance variable of the servlet program. So Connection object is not thread safe.
Advantage: All requests coming to servlet program will use single connection to interact with database software. This improves the performance of the web applications.
Disadvantage: There Multiple threads may use single connection object simultaneously or concurrently, which means programmer should take care of multithreading issues by using synchronization concept.
Approach 2
Create JDBC Connection object in service(-,-)/ doXxx(-,-) method.
• use JDBC Connection obj to create other JDBC obj and devlope JDBC Persistance logic in service( -,-)/ doXxx( -,.) method
• close JDBC Connection obj is service(-,-)/doXxx(-,-) methods.
Advantage: Here JDBC connection object is a local variable of service(-,-)/doXxx(-,-) methods.
Disadvantage: For every request one separate JDBC connection object will be created. So this approach degrades the performance.
JDBC connection pool: JDBC connection pool is a factor that contains set of readily available JDBC connection object.
Approach 3
Get JDBC connection object from JDBC connection pool from service(-,-)/ doXxx(-,-) method
• use JDBC connection object to create other JDBC connection object and develop JDBC persistence logic in service(-,-)/ doXxx(-,-) method.
• Return JDBC con Object back to JDBC con Pool being from service( -,-)/ doXxx(-,-) methods.
Advantages
• Here JDBC connection object should be taken as a local variable of service(-,-)/ doXxx(-,-) method. So there is no need to worry about multithreading issues.
• While working with JDBC con pool, programs are not responsible to create, manage and destroy JDBC connection object.
• We can use minimum number of JDBC connection objects to make more clients and requests interact with database software.
• Gives better performance than Approach 2.
• Allows JDBC connection object of the JDBC connection pool in multiple web resource programs of same or different web application.
Example: Application of servlet-to-database software communication based on Approach 1:

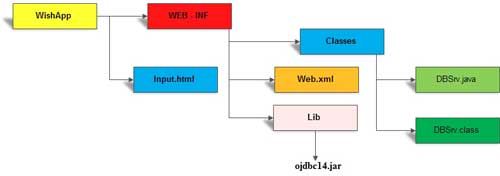
Step 1: Prepare the deployment directory structure of web application.
Deployment directory structure (When type 1 JDBC driver is used)

Deployment directory structure (When type 4 JDBC driver is used)

• In the above discussion, jar files added to classpath will be used by Java compiler to recognize third party API during the compilation of servlet program. Similarly, JAR file added to WEB-INF/lib folder the will be used by servlet container to recognize the third party API during the execution of servlet program.
• Standalone application compilation and execution take place from command prompt, so we must add jar file in classpath.
• In servlet program compilation takes place from command prompt but execution takes place from servlet container so we need to add jar files to c1asspath and also to WEB-INF /lib folder of web application.
Step 2: Develop the source code of above servlet program or web Application. Source Code of the Above Application.
Input.html
<form action ="dburl" method="get">
  Employee no:<input type="text" name="t1"/ ><br>
  <input type=”submit”value="search">
</form>
DBSrv.Java
import javax.servlet.*;
import javax.servlet.http.*;
import java.sql.*;
import java.io.*;
public class DBServlet extends HttpServlet {
 public void doGet(HttpServletRequest req,HttpServletResponse res)
  throws ServletException, IOException {
 try {
 String qry;
 qry = req.getParameter("query");
 System.out.println(qry) ;
 Class.forName("oracle.jdbc.driver.OracleDriver");
 System.out.println("driver") ;
 Connection con;
 con=DriverManager.getConnection("jdbc:oracle:thin:
    @localhost:1521:XE","system" , "manager");
 System.out.println(con) ;
 Statement st;
 st = con.createStatement();
 ResultSet rs;
 rs =st.executeQuery (qry) ;
 printWriter pw;
 pw = res. getWriter () ;
 pw.println("<html>") ;
 pw.println("<body>") ;
 pw.println("<table border=0 width=100%>") ;
 pw.println("<tr>") ;
 pw.println("<th> Number </th>");
 pw.println("<th> Name </th>");
 pw.println("<th> Designation </th>");
 pw.println("</tr>") ;
 while(rs.next() ) {
  pw.println("<tr>") ;
  pw.println("<td>" + rs.getInt(1) + "</td>") ;
  pw.println("<td>" + rs.getString(2) + "</td>");
  pw.println("<td>" + rs.getString(3) + "</td>");
  pw.println("</tr>") ;
} // end of while loop
 rs.close() ;
 st.close () ;
 con.close();
 pw.println("</table></body></html>") ;
 } //end of try block
 catch(Exception e) {
  e.printStackTrace() ;
 }//end of catch block
 } // end of doGet()
}
web.xml
<web-app>
 <servlet>
 <servlet-name>db</servlet-name>
 <servlet-class>DBServlet</servlet-class>
 </servlet>
 <servlet-mapping>
 <servlet-name>db</servlet-name>
 <url-pattern>/dburl</url-pattern>
 </servlet-mapping>
</web-app>
Explanation of the above program
In this Our intention is to communicate with the database/Oracle and pass a query through which we can extract information present in the required table of the database and display it as an output.
First, one needs to import all the to three packages, that is, SQL package, ID package and servlet.http.package. Our class DBServlet extends from the HttpServlet. As the doGet(_,_) is overridden in the program so it is necessary to match the signature of the method with the base class method and this doGet( ) throws ServletException, IOException. In the program we write the logic of JDBC which throws sql exception, So the logic is written within the try-catch block to handle the exception.
• String qry;
Here we declare a variable named as ‘qry’ of String type.
• qry=req.getParameter("query");
Whatever the query we pass in the text field that is read by the getParameter( ) and it is assigned to the qry variable of String type.
• ClassforName("oracle.jdbc.driver.OracieDriver");
It loads the Type-4 driver
• Connection con;
Here we create the reference of the Connection interface.
con = DriverManager.getConnection("jdbc:oracle:thin:@localhost:1521:XE", "system", "manager");
Through this we establish the connection with the database.
• Statement st;
The reference of the statement interface is created.
• st=con.createStatement();
By using the createStatement( ) statement is created. The createStatement( ) is a method of the connection interface, so it is invoked through the Connection interface object.
• ResultSet rs;
ResultSet reference is created.
• rs=st.executeQuery(qry);
This method executes the query of the database, which is assigned to the qry variable. executeQuery() is a method of the Statement interface. So it is invoked through the Statement interface reference. The return type of this method is ResultSet.
• PrintWriter pw;
• pw=res.getWriter();
With the help of the PrintWriter class reference the response content print on the browser window.
• pw.println(" ");
Within the println( )of the PrintWrite class we pass the HTML code through which we can print the content of the response within the table.
• while(rs.next())
By using the executeQuery( ) of the statement interface the query is executed and retrieved from database and assigned within the ResultSet reference rs. When we write rs.next( ) within the while( ) at that cursor point to the first row of the table.
If it returns true then control enter into the while( ).
• rs.close();
• st.close();
• con.close();
The close methods close all the connections with the database.
• pw.println(" </table></body></html> ");
It shows the end of the table, end of the body and end of the HTML code. After it try block is closed.
• catch(Exception e)
If any exception is generated in try block then that exception is thrown to the catch block.
• e.printStackTrace();
The printStackTrace( ) method, when the exception arises, shows the reason of exception. It also shows the location of the line in which the exception is created.
Step 4: Configure all the four servlet programs in web.xml file having four different URL patterns.
Step 5: Start the server (Tomcat).
Step 6: Deploy the web application.
Copy DBAPP folder to Tomcat_home\webapps folder.
Step 7: Test the web application.
Open browser window type this url: https://ecomputernotes.com:2020/DBApp/input.html
 Dinesh Thakur holds an B.C.A, MCDBA, MCSD certifications. Dinesh authors the hugely popular