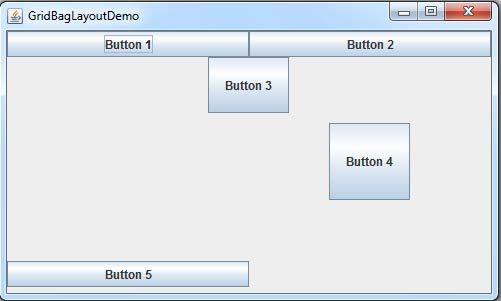
The grid bag layout manager is the most advanced and yet easy to use layout manager. A GridBagLayout arranges the component in a grid of rows and columns. It allows different sized components to span multiple rows or columns. Also, each row in the grid can have different number of columns. Grid bag layout specifies a grid of cells with the container determines the component’s size and then positions each component in one or more cell accordingly.
The grid bag layout manager can be created by using the following constructor.
GridBagLayout ()
Information such as, size and location of each component in a grid bag is determined by a set of constraints contained in an object of type GridBagConstraints. The variables in the class GridBagConstrain ts that represent these constraints are given below:
• gridx and gridy: gridx and gridy specify the x and y coordinates to position the component. gridx and grid y represent the number of cells at the left of the component and the number of cells at the top of the component, respectively. By default, the value of both gridx and gridy is relative. It places the component at position next to the component added last in a row or a column.
• gridwidth and gridheight: gridwidth and gridheight specify the number of columns and rows, respectively occupied by the components. The default value for both gridwidth and gridheight is 1. The value REMAINDER can be assigned to gridwidth and gridheight to indicate that the component should be the last one in a row or a column. Ifwe want the component to be the next to last one in a row or a column, the value RELATIVE is used.
• fill: fill specifies how the component should expand within its display area if the area is larger than the component. Any one of the following values can be assigned to fill.
NONE: To specify that the size of the component remains unchanged. It is the default value.
VERTICAL: To specify that the component can expand only vertically.
HORIZONTAL: To specify that the component can expand only horizontally.
BOTH: To specify that the component can expand vertically as well as horizontally.
• ipadx and ipady: ipadx and ipady specify extra width and height of the component, respectively. The default value is 0. Negative values can also be used to tighten the spacing between the components.
• insets: It specifies the amount of space to leave between the borders of the component and the edges of display area. The Insets class specifies the separate values of top, left, bottom, and right. The default value is (0,0,0,0).
• anchor : It specifies where the component should be placed within the display area if it is smaller than its display area. The location of the component is usually given as a compass direction. Any one of the following values can be assigned to anchor.
CENTER(default), NORTH, SOUTH, NORTHEAST, SOUTHWEST, EAST, WEST, SOUTHEAST,NORTHWEST
• weightx and weighty: weightx and weighty specify how the extra horizontal and vertical spaces be adjusted while resizing the container. The component will occupy extra space in the specific direction according to the weight assigned to it.
Consider Example. In this example, grid bag layout is set as the layout for the frame. Five buttons are created and their grid bag constraints are specified. Then the buttons are added to the frame.
Example: A Program to demonstrate the use of GridBaglayout
import java.awt.*;
import javax.swing.*;
class myGridBag extends JApplet
{
final static boolean shouldWeightX = true;
final static boolean RIGHT_TO_LEFT = false;
public static void addComponentsToPane(Container pane)
{
if (RIGHT_TO_LEFT)
{
pane.setComponentOrientation(ComponentOrientation.RIGHT_TO_LEFT);
}
JButton button;
pane.setLayout(new GridBagLayout());
GridBagConstraints gb =new GridBagConstraints();
button= new JButton(“Button 1”);
if (shouldWeightX)
{
gb.weightx = 0.5;
}
gb.fill = GridBagConstraints.HORIZONTAL;
gb.gridx = 0;
gb.gridy = 0;
pane.add(button, gb);
button= new JButton(“Button 2”);
gb.fill = GridBagConstraints.HORIZONTAL;
gb.weightx = 1;
gb.gridx = 1;
gb.gridwidth = 2;
gb.gridy = 0;
pane.add(button, gb);
button= new JButton(“Button 3”);
gb.fill = GridBagConstraints.VERTICAL;
gb.ipady = 30;
gb.weightx = 2;
gb.gridwidth = 4;
gb.gridx = 0;
gb.gridy = 1;
pane.add(button, gb);
button= new JButton(“Button 4”);
gb.fill = GridBagConstraints.VERTICAL;
gb.ipady = 0; //reset to default
gb.weighty = 1.0;
gb.anchor = GridBagConstraints.PAGE_END;
//bottom of space
gb.insets =new Insets(10,0,0,0); //top padding
gb.gridx = 1;
gb.gridwidth = 2;
gb.gridy = 2; //third row
pane.add(button, gb);
button= new JButton(“Button 5”);
gb.fill = GridBagConstraints.HORIZONTAL;
gb.weighty = 1.0;
gb.anchor = GridBagConstraints.PAGE_END;
gb.insets =new Insets(10,0,5,0);
gb.gridx = 0;
gb.gridwidth = 2;
gb.gridy = 3; //fourth row
pane.add(button, gb);
}
private static void displayGUI()
{
JFrame frame= new JFrame(“GridBagLayoutDemo”);
frame.setDefaultCloseOperation(JFrame.EXIT_ON_CLOSE);
addComponentsToPane(frame.getContentPane());
frame.setSize(500, 300);
frame.setVisible(true);
}
public static void main(String[] args)
{
javax.swing.SwingUtilities.invokeLater(new Runnable()
{
public void run()
{
displayGUI ();
}
}) ;
}
}
The output of the program is shown in Figure

 Dinesh Thakur holds an B.C.A, MCDBA, MCSD certifications. Dinesh authors the hugely popular