Let’s begin in the traditional way, by looking at the code of a Hello World program.
1. using System;
2. public class HelloWorld
3. {
4. public static void Main()
5. {
6. II This is a single line comment
7. /* This is a
8. multiple
9. line comment */
10. Console.WriteLine(“Hello World! “);
11. }
12. }
• The first thing to note about C# is that it is case-sensitive. You will therefore get compiler errors if, for instance, you write ‘console’ rather than ‘Console’.
• The second thing to note is that every statement finishes with a semicolon (;) or else takes a code block within curly braces.
We’ll be covering the following topics in this tutorial:
Explanation of Program
Line 1: using System;
We are using the System namespace. The point of this declaration is mostly to save ourselves time typing. Because the ‘Console’ object used in line 10 of the code actually belongs to the ‘System’ namespace, its fully qualified name is ‘System.Console’. However, because in line 1 we declare that the code is using the System namespace, we can then leave off the ‘System.’ part of its name within the code.
Line 2: public class HelloWorld
As C# is an object-oriented language, C# programs must be placed in classes. This line declares the class to be named ‘HelloWorld’.
Line 4: public static void Main()
When compiled and run, the program above will automatically run the ‘Main’ method declared and begun in this line. Note again C#’s case-sensitivity – the method is ‘Main’ rather than ‘main’.
Line 3, 11 and 5, 12:
These lines uses the ‘{‘for starting braces and ‘}’ for closing braces of block.
Lines 6-9: Comments
(‘//’ uses for single line and ‘/*…………. */’ uses for multiple line comments)
These lines of the program are ignored by the compiler, being comments entered by the programmer for his own benefit.
Line 6 shows a single line comment, in which everything on the line after the two forward slashes is ignored by the compiler.
Lines 7-9 demonstrate a multi-line comment, in which everything between the opening /*and closing */ is ignored, even when it spans multiple lines.
Line 10: Console.WriteLine (“Hello World”);
The statement on this line calls the ‘WriteLine’ method of the Console class in the System names pace. It should be obvious how this works in the given example – it just prints out the given string to the ‘Console’ (on PC machines this will be a DOS prompt).
Instruction for Saving the Program
In order to run the program, it must first be saved in a file. Unlike in Java, the name of the class and the name of the file in which it is saved do not need to match up, although it does make things easier if you use this convention. In addition, you are free to choose any extension for the file, but it is usual to use the extension ‘.cs’.
Writing program in Computer
There are two ways of program writing in computer
• Using Text Editor
• Using Visual Studio.NET
Using Text Editor:
We are giving the steps for writing the program in text editor, notepad.
1. Start Notepad
2. In the empty file, type the following
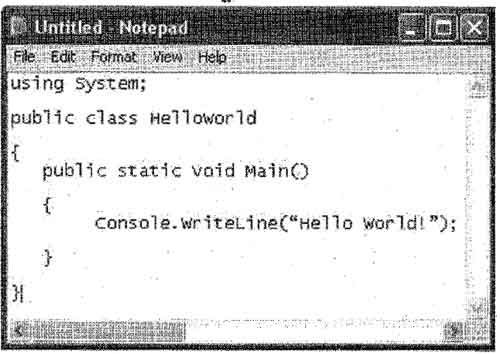
3. To save the file, on the main menu, click File -> Save
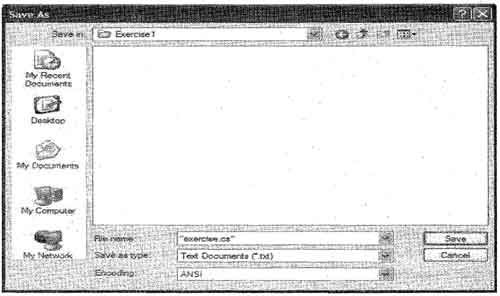
4. Select and display the C: (or the D 🙂 drive in the Save in combo/box
5. Click the Create New Folder button
6. Type Exercise! and press Enter twice or display the new folder in the Save In combo box
7. Save the file as exercise.cs using double quotes.
Using Visual Studio.NET
To create a console application using Visual Studio .NET follow the steps which are given below:
- Open Visual Studio .NET.
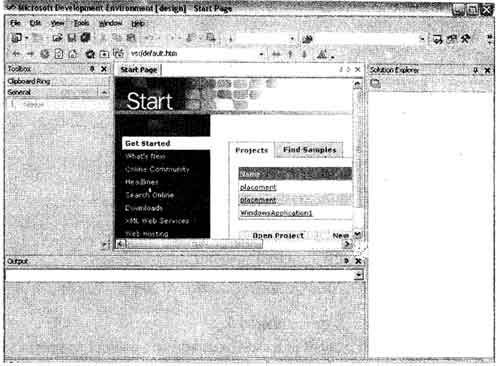
2. Create a new console application project by selecting the
File -> New -> Project ….. Menu item:
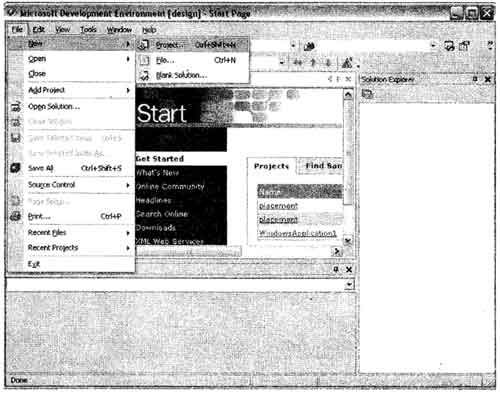
3. Select the Visual C# Projects folder from Project types: Pane of the window that appears, and Console Application project type in the Template: pane.
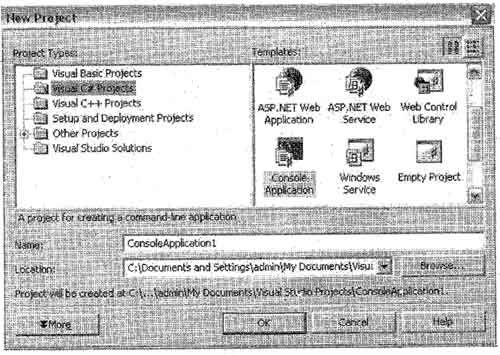
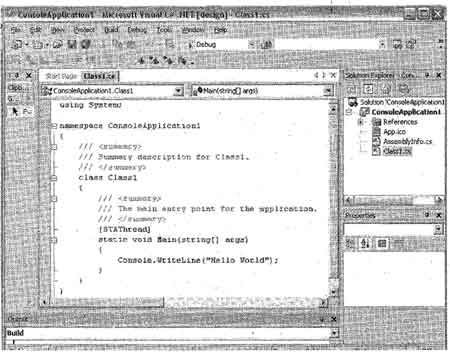
4. Click the OK button. Once the project is initialized, add the code of program to file displayed in the main window:
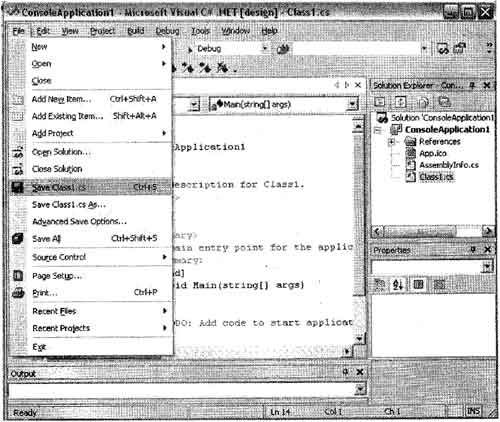
5. Save the application file by selecting the File I Save Class1.cs or press Ctrl +S.
Compilation and Execution
The compiler that ships with the C# version we will use, that is, the compiler of the .NET
Frameworks a program called csc. Like most other programs, it has the extension .exe. This csc name is not standard. This means that another C# compiler may have another name; csc.exe is just the name of the compiler we will use.
To use csc.exe, you should first find it in your computer. By default, it is installed in a
Folder like C:\ WINDOWS \ Microsoft.NET \ Framework. To use this compiler in all of your programs, you should include it in your system path.
After saving the file as ‘exercise.cs’.
To compile the program – open the Command Prompt and change to the folder in which
You created the C# file:
C:\ > cd Exercise l
C:\ Exercise l> csc exercise.cs
You Will see the following output on your screen in the dos box.
Microsoft (R) Visual C# Compiler Version 7.00.9254 [CLR version vl.0.29l4]
copyright (C) Microsoft Corp 2000-2001. All rights reserved.
Its means your program is successfully compiled. Other wise it will show the error, to remove go back to the program.
This command would generate the executable exercise.exe, which could be run in the usual way, by entering its name:
C:\Exercise1> exercise
Fairly obviously, this program would produce the output:
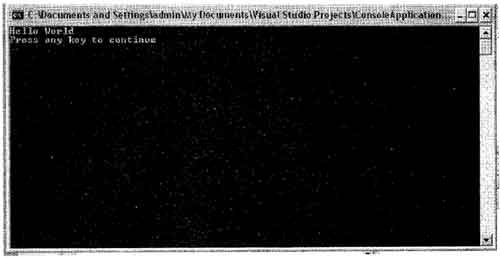
Hello World!
For Visual Studio Users:
- Compile the application by selecting Build | Build Solution or press Ctrl + Shift + B.
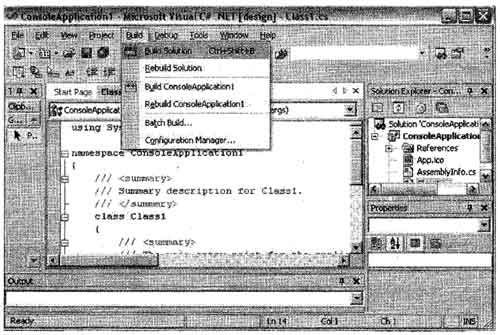
2. To execute the application select Debug I Start without Debugging or press Ctrl + F5.
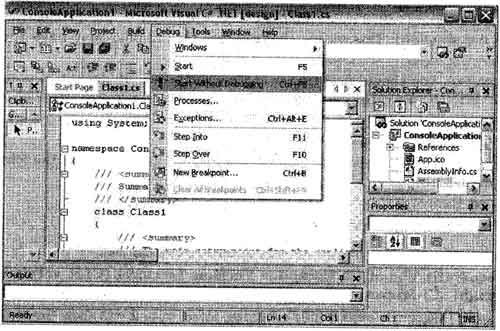
Here is execution of the application. :
Different Ways of C# Program
The following examples show different ways of writing the C# Hello World Program.
Normal Program
public class Helloworld
{
public static void Main()
{
System.console.writeLine(“Hello world!”);
}
}
Output of Example
Hello World!
To avoid fully qualifying classes throughout a program, we can use the ‘using’ directive
Using system;
Public class Helloworld
{
public static void Main()
{
console.writeLine(“Hello world!”);
}
}
Output of Example
Hello World!
To return a return code, change the prototype of Main function
using system;
public class Helloworld
{
Console.writeLine(“Hello world!”) ;
return 0;
}
}
Output of Example
Hello World!
All of the above three examples will generate the same output. In first example we have used ‘System’ namespace with in the program. In the second example we have used ‘System’ namespace as directive with ‘using’ keyword. And in the third example we have used ‘Main’ function with return value.
 Dinesh Thakur holds an B.C.A, MCDBA, MCSD certifications. Dinesh authors the hugely popular