• Skip to main content
  • Skip to primary sidebar
  • Skip to secondary sidebar
  • Skip to footer

Computer Notes

Library
    • Computer Fundamental
    • Computer Memory
    • DBMS Tutorial
    • Operating System
    • Computer Networking
    • C Programming
    • C++ Programming
    • Java Programming
    • C# Programming
    • SQL Tutorial
    • Management Tutorial
    • Computer Graphics
    • Compiler Design
    • Style Sheet
    • JavaScript Tutorial
    • Html Tutorial
    • Wordpress Tutorial
    • Python Tutorial
    • PHP Tutorial
    • JSP Tutorial
    • AngularJS Tutorial
    • Data Structures
    • E Commerce Tutorial
    • Visual Basic
    • Structs2 Tutorial
    • Digital Electronics
    • Internet Terms
    • Servlet Tutorial
    • Software Engineering
    • Interviews Questions
    • Basic Terms
    • Troubleshooting
Menu

Header Right

Home » C# » Introduction

What is Structure in C#

By Dinesh Thakur

Structure is a user-defined value type which encapsulates member data and member function.

A struct is a user-defined value type. It is declared in a very similar way to a class, except that it can’t inherit from any class, nor can any class inherit from it (as mentioned\ previously, however, all value types do inherit from System.object), The following example shows a partial declaration for a ‘Coordinate’ struch.

struct Coordinate

{

pub1i c int x;

public int y;

public Coordinate(int x, int y)

{

this . x = x;

this.y = y;

}

}


Given the above, one could initialise a Coordinate type in a familiar way, using code like:


coordinate c = new coordinate(10, 2);

~ Concept

Note that if a variable of a struct type is declared without being given an explicit value, eg:


Coordinate c2 ;


it does not equate to ‘null’ (this being the default value for reference types, rather than value types. Instead, the variable is initialised to a state where its fields have their default values.If these fields are basic value types, they will generally be set to zero. If these field they will be set to ‘null’.


Because of this default initialization behaviour, it is an error for a struct to be given a parameterless constructor (eg. one like ‘public Coordinate().) Also, where a struct does have a constructor, you should be sure to make assignments to all of the struct’s fields within this constructor.


Use of structure


using system;

public struct Storeitem

{

public long ItemNumber;

public string ItemName;

public double unitprice;


public void DisplayAnltem()

{

console.writeLine(“Department store”);

console.writeLine(“Item #: {0}”, this.ltemNumber);

console.writeLine(“Description: {0}”, this.ItemName);

Console.writeLine(“unit price: {0:C}\n”, this.unitprice);

}

}

public class Exercise

{

static void Main()

{

Storeltem item = new Storeltem ();


item.ltemNumber = 348649;

item.ItemName = “Men 3-piece Jacket”;

item.unitprice = 275.95;


item.DisplayAnltem ();

}

}


OUTPUT:


Department Store

Item #: 348649

Description: Men 3-piece Jacket

unit price: 275.95
What is enumeration in C#

By Dinesh Thakur

An enumeration is a special set of numeric type string literals which considered as a constants.

An enumeration is a special kind of value type limited to a restricted and unchangeable set of numerical values. By default, these numerical values are integers, but they can also be longs, bytes, etc. (any numerical/value except char) as will be illustrated below.

When you define an enumeration you provide literals which are then used as constants for their corresponding values. The following code shows an example of such a definition:


public enum DAYS

{

Monday,

Tuesday,

Wednesday,

Thursday,

Friday,

Saturday,

Sunday

}


Note, however, that there are no numerical values specified in the above. Instead, the numerical values are set up according to the following two rules:


1. For the first literal: if it is unassigned, set its value to O.

2. For any other literal: if it is unassigned, then set its value to one greater than the value of the preceding literal.


From these two rules, it can be seen that DAYS.Monday will be set to 0, and the values increased until DAYS.Sunday is set to 6. Note also how we are referring to these values – the values specified in an enumeration are static, so we have to refer to them in code using the name of the enumeration: “DAYS.Monday” rather than just “Monday”. Furthermore, these values are final-you can’t change their runtime value.

~

The following code demonstrates how you can override the default setting which makes the default values integers. In this example, the enumeration values are set to bytes.


enum byteEnum : byte

{

A,

B

}


You can also override the default numerical values of any and all of the enumeration elements. In the following example, the first literal is set to value 1. The other literals are then set up according to the second rule given above, so DAYS.Sunday will end up equal to 7.


public enum DAYS

{

Monday=!,

Tuesday,

wednesday,

Thursday,

Friday,

saturday,

Sunday,

}


In the two examples given, the values of each literal has been’ unique within the enumeration. This is usually how you will want things to be, but in fact the values need not be unique. In the following case, the value of DAYS.Thursday is also set to equal!. The values assigned to the other literals will follow the rules given previously, so both DAYS.Tuesday and DAYS.Friday will equal 2, etc.

public enum DAYS

{

Monday=l,

Tuesday,

wednesday,

Thursday=l,

Friday,

Saturday,

Sunday

}

In C# enumerations are type-safe, by which we mean that the compiler will do its best to stop you assigning implicit values to enumeration typed variables. For instance, the following code should not compile:


int i = DAYS.Monday;

DAYS d = i;

In order to get this code to compile, you would have to make explicit casts both ways (even converting from DAYS to int), ie:


int i = (int)DAYS.Monday;

DAYS d = (DAYS)i;

At this point you may be wondering what happens if you cast an int to an enumeration value where that same value is defined for two elements within the enumeration. And the answer is this: one of the elements is given ‘primary’ status, so it gets picked ahead of the other.

A useful feature of enumerations is that one can retrieve the literal as a string from the numeric constant with which it· is associated. In fact, this is given by the default To String() method, so the following expression comes out as true:

DAYS.Monday. ToStringO==”Monday”

The following code prints out both the literal and its constant value for the specified enumeration.


Example of Enumeration


class EnumTest

{

public enum DAys:byte {MON,TUE, WED,THU,FRI,SAT,SUN}

public static void Main(string[] args)

{

DAYS d=EnumTest.DAYS.SAT;

byte a=(byte) EnumTest.DAYS.SAT;

string str=EnumTest. DAYS. SAT.ToString() ;

consol e. writeline(“{O}, {I}, {2}” ,d, d. ToString() ,d. Tostring(“d”)) ;

consol e. writeline(“{O}, {l}”,str, a) ;

}

}


OUTPUT:

SAT, SAT, 5

SAT, 5

Since it’s not immediately obvious what’s going on in the main method here, let’s take the time to go through it.

console.Writeline(“{0}, {I}, {2}” ,d, d. ToString() ,d. Tostring(“d”)) ;

And what the String.Format method does is to take ‘textual representations’ of the objects it is passed as parameters, and slots them into the appropriate places within the ‘format string’ it is passed.

Now, we’ve already noted that ToString () will return a literal string, but what about the method d.ToString (“d”)?

The ToString method can take a single IFormatProvider parameter which indicates how the string conversion should be conducted. Values for this parameter can include things like “g”, “d”, “x”, “f’, etc. The stated implication of “d”, however, is to render in ‘Decimal format’.And when we use this on an enumeration member, it provides a string representation of the “numerical value” of the enumeration member.

Type of String in C#

By Dinesh Thakur

A string is an empty space, a character, a word, or a group of words.

A string is an empty space, a character, a word, or a group of words that you want the compiler to consider “as is”, that is, not to pay too much attention to what the string is made of, unless you explicitly ask it to. This means that, in the strict sense, you can put in a string anything you want.

Primarily, the value of a string starts with a double quote and ends with a double-quote.

An example of a string is “Welcome to the World of C# Programming!”. You can include such a string in the Console.Write () method to display it on the console. Here is an example:

Simple string

using System;

class Bookclub

{

static void Main()

{

console.writeline(“welcome to the world of c# programming!”) ;

}

}

OUTPUT:

welcome to the world of c# programming!

Sometimes, you will need to use a string whose value is not known in advance. Therefore, you can first declare a string variable. To do this, use the string keyword (in fact, it is a class) followed by a name for the variable. The name will follow the rules we defined above. An example of a string declaration is:

string Msg;

After declaring a string, you can give it a primary value by assigning it an empty space, a character, a symbol, a word, or a group of words. The value given to a string must be included in double-quotes. Here are examples of string variables declared and initialized:

string Empty = “”;

string Gender = “F”;

string FName = “Mahatama Gandhi”;

string Msg = “welcome to the world of c# programming! “;

After initializing a string variable, you can use its name in any valid operation or expression. For example, you can display its value on the console using the Console.Write () or the Console.WriteLine () methods. Here is an example:

Use of string variable

using system;

class Bookclub

{

static void Main()

{

string Msg = “welcome to the world of C# programming! “;

console.writeLine(Msg);


}

}


OUTPUT:

Welcome to the World of C# Programming!

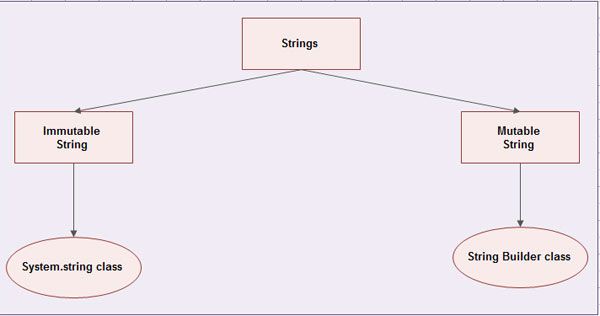
There are two types of string in C#:

1. Immutable strings

2. Mutable strings

The immutable strings are can’t be modify while mutable strings are modifiable.C# also supports a feature of regular expression that can be used for complex strings manipulations and pattern matching.

                          The immutable strings are can't be modify while mutable strings are modifiable.

Handling of Strings

We can create immutable strings using string or String objects in a number of ways.

There are some techniques to handling the immutable strings:

Assigning String

string s1;

s1 = “welcome”;


or

string s1 =”welcome”;

Copying String

string s2 = s1;

or


string s2 = string.copy(s1);

Concatenating Strings

string s3 =s1 + s2;


or


string s3 = string.Concat(sl,s2);

Reading from Console

string sl = console.ReadLine(); .

Converting Number to String

int num = 100 ;

string s1= num.Tostring();

Inserting String

string s1 = “wel”

string s2 = s1.Insert(3,”come”);

II s2 = welcome

string s3 = s1.Insert(3,”don”);

/ / s3 = we1don;

Comparing Strings

int n = string.Compare(sl,s2);

This statement will perform case-sensitive comparison and returns integer values for different conditions. Such as:

• If sl is equal to s2 it will return zero.

• If sl is greater than s2 it will return positive integer (1).

• If sl is less than s2 it will return negative integer(-l).

Or you can use following statement:


bool a = s2.Equals(sl);

bool b = string.Equal(sl,s2);

Above statements will return a Boolean value true (if equal) or false (if not equal).

Or you can also use the “==” operator for comparing the strings. Like as:


if (s1 == s2)

console.write (” both are equal”);

In this statement, it will return a Boolean value true (if equal) or false (if not equal

Mutable String

Mutable strings are those strings, which can be modifying dynamically. This type of strings are created using StringBuilder class. For Example:


StringBuilder sl = new StringBuilder (“welcome”);

StringBuilder s2 = new StringBuilder ( );

The string sl is created with an initial size of seven characters and s2 is created as an empty string. They can grow dynamically as more character added to them. Mutual string are also referred as a dynamic strings. Mutable string can be modify dynamically.

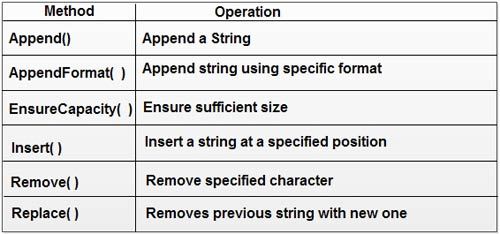
The StringBuilder class supports many methods that are useful for manipulating dynamic strings. Some of the most common methods are listed below:

                       Some of the most common methods

StringBuilder also provides some attributes to access some properties of strings, such as:

                        StringBuilder also provides some attributes to access some properties of strings

Here is an example program for mutable string. To use string builder class we have to use System. Text in the program.

Mutable string

using system.Text;        // For using StringBuilder

using system;

class strMethod

{

public static void Main( )

{

StringBuilder s = new stringBui1der(“c”};

console.writeLine(” stored string is :”+ s);

console.writeLine(“Length of string is :”+s.Length);


s.Append(“Sharp “);   II appending the string s


Console.writeLine(“After Append String is :”+ s);

console.writeLine(“Length of string is :”+s.Length);

//space will be count in “sharp” string.


s.Insert(7,”Language”); II inserting the string at last in s


console.writeLine(“After Insertion String is:”+ s);

console.writeLine(“Length of string is :”+s.Length);


int n = s.Length;


s [n] = “!”;

console.writeLine (” At Last String is:”+ s);

}

}


OUTPUT:


Stored string is : C

Length of string is 1

After Append string is : cSharp

Length of string is : 7

After Insertion string is : cSharp Language

Length of string is: 15

At Last String is : cSharp Language!

Type of Array

By Dinesh Thakur

An array is a group or collection of similar type of elements.


An array is a group or collection of similar values. An array contains a number of variables, which are accessed through computed indexes. The various value contained in an array are also called the elements of array. All elements of an array have to be of same type, and this type is called the element type of the array. The element of an array can be of any type including an array type.

An array has a rank that determines the number of indexes associated with each array elements. The rank of an array is also referred as the dimension of the array. An array may be:


• Single Dimensional

• Multi Dimensional

An array with a rank of one is called single-dimensional array, and an array with a rank greater than one is called a multi dimensional array.


Each dimension of array has an associated length, which is an integer number greater than or equal to zero. For a dimension of length n, indices can range from 0 to n-l. In C#, array types are categorized under the reference types derived from. the abstract base. Types system. Array.

Single Dimensional Array

Single-dimensional arrays have a single dimension (ie. are of rank 1). The process of creation of arrays is basically divided into three steps:


1. Declaration of Array

2. Memory Allocation for Array

3. Initialization of Array


Declaration of Array


To declare an array in C# place a pair of square brackets after the variable type. The syntax is given below :


type[] arrayname;

For Example:


int [ ] a;

float[] marks;

double] x;

int [ ] m, n ;

You must note that we do not enter the size of the arrays in the declaration.


Memory Allocation for Array


After declaring an array, we need to allocate space and define the size. Declaring arrays merely says what kind of values the array will hold. It does not create them. Arrays in C# are objects, and you use the new keyword to create them. When you create an array, you must tell the compiler how many components will be stored in it. Here is given the syntax:


arrayname = new type[size];


For Example:


a = new int[5];

marks = new float[6];

x = new double[10];

m = int[100];

n = int [50];

It is also possible to combine the two steps, declaration and memory allocation of array, into one as shown below:


int[] num= new int [5];


Initialization of Array


This step involves placing data into the array. Arrays are automatically assigned the default values associated with their type. For example, if we have an array of numerical type, each element is set to number o. But explicit values can be assigned as and when desired.

Individual elements of an array are referenced by the array name and a number that represents their position in the array. The number you use to’ identify them are called subscripts or indexes into the array.

Subscripts are consecutive integers, beginning with 0. Thus the array “num” above has components num[0], num[l], num[2], num[3], and num[4].

The initialization process is done using the array subscripts as shown:


arrayname[subscript] = value;


For Example:


num[O] = 5;

num[1] = 15;

num[2] = 52;

num[3]·= 45;

num[4] = 157;

We can also initialize arrays automatically in the same way as the ordinary variables when they are declared, as shown below:


type[] arrayname = { list of values };

the list of variables separated by commas and defined on both ends by curly braces. You must note that no size is given in this syntax. The compiler space for all the elements specified in the list.

For Example:


int[] num = {5,15,S2,45,57};

You can combine all the steps, namely declaration, memory allocation and initialization of arrays like as: “,


int[] num = new int [5]” {5,15,52,4S,S7};

You-can also assign an array object to another. For Example


int [] a = { 10, 20, 30};

int [] b;

b=a;

The above example is valid in C#. Both the array will have same values.

Demonstration of array

using system;

class Number

{

public static void Main()

{

int [] num = {10, 20, 30, 40, SO};

int n =. num.Length;

II Length is predefined attribute to access the size of array

console.write(” Elements of ,array are :”);

for(int ;=0; i<n; i++)

{

console.writeLlne(num[i]);

}

int sum =0;

for(int i=O; i<n; i++) {

sum = sum +.num[i]); }

Console.writeLine(” The sum of elements :”+sum);

}

OUTPUT:

Elements of array are:

10

20

30

40

50


The sum of elements :150

Note : If you do not initialize an array at the time of declaration, the array members are automatically initilized to the default initial value for the array type. Also, if you declare the array as a field of a type, it will be set to the default value null when you instantiate the type.

Multi Dimensional Array

C# supports two types of multidimensional arrays:


• Rectangular Array

• Jagged Array


Rectangular Arrays


A rectangular array is a single array with more than one dimension, with the dimensions’ sizes fixed the array’s declaration. The following code creates a 2 by 3 multi-dimensional array:


int[,] squareArray =new int[2,3];

As with single-dimensional arrays, rectangular· arrays can he filled at the time they are declared. For instance, the code


int[,] squareArray = {{l, 2, 3}, {4 , 5, 6}};


creates a 2 by 3 array with the given values . .It is, of course, important that the given values do fill out exactly a rectangular array.

The System.Array class includes a number of methods for determining the size and bounds of arrays. These include’ the methods GetUpperBound(int i) and GetLowerBound(int i), which return, ;respectively, the upper and lower subscripts of dimension i of the array (note that i is zero based, so the first array is actually array 0).

For instance, since the length of the second dimension of squareArray is 3, the expression


squareArray.GetLowerBound(l)

returns 0, and the expression


squareArray.GetupperBound(l)

returns 2, because lowerbound is 0 and upperbound is 2 for length 3.

System.Array also includes the method GetLength(int i), which returns the number of elements in the ith dimension (again, zero based) ..

The following piece of code loops through squareArray and writes out the value of its elements.


for(int i = 0; i < squareArray.GetLengthCO); i++)

for (int j = 0; j < squareArray.GetLengthCl); j++)

console.writeLine(squareArray[i,j]);

A foreach loop can also be used to access each of the elements of an array in turn, but using this construction one doesn’t have the same control over the order in which the elements are accessed.


Jagged Arrays


A jagged array is an array whose elements are arrays. The elements can be different dimensions and sizes.

Using jagged arrays, one can create multidimensional arrays with irregular dimensions. This flexibility derives from the fact that multidimensional arrays are implemented as arrays of arrays. The following piece of code demonstrates how one might declare an array made up of a group of 4 and a group of 6 elements:


int[][] jag = new int[2][];

jag[0] = new int [4];

jag[l] = new int [6];


The code reveals that each of jag[O] and jag[l] holds a reference to a single-dimensional int array. ‘To illustrate how one accesses the integer elements: the termjag[0] [1] provides access to the second element of the first group.

& Concept

To initialise a jagged array whilst assigning values to its elements, one can use code like the following:


int[ ][ ] jag = new int[ ][ ] {new int[ ] {1, 2, 3, 4}, new int[ ] {5, 6, 7, 8, 9, 10}};


Be careful using methods like GetLowerBound, GetUpperBound, GetLength, etc. with jagged arrays. Since jagged arrays are constructed out of single-dimensional arrays, they shouldn’t be treated as having multiple dimensions in the same way that rectangular arrays do.


To loop through all the elements of a jagged array one can use code .like the following:


for (int i = 0; i < jag.GetLength(O); i++)

for (int j = 0; j < jag[i].GetLength(O); j++)

console.writeLine(jag[i] [j]);


or


for (int i = 0; i < jag.Length; ‘i++)

for (int j = 0; j < jag[i].Length; j++)

console.writeLine(jag[i] [j]);


The following example builds on arrays myArray, whose elements are arrays. Each one of array elements has a different size.


using System;

public class Array Test

{

public static void Main()

{

II Declare the array of two elements

int [][] myArray = new int [2][];

II initilize the elements

myArray [0] = new int [5] {I, 3, 5, 7, 9};

myArray [1] = new int [4] {2, 4, 6, 8};

II Display the array elements


for (int i = 0; i< myArray.Length; i++)

{

console.write (“Element( {O}):”, i)

for (int j = 0; j < myArray [i].Length; j++)

console.write (“{O}”, myArray [i] [j]);

console.writeLine ();

}

}

}


OUTPUT:


Element (0): 1 3 5 7 9

Element (1): 2 4 6 8

Passing Arrays as Parameters

You can pass an initialized array to a method. Here we given example of a printArray (myArray); function for both single and multidimensional arrays.

Single Dimension

In following example, a string array is initialized and passed as a parameter to the printArray method, where its elements are displayed.


using System;

public class Arrayclass

{

static void PrintArray (string [] w)

{

for (int i = 0; i < w.Length; i++)

console.write (w[i]);

Console.writeline ();

}

public static void Main ()

{

II Declare and initialize an array

string [] weekDays = new string []

{“sun”, “Sat”, “Mon”, “Tue”, “wed”, “Thu”, “Fri”};

1/ Pass the array as a parameter

printArray (weekDays);

}

}


OUTPUT:


Sun Sat Mon Tue wed Thu Fri

Multi Dimension

In this example, a two dimensional array is initialized and passed to the PrintArray method, where its elements are displayed.


using system;

public class Arrayclass

{

static void printArray (int [,]w)

{

II Display the array elements

for (int i = 0; i < 4; i++)

for (int j = 0; j < 2; j++)

console.writeLine (“Element {O}; {1} = {2}”, i, j,w[i ,j]);

}

public static void Main ()

{

II pass the array as a parameter

printArray (new int [,] {{1, 2}, {3, 4}, {5, 6}, {7, 8}});

}

}

OUTPUT:


Element (0, 0) =1

Element (0, 1) = 2

Element (1, 0) = 3

Element (1, 1) = 4

Element (2,    0) = 5

Element (2,   1) = 6

Element (3,    0) = 7

Element (3,   1) = 8

What is Scope of Variable

By Dinesh Thakur

In the body of a method, you can also declare variables that would be used internally. A variable declared in the body is referred to as a local variable. It cannot be accessed outside of the method it belongs to. After declaring a local variable, it is made available to the method and you can use it.

As mentioned with functions, C# doesn’t have the notion of global variables (in C/C++,

Visual Basic, Pascal, etc, a global variable is one that is declared outside of any class; such a variable is made available to any function, or even file, of the same program without being declared again where needed). Still, if you want to use the same variable in various methods of the main class, you can declare it outside of any method. The variable must be declared as static. That is, you must type the static keyword to its left when declaring it. Here is an example:


Using System;

Class Exercise

{

Static double Length;

Static void welcome()

{

console. WriteLine (“welcome to the wonderful world of c#”);

}

Static void Main ()

{

Welcome();

console. WriteLine ();

}

}

After declaring such a variable, you can access from any method that belongs to the same class. Here is an example, to understand the concept of static variable.

Use of static variable


using System;

class Cylinder

{

static double Length;

static double Width;

static double Area;

static double Get The Length ()

{

double Len;

console. Write (“Length: “);

Len= double. Parse (console. Read Line ());

return 1en;

}

static double GetThewidth()

{


double w;

console. Write \(“width: “);

w = double. Parse (console. Read Line ());

return w;

}

static void AreaRect ()

{

console. WriteLine (“Enter the Length and width of Rectangle “);

width = Get The width();

Length = Get The Length();

Area = Length * width;

}

static void show Area()

{

console. Write Line(“\n characteristics of Rectangle”);

console. write Line(“Length: “+ Length);

console. Write Line(“width :”+ width);

Console. Write Line(“Area :”+ Area); }

}

static void Main()

{

AreaRect ();

Show Area() ;

console. Write Line (); }

}

 }


OUTPUT:


Enter the Length and Width of Rectangle

Length: 38.24

Width: 32.58

Characteristics of Rectangle

Length: 38.24

Width: 32.58

Area : 1245.85

Type of Method in C#

By Dinesh Thakur

The Function defined with in class is called method. It is a code designed to work on the member data of class.


Methods are operations associated with types. To provide a type with methods is to give it some useful functionality. Often this functionality is made generally available, so that it can be utilized by other types.

A method declaration, specified within a class declaration, comprises a method-head and a method-body. The method-head is made up of the following elements (square brackets enclose those which are optional).


[attributes] [method-modifiers] return-type method-name ([formal-parameter-list])


An example of a method’s name would be Welcome. To distinguish a method from a variable, it is always followed by parentheses, sometimes empty. Since a method is used to perform an assignment, its job is included between an opening curly bracket “{“and a closing curly bracket “}”.Here is an example:


using system;

class Exercise

{

Welcome() { }

static void Main()

{

Console.writeLine();

}

}


If the assignment performed by a method is long, you can use many lines to define its behavior. For this reason, each bracket can be typed on its own line.

Any time you create a method, the compiler needs to know the type of value that the method would return. The type of value that a method would return is specified on the left side of the method’s name.

Some, even many; of the methods used in your programs will not return a value after they have performed an assignment. When a method doesn’t return a value, it is considered void. The return type of such a method is the void keyword. Here is an example:


using System;

class Exercise

{

void welcome()

{

}

static void Main()

{

console.writeLine();

}

}


Static Methods

Unlike some other languages like C/C++, Pascal, Visual Basic, etc, but like Java, C# doesn’t have the notion of global function: every method must belong to a class. For this reason, every program uses at least one class and we call this primary class, the main class. Because of this feature of the language, it imposes some rules on the way methods can be called. If you create a method in the main class of your project, you should indicate that the method will always belong to this main class. The method must be created as static.

To define a method as static, type the static keyword to its left. Here is an example:


using system;

Class Exercise

{

Static void welcome ()

{

}

Static void Main ()

{

Console.WriteLine ();

}

}


As we have used the Main () function so far, the behavior of a method is defined between its delimiting curly brackets. The section inside the curly brackets is called the body of a method. In the body of the method, you can simply display a sentence. Here is an example:


Using system;

Class Exercise

{

Static void welcome ()

{

Console.WriteLine (“welcome to the wonderful world of c#”);

}

Static void Main ()

{

Console.WriteLine ();

}

}


In the same way, you can use a method to perform any other assignment. After creating a method, you can use it where needed. Using a method is also referred to as calling it. If you create a simple method like the above Welcome (), to call it, type its name followed by parentheses and ending with a semi-colon. Here is an example:


Using System;

Class Exercise

{

static void welcome()

{

Console.WriteLine (“welcome to the wonderful world of c#”);

}

static void Main()

{

Welcome ();

Console.WriteLine ();

}

}


Methods with return value

If a method has carried an assignment and must make its result available to other methods or other classes, the method must return a value and cannot be void. To declare a method that returns a value, provide its return type to the left of its name. Here is an example:


Using system;

Class Exercise

{

Static double operation ()

{

}

static void Main()

{

}

}


After a method has performed its assignment, it must clearly demonstrate that it is returning a value. To do this, you use the return keyword followed by the value that the method is returning. The value returned must be of the same type specified as the return type of the method. Here is an example:


using System;

class Exercise

{

Static double operation()

{

return 24.55;

}

static void Main()

{

}

}


A method can also return an expression; provided the expression produces a value that is conform to the return type. Here is an example:


using system;

class Exercise

{

static double operation()

{

return 24.55 * 4.16;

}

static void Main()

{

}

}


When a method returns a value, the compiler considers such a method as if it were a regular value. This means that you can use Console .Write () or Console.WriteLine () to display its value. To do this, simply type the name of the method and its parentheses in the Console.Write () of the Console.WriteLine () methods’ parentheses. Here is an example:


Using system;

Class Exercise

{

Static double operation ()

{

Return 24.55;

}

Static void Main ()

{

Console.WriteLine(operation());

}

}

Methods with Arguments

Like a variable, an argument is represented by its type of value. For example, one method may need a character while another would need a string. Yet another method may require a decimal number. This means that the method or class that calls a method is responsible for supplying the right value, even though a method may have an internal mechanism of checking the validity of such a value.

The value supplied to a method is typed in the parentheses of the method and it’s called an argument. In order to declare a method that takes an argument, you must specify its name and the argument between its parentheses. Because a method must specify the type of value it would need, the argument is represented by its data type and a name. If the method would not return a value, it can be declared as void.

Below examples which uses the arguments.

Call by value

When calling the methods that take one or more arguments, we made sure that we provided the needed argument. This is because an argument is always required and the calling function or class must provided a valid value when calling such a method.


Call by value method


Using System;

Class cylinder

{

static double GetTheRadius()

{

Double rad;

Do

{

Console. Write (“Radius: “);

Rad = double. Parse (console. Read Line ());

If (rad < 0)

Console. Write Line (“please enter a positive number”);

} while (rad < 0);

Return rad;

}

Static double GetTheHeight ()

{

Double h;

Do

{

Console.Write (“Height: “);

h = double.Parse (console. Read Line ());

if ( h < 0 )

Console. Write Line (“please enter a positive number”);

} while (h < 0);

Return h;

}


Static double calculateBaseArea (double rad)

{

Return rad * rad * Math.PI;

}

Static double calculateLateralArea (double rad, double hat;)

{

Return 2 * Math.PI * rad * hgt ;

}

static double calculateTotalArea(double rad, double hgt)

{

return 2 * Math. PI * rad * (hgt + rad);

}

static double calculatevolume(double rad, double hgt)

{

return Math. PI * rad * rad * hgt;

}

static void processcylinder()

{

double Radius;

double Height;

double BaseArea;

double LateralArea;

double TotalArea;

double volume;

Console.Writeline(“Enter the dimensions of the cylinder”);

Radius GetTheRadius();

Height = GetTheHeight();

BaseArea = calculateBaseArea(Radius);

LateralArea = calculateLateralArea(Radius, Height);

TotalArea = calculateTotalArea(Radius , Height);

volume = calculatevolume(Radius, Height);

Showcylinder(Radius, Height, BaseArea, LateralArea, TotalArea , volume); }

static void ShowCylinder(double rad, double hgt, double BArea,

double Lateral, double Total, double vol) {

console.writeLine(“\ncylinder characteristics”);

console.writeLine(“Radius: {O}”, rad);

console.writeLine(“Height: {O}”, hgt);

console.writeLine(“Base: {O:F}”, BArea);

console.writeLine(“Lateral: {O:F}”, Lateral);

console.writeLine(“Total: {O:F}”,total);

console.writeLine(“volume: {O:F}”, vol);

}

static void Main()

{

processCylinder();

console.writeLine();

}

}


OUTPUT:


Enter the dimensions of the cylinder

Radius: 38.26

Height: 28.48

Cylinder Characteristics

Radius: 38.26

Height: 28.48

Base: 4598.75

Lateral: 6846.44

Total: 16043.94

Volume: 130972.40

Call by reference

If you supply the argument using its name, the compiler only makes a copy of the argument’s value and gives it to the calling method. Although the calling method receives the argument’s value and can use in any way, it cannot (permanently) alter it. C# allows a calling method to modify the value of a passed argument if you find it necessary. If you want the calling method to modify the value of a supplied argument and return the modified value, you should pass the argument using its reference.

To pass an argument as a reference, when defining and when calling the method, precede the argument’s data type with the ref keyword. You can pass 0, one, or more arguments as reference in the program or pass all arguments as reference. The decision as to which argument(s) should be passed by value or by reference is based on whether or not you want the called method to modify the argument and permanently change its value.

Here are examples of passing some arguments by reference:


void Area(ref double Side);


II The argument is passed by reference


bool Decision(ref char Answer, int Age);


II One argument is passed by reference


Here is an example of call by reference :


Method call by reference


using system;

class swap

{

static void swapvalue(ref int a, ref int b)

{

int temp =. a;

a = b;

b = temp;

}

public static void Main()

{

int x =10, y = 20;

console.writeLine(” values of x and yare:”);

Console.writeLine(” x = ” + x);

Console.writeLine(” y= ” + y);

Swapvalue (ref x, ref y);

console.wrjteLine(“After swapping values are:”);

console.writeLine(” x “+ x);

console.writeLine(” y = ” + y);

}

}


OUTPUT:


values of x and y are


x = 10

Y = 20


After swapping values are:


x = 20

Y = 10

Special Parameters

C# provides two special types of parameters for functions which are given below:


• Output parameter

• Parameter array


Output Parameter


In addition to passing values by reference, there is an output parameter used to pass result back to the calling method. Using out keyword you can declare output parameter, which does not create a new storage location like reference parameters. When a formal parameter is declared as out, the corresponding actual parameter in the calling method must also be declared as out. For Example


Use of output parameter


using system;

class Outparameter {

static void Area_of_sqaure(int x, out int y)


{

y = x * x;

}

public static void Main()

{

int m;

Area_of_sqaure (3, out m);

console.writLine(“Area of square :”+m); }


OUTPUT:


Area of Square: 9

Parameter Array

This type of parameter is defined using params keyword and this is used to handle variable number of arguments in the method. For Example:


Use of Parameter Array


using System;

class ArrayParameter

{

static void Myfun( params int[] a)

{

console.writeLine(“Elements of array are:”)

foreach( int i in a)

console.writeLine(i);

}

public static void Main()

{

int [] x = { 10, 20, 30};

Myfun(x);

Myfun();

Myfun(45,67) ;

}

}


OUTPUT:


Elements of array are:


10

20

30


Elements of array are:

Elements of array are:

45

67

In the above example the Myfunc() call is equivalent to


Myfunc (new int [] { });


And Myfun (45, 67) call creates an int type array with two elements 10 and 20 and passes

the newly created array as the actual argument to the method, it is equivalent to


Myfun (new int [] {45, 67});


No additional parameters are permitted after the params keyword in a method declaration, and only one params keyword is permitted in a method declaration. If two parameters are specified in the function the params should be in last.

We can also use object type as parameter arrays. For Example:


public static void Main() {

objArr ‘(10, 20, “xyz”);,

}

static void objarr ( params object [] x)

{

foreach(object i in x)

{

Console.write(i);

}

}

In the above example Objarr is passed for an array of object reference. The method call automatically builds an object array to holds the arguments, boxing value types as necessary.

Method Overloading

Multiple methods of same name with different arguments in a single program or class is called method overloading.


A typical program involves a great deal of names that represent variables and methods of various kinds. The compiler does not allow two variables to have the same name in the same function. Although two methods should have unique names in the same program, C# allows you to use the same name for different functions of the same program following certain rules. The ability to have various methods with the same name in the same ‘program is referred to as method overloading or function overloading. The most important rule about function overloading is to make sure that each one of these methods has a different number or different type (s) of arguments.

& Concept

We will illustrate method overloading through an example:


Method overloading


using System;

public class Newproject

{

// Rectangle

static double Area(double l, double w)

{

return 1 * w;

}

// circle, overload area method

Static double Area (double R)

{

Const double PI = 3.14159;

return R * R * PI;

}

static void Main()

{

double length, width;

double Radius;


console.writeLine(“Enter the sides of Rectangle”);

console.write(“Length: “);

Length = double.parse(console.ReadLine());

console.write(“width: “);

width = double.parse(console.ReadLine());


console.writeLine(“\n Area of Rectangle:”);

console.writeLine(Area(Length, width));


console.write(“\nEnter the radius: “);

Radius = double.parse(console.ReadLine());

Console.writeLine(“ Area of circle: “);

console.writeLine(Area(Radius));


console.writeLine();

}

}


OUTPUT:


Enter the sides of Rectangle

Length : 10.2

Width: 3.25

Area of Rectangle : 33.15

Enter the radius : 6.27

Area of, circle: 123.5050

Multiple Main() Functions in C#

By Dinesh Thakur

C# has a strong feature in which we can define more than one class with the Main method. Since Main is the entry point for the program execution, there are now more than one entry points. In fact, there should be only one entry point. Which will be resolved by specifying which Main is to be used to the compiler at the time of compilation as shown below:


csc filename.cs/main : class name


Where filename is the name of file where code is stored and classname is the name of class containing the Main which we would like to be the entry point. To understand the concept lets see an example.


Program with multiple Main Methods

using system;

class First {

public static void Main()

{

conso1e.writeLine(“This is First Class”); }

}

class second {

public static void Main() {

conso1e.writeLine(“This is second class”); }

}

c1ass Third {

public static void Main() {

conso1e.writeLine(“This 1S Third Class”); }

}

Compilation and Execution of Program

(suppose the name of file is multiple.cs)

c:\> csc/main : second mu1tiple.cs

c:\> multiple


This is second class


C:\>

C:\> csc/main : first multiple.cs

C:\>multiple

This is First class

Command Line Arguments

By Dinesh Thakur

Command line arguments are parameters supplied to the Main method at the time of invoking it for execution. To understand the concepts see the example given below:

Program of Command line argument to accept name from the command line and writes to the console. (Sample.cs)

using System;

class sample

{

public static void Main( string[ ] args)

{

console.write(“welcome to”);

console.write(” ” +args[0]);

console.write(” ” +args[l]);

}

}

Execution for this program

C:\ > Sample My Home

Output of Example

Welcome to My Home

In Previous examples, we have used the Main method with no parameters. Notice that in the above example how the Main is declared.

Main is declared with a parameters args. The parameter args is an array of strings. Any arguments provided in the command line at the time of execution, are passed to the array args as its elements. We can access the array elements by using a subscript like args[0],args[1] and so on.

Like as in the command line” C:\> Sample My Home”, args[O] and args[1] contains:

Args [0] <– My

args [1] <– Home

There fore the values will be display of these parameters in Console.Write() statement.

What is Namespace in C#

By Dinesh Thakur

When many people work in creating the same program, it could be difficult to keep track of the names of various classes. If more than one programmer creates a class with the same name in the same program, there would be conflict and the program would not work. The solution to avoid this situation is to delimit sections of code with names.

A names pace is a section of code that is identified by a specific name. The name could be anything such as somebody’s name, the name of the company’s department, or a city. To create a namespace, you start with the namespace keyword followed by the name of the section.

Like a class, the section that is part of a names pace starts with an opening curly bracket “{“and ends with a closing curly bracket “}”.Here is an example:

namespace Jason

{

}


Between the curly brackets, you can type anything that is part of the namespace. For example, you can create a class inside of a namespace. Here is an example:

namespace Jason

{

class Airport

{

}

}


Accessing members of Namespace


After creating the necessary items in a names pace, you can use the period operator (.) to access an item that is part of the namespace. To do this, in the desired location, type the name of the names pace, followed by a period, followed by the desired member of the namespace. Here is an example:

namespace Accounting

{

class Departure

{

}

}

class Mainclass

{

static void Main)

{

Accounting.Departure

}

}

Namespace Nesting

Imagine that you create a namespace called Accounting and many people from the Accounting department are asked to create their methods and objects only in the Accounting names pace and you may have asked the Accounting programmers not to create their methods and objects outside of the Accounting namespace. One thing you can do is to create other names paces inside of the existing namespace.

Creating a namespace inside of an existing namespace is referred to as nesting the namespace. The namespace inside of another namespace is nested.

To create a namespace inside of another, simply type it as you would create another namespace. Here is an example:

namespace Accounting

{

namespace Jason

{

}

}


In the example above, the Jason namespace is nested inside of the Accounting namespace.

After creating the needed namespaces, nested or not, you can create the necessary methods and objects inside of the desired namespace. To access anything that is included in a nested namespace, you use the period operator before calling a member of a namespace or before calling the next nested namespace. Here is an example:

namespace Accounting

{

class payroll

{

}

}

namespace Personnel

{

namespace EmployeesRecords

{

class Timesheet

{

}

}


namespace Benefits

{

class Medicallnsurance

{

}

}

}

class Mainclass

{

static void Main()

{

Accounting. payroll

personnel.Benefits.Medicallnsurance

personnel.EmployeesRecords.TimeSheet

}

}


A line of code such as Accounting.Payroll is called a statement. Every statement must be terminated with a semicolon. Therefore, this statement may be written as:

Accounting.Payroll;

The System Namespace

To make programming in C# a little easier, many classes have already been created and stored in various namespaces. Each namespace in C# is used to provide a specific set of classes. The most regularly used namespace in the C# language is called System. Inside of the System namespace is a class called Console. The Console class is used to display things on the console screen also called the DOS window.

The Console class contains assignments (called methods) to display information on the screen or to retrieve information from the user who types it in the DOS window. The method that is used to display text on the screen is called Write. To use the Write() method, inside of the parentheses, type the sentence between double-quotes. Here is an example:

class program

{

static void Main()

{

System.console.write(“The Wonderful world of c# programming”);

}

}


Besides the Write() method, the Console class also provides a method called WriteLine(). The difference is that, after displaying something on the screen, the Write() method keeps the caret (cursor) on the same line but WriteLine() transfers the caret the next line.

The using Keyword

We saw that, to call an object or a method that is part of a namespace, you must “qualify” that method or object using the period operator. Instead of using this approach, if you already know the name of a namespace that exists or has been created in another file, you can use a special keyword to indicate that you are using a names pace that is defined somewhere. This is done with the using keyword. To do this, on top of the file (preferably), type using followed by the name of the namespace.

With the using keyword, you can include as many external namespaces as necessary.

You can use ‘=’ operator with using key word to assign the alias name for the any namespace see an example


using X = System.console;


after this statement you can use alias ‘X’ in place of ‘System. Console’ like this:

x.writeLine (“Hello”)

x.writeLine (“HoWare you”);

or

X.ReadLi ne();

Types of Statements in C#

By Dinesh Thakur

Like C++ it contains three types of statements.

1. Simple Statements

2. Compound Statements

3. Control Statements

Simple Statements

A simple statement is any expression that terminates with a semicolon. For example

varl = var2 + var3;

var3 = varl++;

var3++;

Compound Statements:

Related statements can be grouped together in braces to form a compound statement or block. For example:

{

int i = 4;

Console.WriteLine (i);

i++;

}

Semantically, a block behave like a statement and can be used anywhere a single statement is allowed. There is no semicolon after the closing braces. Any variable declared in a block remain in scope up to the closing brace. Once the block is exited, the block variables cease to exist. Blocking improves readability of program code and can help make your program easier to control and debug.

Control Statements

Again control statements are divided into three statements

(a) Loop statements

(b) Jump statements

(c) Selection statements


(a) Loop Statements

C# provides a number of the common loop statements:

• while

• do-while

• for

• foreach

while loops

Syntax: while (expression) statement[s]

A ‘while’ loop executes a statement, or a block of statements wrapped in curly braces, repeatedly until the condition specified by the Boolean expression returns false. For instance, the following code.

int a =0;

While (a < 3) {

System.Console. WriteLine (a);

a++;

}

Produces the following output:

0

1

2

do-while loops

Syntax: do statement [s] while (expression)


A ‘do-while’ loop is just like a ‘while’ loop except that the condition is evaluated after the block of code specified in the ‘do’ clause has been run. So even where the condition is initially false, the block runs once. For instance, the following code outputs ‘4’:

Int a = 4;

do

{

System.Console. WriteLine (a);

a++;

} while (a < 3);


for loops

Syntax: for (statement1; expression; statement2) statement[s]3

The ‘for’ clause contains three part. Statementl is executed before the loop is entered.

The loop which is then executed corresponds to the following ‘while’ loop:

Statementl


while (expression) {statement[s]3; statement2}


‘for’ loops tend to be used when one needs to maintain an iterator value. Usually, as in the following example, the first statement initializes the iterator, the condition evaluates it against an end value, and the second statement changes the iterator value.

for (int a =0; a<5; a++)

{

system.console.writeLine(a);

}

foreach loops

syntax:foreach (variablel in variable2) statement[s]


The ‘foreach’ loop is used to iterate through the values contained by any object which implements the IEnumerable interface. When a ‘foreach’ loop runs, the given variablel is set in turn to each value exposed by the object named by variable2. As we have seen previously, such loops can be used to access array values. So, we could loop through the values of an array in the following way:

int[] a = new int[]{1,2,3};

foreach (int b in a)

system.console.writeLine(b);


The main drawback of ‘foreach’ loops is that each value extracted (held in the given example by the variable ‘b’) is read-only

(b) Jump Statements

The jump statements include

• break

• continue

• goto

• return

• throw

break

The following code gives an example – of how it could be used. The output of the loop is the numbers from. 0 to 4.


int a = 0;

while (true)

{

system.console.writeLine(a);

a++;

if (a == 5)

break;

}

Continue

The ‘continue’ statement can be placed in any loop structure. When it executes, it moves the program counter immediately to the next iteration of the loop. The following code example uses the ‘continue’ statement to count the number of values between 1 and 100 inclusive that are not multiples of seven. At the end of the loop the variable y holds the required value.

int y = 0;

for (int x=l; x<101; x++)

{

if ((x % 7) == 0)

continue;

y++;

}


Goto


The ‘goto’ statement is used to make a jump to a particular labeled part of the program code. It is also used in the ‘switch’ statement described below. We can use a’goto’ statement to construct a loop, as in the following example (but again, this usage is not recommended):

int a = 0;

start:

system.console.writeLine(a);

a++;

if (a < 5)

goto start;

(c) Selection Statements

C# offers two basic types of selection statement:

• if-else

• switch-default

if-else

‘if-else’ statements are used to run blocks of code conditionally upon a boolean expression evaluating to true. The ‘else’ clause, present in the following example, is optional.

if (a == 5)

system.console.writeLine(“A is 5”);

else

system.console.writeLine(“A is not 5”);


‘if’ statements can also be emulated by using the conditional operator. The conditional operator returns one of two values, depending upon the value of a boolean expression. To take a simple example,

int i = (myBoo1ean) ? 1 : 0;


The above code sets i to 1 if myBoolean is true, and sets i to 0 if myBoolean is false. The ‘if statement in the previous code example could therefore be written like this:

system.console.writeLine (a==5 ? “A is 5” “A is not 5”);


switch-default

‘switch’ statements provide a clean way of writing multiple if – else statements. In the following example, the variable whose value is in question is ‘a’. If ‘a’ equals 1, then the output is ‘a>0’; if a equals 2, then the output is ‘a> 1 and a>0’. Otherwise, it is reported that the variable is not set.

switch(a)

{

case 2:

Console.writeLine(“a>l and “);

goto case 1;

case 1:

console.writeLine(“a>0”);

break;

default:

console.writeLine(“a is not set”);

break;

}

Each case (where this is taken to include the ‘default’ case) will either have code specifying a conditional action, or no such code. Where a case does have such code, the code must (unless the case is the last one in the switch statement) end with one of the following statements:

break; .

goto case k; (where k is one of the cases specified)

goto default;

From the above it can be seen that C# ‘switch’ statements lack the default ‘fall through’ behavior found in C++ and Java. However, program control does fall through wherever a case fails to specify any action. The following example illustrates this point; the response “a>0”

is given when a is either 1 or 2.

switch(a)

{

case 1:

case 2:

Console.WriteLine(“a>0”);

break;

default:

Console.WriteLine(“a is not set”);

break;

}

A Simple C# Program

By Dinesh Thakur

Let’s begin in the traditional way, by looking at the code of a Hello World program.

1. using System;

2. public class HelloWorld

3. {

4. public static void Main()

5. {

6. II This is a single line comment

7. /* This is a

8. multiple

9. line comment */

10. Console.WriteLine(“Hello World! “);

11. }

12. }

• The first thing to note about C# is that it is case-sensitive. You will therefore get compiler errors if, for instance, you write ‘console’ rather than ‘Console’.

• The second thing to note is that every statement finishes with a semicolon (;) or else takes a code block within curly braces.

Explanation of Program

Line 1: using System;

We are using the System namespace. The point of this declaration is mostly to save ourselves time typing. Because the ‘Console’ object used in line 10 of the code actually belongs to the ‘System’ namespace, its fully qualified name is ‘System.Console’. However, because in line 1 we declare that the code is using the System namespace, we can then leave off the ‘System.’ part of its name within the code.

Line 2: public class HelloWorld

As C# is an object-oriented language, C# programs must be placed in classes. This line declares the class to be named ‘HelloWorld’.


Line 4: public static void Main()


When compiled and run, the program above will automatically run the ‘Main’ method declared and begun in this line. Note again C#’s case-sensitivity – the method is ‘Main’ rather than ‘main’.

Line 3, 11 and 5, 12:

These lines uses the ‘{‘for starting braces and ‘}’ for closing braces of block.


Lines 6-9: Comments

(‘//’ uses for single line and ‘/*…………. */’ uses for multiple line comments)

These lines of the program are ignored by the compiler, being comments entered by the programmer for his own benefit.


Line 6 shows a single line comment, in which everything on the line after the two forward slashes is ignored by the compiler.


Lines 7-9 demonstrate a multi-line comment, in which everything between the opening /*and closing */ is ignored, even when it spans multiple lines.


Line 10: Console.WriteLine (“Hello World”);

The statement on this line calls the ‘WriteLine’ method of the Console class in the System names pace. It should be obvious how this works in the given example – it just prints out the given string to the ‘Console’ (on PC machines this will be a DOS prompt).

Instruction for Saving the Program

In order to run the program, it must first be saved in a file. Unlike in Java, the name of the class and the name of the file in which it is saved do not need to match up, although it does make things easier if you use this convention. In addition, you are free to choose any extension for the file, but it is usual to use the extension ‘.cs’.

Writing program in Computer

There are two ways of program writing in computer

• Using Text Editor

• Using Visual Studio.NET

Using Text Editor:

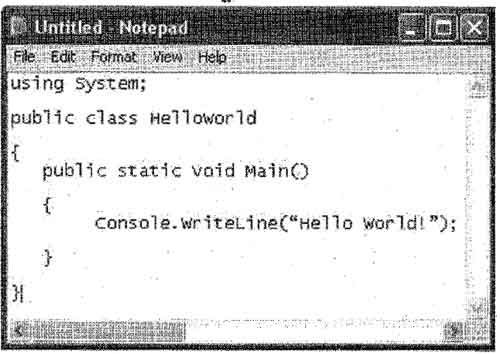
We are giving the steps for writing the program in text editor, notepad.


1. Start Notepad

2. In the empty file, type the following

                          Using Text Editor

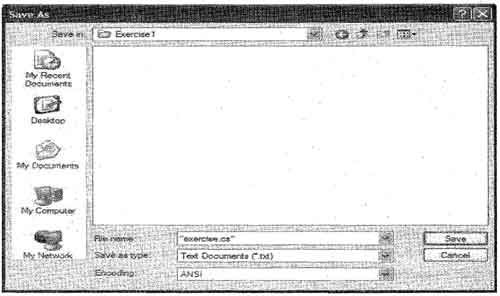
3. To save the file, on the main menu, click File -> Save

4. Select and display the C: (or the D 🙂 drive in the Save in combo/box

5. Click the Create New Folder button

6. Type Exercise! and press Enter twice or display the new folder in the Save In combo box

7. Save the file as exercise.cs using double quotes.

                          . Save the file as exercise.cs using double quotes

Using Visual Studio.NET

To create a console application using Visual Studio .NET follow the steps which are given below:


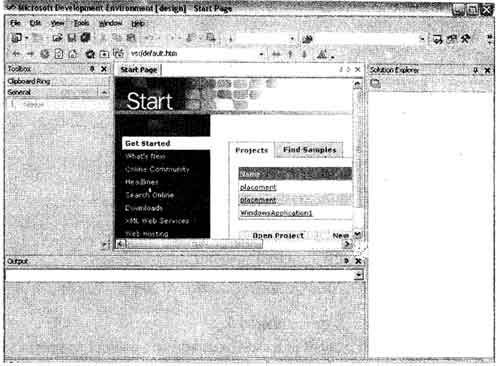
  1. Open Visual Studio .NET.

                          Open Visual Studio .NET

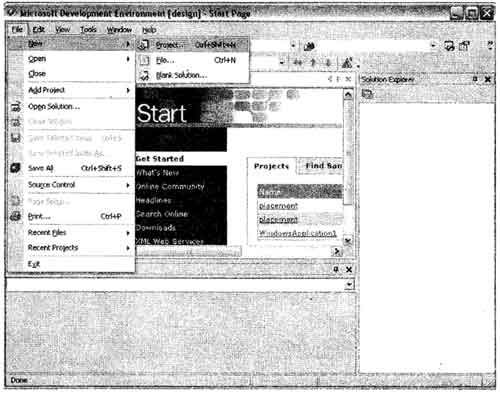
2. Create a new console application project by selecting the

File -> New -> Project ….. Menu item:

                     Menu item

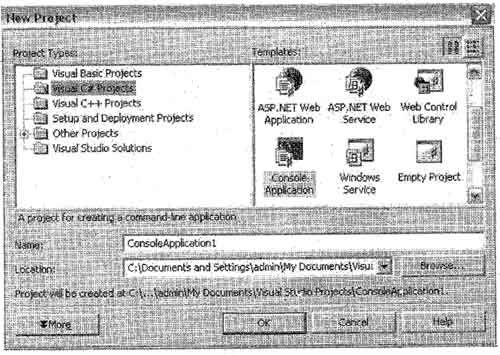
3. Select the Visual C# Projects folder from Project types: Pane of the window that appears, and Console Application project type in the Template: pane.

                            Select the Visual C# Projects folder from Project types

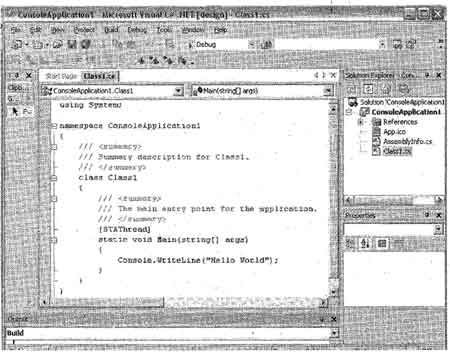
4. Click the OK button. Once the project is initialized, add the code of program to file displayed in the main window:

                             Code main window

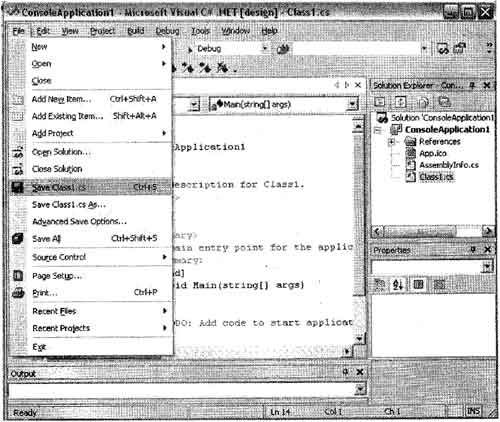
5. Save the application file by selecting the File I Save Class1.cs or press Ctrl +S.

                             Save the application file by selecting the File

Compilation and Execution


The compiler that ships with the C# version we will use, that is, the compiler of the .NET

Frameworks a program called csc. Like most other programs, it has the extension .exe. This csc name is not standard. This means that another C# compiler may have another name; csc.exe is just the name of the compiler we will use.

To use csc.exe, you should first find it in your computer. By default, it is installed in a

Folder like C:\ WINDOWS \ Microsoft.NET \ Framework. To use this compiler in all of your programs, you should include it in your system path.

After saving the file as ‘exercise.cs’.

To compile the program – open the Command Prompt and change to the folder in which

You created the C# file:

C:\ > cd Exercise l

C:\ Exercise l> csc exercise.cs

You Will see the following output on your screen in the dos box.

Microsoft (R) Visual C# Compiler Version 7.00.9254 [CLR version vl.0.29l4]

copyright (C) Microsoft Corp 2000-2001. All rights reserved.

Its means your program is successfully compiled. Other wise it will show the error, to remove go back to the program.

This command would generate the executable exercise.exe, which could be run in the usual way, by entering its name:

C:\Exercise1> exercise

Fairly obviously, this program would produce the output:

Hello World!

For Visual Studio Users:

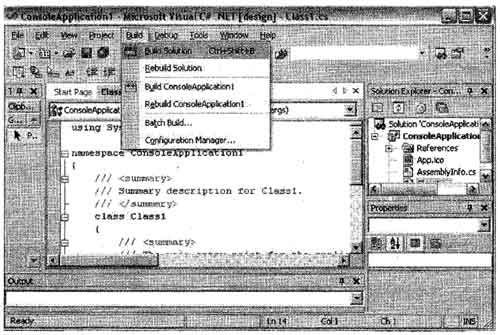
  1. Compile the application by selecting Build | Build Solution or press Ctrl + Shift + B.

                                Compile the application by selecting Build

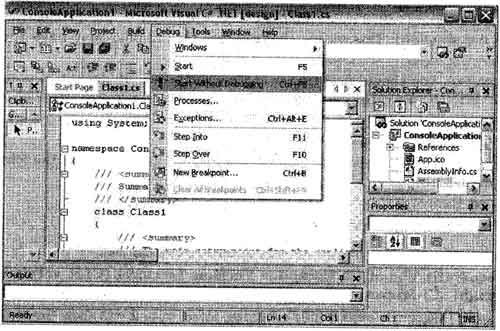
2.    To execute the application select Debug I Start without Debugging or press Ctrl + F5.

                                 To execute the application select Debug

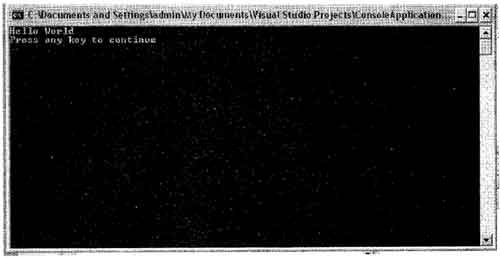
Here is execution of the application. :

                                 execution of the application.

Different Ways of C# Program

The following examples show different ways of writing the C# Hello World Program.

Normal Program

public class Helloworld

{

public static void Main()

{

System.console.writeLine(“Hello world!”);

}

}

Output of Example

Hello World!

To avoid fully qualifying classes throughout a program, we can use the ‘using’ directive

Using system;

Public class Helloworld

{

public static void Main()

{

console.writeLine(“Hello world!”);

}

}


Output of Example


Hello World!


To return a return code, change the prototype of Main function

using system;

public class Helloworld

{

Console.writeLine(“Hello world!”) ;

return 0;

}

}


Output of Example

Hello World!

All of the above three examples will generate the same output. In first example we have used ‘System’ namespace with in the program. In the second example we have used ‘System’ namespace as directive with ‘using’ keyword. And in the third example we have used ‘Main’ function with return value.

Explain C# Data Type

By Dinesh Thakur

C# is a type-safe language Variables· are declared as .being of a particular type; and each variable is constrained to hold only values of its declared type.

Variables can hold either value types or reference types, or they can be pointers. Here’s a quick recap of the difference between value types and reference types.

• Where a variable v contains a value type, it directly contains an object with some value. No other variable v’ can directly contain the object contained by v (although v’ might contain an object with the same value).

• Where a variable v contains a reference type, what it directly contains is something which refers to an object. Another variable v’ can contain a reference to the same object referred to by v.

Value Types

C# defines the following value types:

  • Primitives int i;
  • Enum enum state {off, on }
  • Struct struct Point{ int x, y; }

It is possible in C# to define your own value types by declaring enumerations or structs.

These user-defined types are mostly treated in exactly the same way as C#’s predefined value types, although compilers are optimized for the latter.

The following table lists, and gives information about, the predefined value types. Because in C# all· of the apparently fundamental value types are in fact built up from the (actually fundamental) object type; the list also indicates which System types in the .NET framework correspond to these pre-defined types.

                .NET framework correspond to these pre-defined types.


                .NET framework correspond to these pre-defined types.

In the following lines of code, two variables are declared and set with integer values.


Int X = 10

Int y = x

      y   = 20; // after this statement x holds value 10 and y holds value 20


Reference Types

The pre-defined reference types are object and string, where object – is the ultimate base class of all other types. New reference types can be defined using ‘class’, ‘interface’, and ‘delegate’ declarations. There fore the reference types are:

Predefined Reference Types .

• Object

• String

User Defined Reference Types

• Classes                      • Interfaces

• Delegates                  • Arrays

Reference types actually hold the value of a memory address occupied by the object they reference. Consider the following piece of code, in which two variables are given a reference to the same object (for the sake of the example, this object is taken to contain the numeric property ‘myValue’).


class Demo

{

class XYZ

{

public int myvalue;

}

public static void Maine)


{

Xyz X= new Xyz();

x.myvalue 10;

XYZ Z = x;

z.myvalue 20; II after this statement both

                             II x.myvalue and z.myvalue equal 20

}

}


This code illustrates how changing a property of an object using a particular reference to it is reflected in all other references to it. Note, however, that although strings are reference types, they work rather more like value types. When one string is set to the value of another, for example:


string S1 = “hello”;

string S2 = S1;


Then s2 does at this point reference the same string object as s1. However, when the value of s1 is changed, for instance with


sl = “goodbye”;


What happens is that a new string object is created for s1 to point to. Hence, following this piece of code, s1 equals “goodbye”, whereas s2 still equals “hello”.

The reason for this behavior is that string objects are ‘immutable’. That is, the properties of these objects can’t themselves change. So in order to change what a string variable references, a new string object must be created.

Pointers

This section gives a brief overview of pointers and their use in C#. It only scratches the surface of a complicated topic, however, so if you are new to pointers .it is recommended that you do further reading before using them in your code. Luckily, pointers are only-really needed in C# where execution speed is highly important.

A pointer is a variable that holds the memory address of another type. In C#, pointers can only be declared to hold the memory addresses of value types (except in the case of arrays – see below).

Pointers are declared implicitly, using the ‘reference’ symbol *, as in the following example:


Int *p;


This variation appears to work just as well as the previous one.

This declaration sets up a pointer ‘p’, which will point to the initial memory address of an integer (stored in four bytes).

The combined syntactical element *p (‘p’ prefixed by the referencer symbol ‘*’) is used to refer to the type located at the memory location held by p. Hence given its declaration, *p can appear in integer assignments like the following:

*p=5

This code gives the value 5 to the· integer that was initialized by the declaration. It is important, however, not to confuse such an assignment with one in which the derefencer symbol is absent, e.g.

P=5;

The effect of this assignment is to change the memory location held by p. It doesn’t change the value of the integer initialized by the original declaration; it just means that p no longer points to that integer. In fact, p will now point to the start of the four bytes present at memory location 5.

Another important symbol for using pointers is the operator &, which in this context returns the memory address of the variable it prefixes. To give an example of this symbol, the following code sets up p to point to integer is memory location:


int i = 5 ;

int ‘*P

p = &i;


Given the above, the code


*P=10


Changes the value of i to 10, since ‘*p’ can be read as ‘the integer located at the memory value held by p’.

There is another important piece of notation for pointers. Pointers can be declared for structs, as in ·the following example (which uses the ‘Coords’ struct defined further below):


coords x = new coords();

coords *y = &x;


One can then use the declared pointer y to access a public field of x (say z). This would be done using either the expression


(*y).z


Or .the equivalent expression, which uses the -> string:


y -> z


Note that. Some programmers place the referencer symbol immediately after the type name, for example:


Boxing

Boxing is an implicit conversion of a value type to the type object or to any interface type implemented by this value type. Boxing a value of a value allocated an object instance and copies the values into the new object.

Consider the following declaration of a value-type variable:


Int i = 123;


The following statement implicitly applies the boxing operation on the variables:


Object o = i;


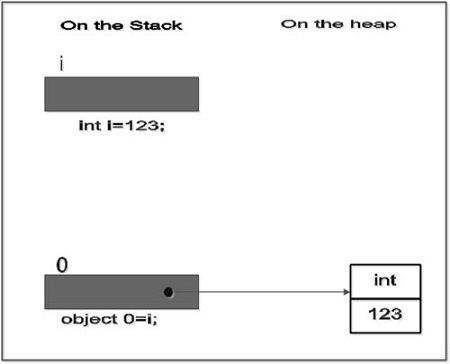
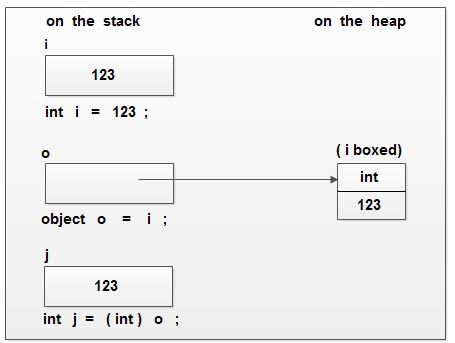
The result of this statement is creating an object, on the stack, that references a value of the type int, on the heap. This value is a copy of the value-type value assigned to the variable i. The difference between the two variables, i and 0 is illustrated in the following figure.

                              Boxing is an implicit conversion of a value type to the type object or to any interface type implemented by this value type.

It also possible, but never needed to perform the boxing explicitly as in the following example


Int i = 123;

Object O = (object) i;


Unboxing

Unboxing is an explicit conversion from the object to value type or from an interface type to a value type that implements the interface. An unboxing operation consists of:

• Checking the object instance to make sure it is a boxed value of the given value type.

• Copying the value from the instance into the value-type variable.

The following statements demonstrate both boxing and unboxing operations:


Int i = 123;       // a value type

object O = i;   //boxing

int j = (int) O;   II unboxing


The following figure demonstrates the result of the preceding statements.

                            Unboxing is an explicit conversion from the object to value type or from an interface type to a value type that implements the interface.

For the unboxing of value types to succeed at runtime, the item being unboxed must be a reference to an object that was previously created by boxing an instance of that value type. Attempting to unbox null or a reference to an incompatible value type will return an invaIidcastException.

OPERATORS

C# has a number of standard operators, taken from C, C++ and Java. Most of these should be quite familiar to programmers; the less common ones are covered elsewhere.

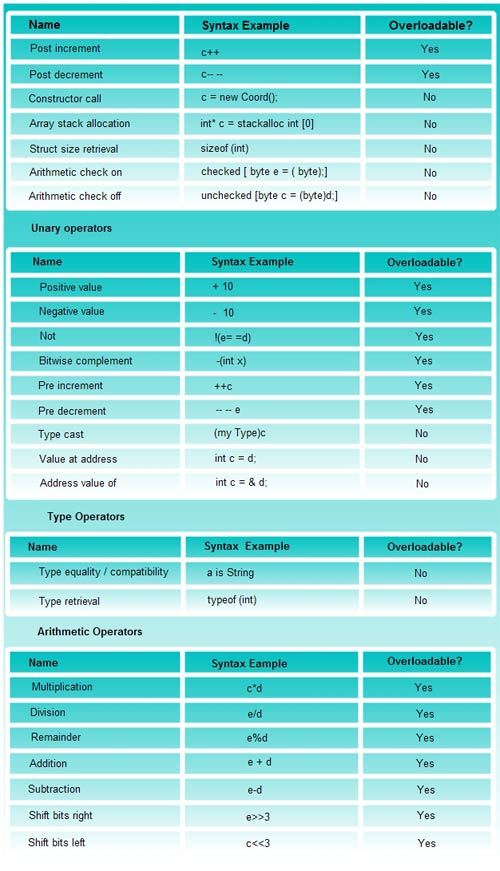
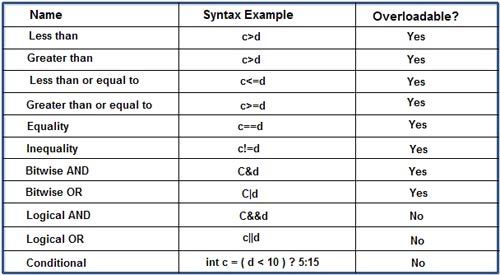
The diagram below lists the standard operators. Note that when writing classes it is possible to change the default behavior of some of these operators (i.e. to ‘overload’ the operator), although this should only be done where the resultant semantics makes sense. The table indicates which of the operators are overloadable.

Primary Operators


C# KEYWORDS

By Dinesh Thakur

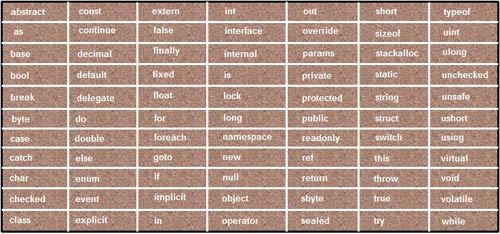
C# uses a series of words, called keywords, for its internal use. This means that you must avoid naming your objects using one of these keywords.

C# uses a series of words, called keywords, for its internal use.

Identifiers And Variables

By Dinesh Thakur

Identifiers refer to the names of variables, functions arrays, classes, etc. created by programmer. They are fundamental requirement of any language. Each language has its own rules for naming these identifiers.

To name the variables of your program, you must follow strict rules. In fact, everything else in your program must have a name.

There are some rules you must follow when naming your objects. On this site, here are the rules we will follow:

• The name must start with a letter or an underscore or the at symbol @.

• After the first letter or underscore, the name can have letters, digits, and/or underscores.

• The name must not have any special characters other than the underscore.

• The name cannot have a space.

• It should not a keyword.

C# is case-sensitive. This means that the names Case, case, and CASE are completely different. For example, the main function is always written Main.

FEATURES OF C#

By Dinesh Thakur

Simplicity

All the Syntax of java is like C++. There is no preprocessor and much larger library. C# code does not require header files. All code is written inline.

Consistent Behavior

C# introduced a unified type system which eliminates the problem of varying ranges of integer types. All types are treated as objects and developers can extend the type system simply and easily.

Modern Programming Language

C# supports number of modem features, such as:

• Automatic Garbage Collection

• Error handling features

• Modern debugging features

• Robust Security features

Pure Object-Oriented Programming Language

In C#, every thing is an object. There are no more global functions, variable and constants.

It supports all three object oriented features:

• Encapsulation

• Inheritance

• Polymorphism

Type Safety

Type safety promotes robust programming. Some examples of type safety are:

• All objects and arrays are initialized by zero dynamically

• An error message will be produced, on use of any uninitialized variable

• Automatic checking of array (out of bound and etc.)

Feature of Versioning

Making new versions of software module work with the existing applications is known as versioning. Its achieve by the keywords new and override.

Compatible with other Language

C# enforces the .NET common language specifications (CLS) and therefore allows interoperation with other .NET language.

Inter-operability

Language interoperability is the ability of code to interact with code that is written using a different programming language. Language interoperability can help maximize code reuse and, therefore, improve the efficiency of the development process.

C# provides support for using COM objects, no matter what language was used to author them. C# also supports a special feature that enables a program to call out any native API.

How to Comparing C# to C++ and Java

By Dinesh Thakur

Microsoft Corporation developed a new computer programming language C# pronounced as ‘C- Sharp’. C# is a simple, modem, object oriented, and type safe programming language derived from C and C++. C# is a purely object-oriented language like as Java. It has been designed to support the key features of .NET framework. Like Java, C# is a descendant language of C++ which is descendant of C language.

C# modernizes C++ by enhancing some of its features and adding a few new features. C# borrows Java’s features such as grouping of classes, interface and implementation together in one file so the programmers can easily edit the codes. C# also handles objects using reference, the same way as Java.

C# uses VB’s approach to form designing, namely, dragging controls from a tool box, dropping them onto forms, and writing events handlers for them.

Comparing C# to C++ and Java

C# versus Java

C# and Java are both new-generation languages descended from a line including C and C++. Each includes advanced features, like garbage collection, which remove some of the low level maintenance tasks from the programmer. In a lot of areas they are syntactically similar.

Both C# and Java compile initially to an intermediate language: C# to Microsoft Intermediate Language (MSIL), and Java to Java bytecode. In each case the intermediate language can be run – by interpretation or just-in-time compilation on an appropriate ‘virtual machine’. In C#, however, more support is given for the further compilation of the intermediate language code into native code.

C# contains more primitive data types than Java, and also allows more extension to the value types. For example, C# supports ‘enumerations’, type-safe value types which are limited to a defined set of constant variables, and ‘structs’, which are user-defined value types.

Unlike Java, C# has the useful feature that we can overload various operators.

Like Java, C# gives up on multiple class inheritance in favour of a single inheritance model extended by the multiple inheritances of interfaces. However, polymorphism is handled in a more complicated fashion; with derived class methods either ‘overriding’ or ‘hiding’ super class methods

C# also uses ‘delegates’-type-safe method pointers. These are used to implement event handling.

In Java, multi-dimensional arrays are implemented solely with single-dimensional arrays (Where arrays can be members of other arrays). In addition to jagged arrays, however, C# also implements genuine rectangular arrays.

C# versus C++

Although it has some elements derived from Visual Basic and Java, C++ is C#’s closest relative.

In an important change from C++, C# code does not require header files. All code is written inline.

As touched on above, the .NET runtime in which C# runs performs memory management, taking care of tasks like garbage collection. Because of this, the use of pointers in C# is much less important than in C++. Pointers can be used in C#, where the code is marked as ‘unsafe’, but they are only really useful in situations where performance gains are at an absolute premium.

Speaking generally, the ‘plumbing’ of C# types is different from that of C++ types, with all C# types being ultimately derived from the ‘object’ type. There are also specific differences in the way that certain common types can be used. For instance, C# arrays are bounds checked unlike in C++, and it is therefore not possible to write past the end of a C# array.

C# statements are quite similar to C++ statements. To note just one example of a difference: the ‘switch’ statement has been changed so that ‘fall-through’ behavior is disallowed.

As mentioned above, C# gives up on the idea of multiple class inheritance. Other differences relating to the use of classes are: there is support for class ‘properties’ of the kind found in Visual Basic, and class methods are called using the Operator rather than the :: operator.

Primary Sidebar

C# Tutorials

C# Tutorials

  • C# - .NET Languages Types
  • C# - Dot Net
  • C# - Dot Net Framework
  • C# - Inheritance Types
  • C# - Features
  • C# - CTS
  • C# - CLS
  • C# - CLR
  • C# - Console
  • C# - MSIL
  • C# - Base Class Library
  • C# - Web Forms Creation
  • C# - C# Vs C++
  • C# - Statements Types
  • C# - JIT
  • C# - CLI
  • C# - Controls Types
  • C# - String Types
  • C# - Execution Model

Other Links

  • C# - PDF Version

Footer

Basic Course

  • Computer Fundamental
  • Computer Networking
  • Operating System
  • Database System
  • Computer Graphics
  • Management System
  • Software Engineering
  • Digital Electronics
  • Electronic Commerce
  • Compiler Design
  • Troubleshooting

Programming

  • Java Programming
  • Structured Query (SQL)
  • C Programming
  • C++ Programming
  • Visual Basic
  • Data Structures
  • Struts 2
  • Java Servlet
  • C# Programming
  • Basic Terms
  • Interviews

World Wide Web

  • Internet
  • Java Script
  • HTML Language
  • Cascading Style Sheet
  • Java Server Pages
  • Wordpress
  • PHP
  • Python Tutorial
  • AngularJS
  • Troubleshooting

 About Us |  Contact Us |  FAQ

Dinesh Thakur is a Technology Columinist and founder of Computer Notes.

Copyright © 2025. All Rights Reserved.

APPLY FOR ONLINE JOB IN BIGGEST CRYPTO COMPANIES
APPLY NOW