Life cycle of a program includes the phases starting from creating objects for the class, execution, and at last destruction of objects. For this life cycle, JSP needs some life cycle methods.
The method that is called by container automatically and directly when event is raised is called life cycle method. The methods which are called internally from this life cycle methods are called life cycle convince helper methods.
Life cycle of JSP is similar to Servlet life cycle.
In the execution phase of JSP page, first JSP page is translated into an equivalent Servlet, then the source file of the Servlet is compiled into a .class file. Every time a JSP page is requested, its corresponding Servlet will be executed. So life cycle of JSP is similar to Servlet life cycle.
JSP Life-Cycle Methods
The methods called by the container automatically when event is raised are called life-cycle methods.
As you know, JSP page is first converted into an equivalent Servlet program, so life cycle method of JSP is same as Servlet life-cycle method. But Sun Microsystems has given three life-cycle convince methods as alternatives to original life-cycle methods.
Like:
for init(-) _jspInit()
service(-,-)….._jspService(-,-)
destroy () ……._jspDestroy ()
init(-) method internally calls the convince method _jsplnit() from super class of JSP equivalent servlet class.
service(-,-) internally calls the convince method _jspService(-,-) from super class of JSP equivalent servlet class.
destroy() internally calls the convince method _jspDestroy() from super class of JSP equivalent servlet class.
The super class for JSP equivalent Servlet is server dependent. In Tomcat server, the super class is org.apache.jasper.runtime.Http]spBase. Every JSP equivalent Servlet is HttpServlet by default.
Main Stages of The Life-Cycle Of A JSP Page
• JSP Page compilation
• Source Code Compilation
• Life Cycle ConvinceMethodExecution
JSP Page Compilation
Page compilation: The process of converting JSP code into an equivalent Servlet program code is called JSP page compilation.
In this phase, web container translates the JSP page into an equivalent Servlet code. The main objective of page translation is to convert the tag based code into more Java code for smooth execution by the JVM. The translation of JSP is automatically done by the server at the time of deploying web application or JSP receives the request for the first time.
In this phase, web container performs the activity like locating requested JSP page, validating the syntactic correctness of the JSP pages, and generating source code of equivalent Servlet code for JSP page.
i. Source code compilation:
In this stage, JSP container compiles the Java source code i.e. the equivalent servlet code and converts into Java byte (.class) code. Generally, most servers like web logic, discard the generated source code after compilation phase.
ii. Life cycle convinces methods execution:
Initialization: After the compilation phase, web container loads the class file. To create instance of Servlet class, ISP container uses the no-argument constructor. After that the container initializes the objects by invoking the init(ServletConfig) method. This method is called jsplnit() method.
Request processing: In this stage, web container uses the successfully initialized ISP equivalent Servlet objects to process client request. As per Servlet life cycle web container invokes service(-,-) method on the Servlet object by passing the request object of HttpServletRequest and response object of HttpServletResponse. In case of JSP equivalent Servlet. the container invokes the _jspService() method.
Destroying: If Servlet container wants to destroy the instances then it performs the following activities-First it allows time to currently executing threads to complete their operations and simultaneously it makes Servlet instance unavailable for other requests. After the current threads complete their operations on service( -,-) method, then the container calls the destroy() method on a Servlet instance, which invokes the jspDestroy() method.
Creating a Simple JSP Page
Here we are creating a simple web application which will show current system date and addition of numbers. Till know we have not discussed the various tags like scriptlets, directives. So this will give you an idea about how ISP program is designed, used, deployed in server, and accessed through browser windows.
Procedure to Develop and Deploy JSP-based Web Application
Settings needed: A web server or application server (here we have taken Tomcat
server)
Jar file to be set in the CLASSPATH: Servlet-api.jar or jsp-api.jar file have to be set to the CLASSPATH.
To set jar file to CLASSPATH: Copy the path of the jar file from the address bar of folder where Tomcat is installed as shown:
F:\ Tomcat 6.0\lib \servlet-apLjar
then
Right click on my computer
Click properties
Click advanced tab
Click environment variables
Click ‘new’ button of system variables and set
variable name: CLASSPATH
variable value: F:\ Tomcat 6.0\lib \servlet-api.jar; (paste and insert ‘;’ at the end) click OK for installation Tomcat server.
Development of Web Application
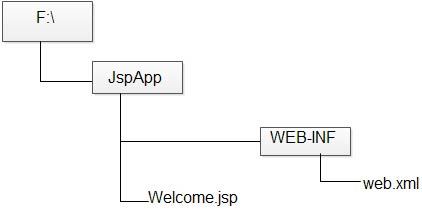
Step 1 Create a deployment directory structure like this

Here WEB-INF, web.xml is case sensitive and .jsp file should be placed parallel to WEB-INF folder
Step 2 Welcome.jsp
<html>
<hl> <center> Welcome to JSP </center> </hl>
<b> <center> <font size=5>Systems date and time is :- </font> </center> </b>
<% java.util.Date d=new java.util.Date (); %>
<body> <font color=“red” size=6/> <center>
<%
out.println (d.toString ());
%>
</center>
</html>
Save this file as Welcome.jsp, the extension is .jsp
Step 3 Configuration of web.xml in JSP program is optional
You can make web.xml as
web.xml
<web-app/>
Deploy the web application
Step 4 Start the Tomcat server
Click F:\Tomcat 6.0\bin\tomcat6.exe file (or) Open command prompt and specify the path of bin folder of Tomcat and type as given below:
F:\Tomcat 6.0\bin>java -jar bootstrap.jar and press enter
Step5 Copy the JspApp folder and paste in F:\ Tomcat 6.0\ webapps folder
Step6 Testing of web application
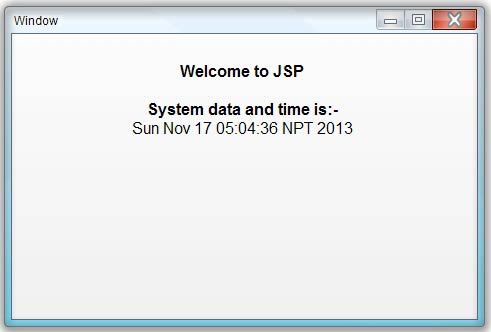
Open browser window and write in the address bar of browser as follows:
https://ecomputernotes.com:8080/JspApp/Welcome.jsp
localhost: Because system is not in network, if system is in network then type IP address of the system in place of local host.
8080: It is the port number of Tomcat. You can give any 4-digit number at the time of Tomcat installation.
JspApp: is the JSP application folder name.

After giving request to browser window, the JSP equivalent Servlet code (JES) and .class file will create in F:\Tomcat 6.0\work\catalina\localhost\jspApp\org\apache\jsp
And the JES code will like this…
package org.apache.jsp;
import javax.servlet.*;
import javax.servlet.http.*;
import javax.servlet.jsp.*;
public final class Welcome_jspextends org.apache.jasper.runtime.HttpJsp
Base implements org.apache.jasper.runtime.JspSourceDependent
{
private static final JspFactory_jspxFactory =
JspFactory.getDefaultFactory();
private static java.util.List_jspx_dependants;
private javax.el.ExpressionFactory_el_expressionfactory;
private org.apache.AnnotationProcessor_jsp_annotationprocessor;
public object getDependants ()
{
return_jspx_dependants;
}
public void_jsplnit ()
{
_el_expressionfactory = _jspxFactory.getJspApplicationContext
(getServletConfig ().getServletContext ()).getExpressionFactory ();
_jsp_annotationprocessor = (org.apache.Annotationprocessor)
getServletConfig ().getServletContext ().getAttribute
(org.apache.Annotationprocessor.class.getName ());
}
public void_jspDestroy ()
{
}
public void_jspService (HttpServletRequest request, HttpServlet
Response response) throws java.io.IOExcption, Servletexception
{
PageContext pageContext = null;
HttpSession session = null;
ServletContext application = null;
ServletConfig config = null”;
JspWriter out= null;
Object page= this;
JspWriter_jspx_out = null;
PageContext_jspx_page_context = null;
try
{
response.setContentType (“text/html”);
pageContext = _jspxFactory.getPageContext (this, request,
response, null, true, 8192, true);
_jspx-page_context = pageContext;
application = pageContext.getServletContext ();
config = pageContext.getServletConfig ();
session = pageContext.getSession ();
out = pageContext.getOut ();
_jspx_out = out;
out.write (“<html>\r\n”);
out.write (“<hl> <center> Welcome to JSP </center> </hl>\r\n”);
out.write (“<b> <center> font size=5>Systems date and time is:-
</font> </center> </b>\r\n”);
java.util.Date d=new java.util.Date();
out.write (“\r\n”) ;
out.write (“<body> <font color=\“red\” size=6/> <center>\r\n”);
out.println (d.toString ());
out.write (“\r\n”);
out.write(“</center>\r\n”) ;
out.write(“</html>\r\n”) ;
}
catch (Throwable t)
{
if (! (t instanceof SkipPageException))
{
out = _jspx_out;
if (out != null && out.getBufferSize () !=0)
try
{
out.clearBuffer ();
}
catch (java.io.IOException e)
{
}
if (_jspx-page_context != null)_jspx_page_context.handlePage
Exception (t);
}
}
finally
{
_jspxFactory.releasePageContext (_jspx_page_context) ;
}
}
}
Here the point to consider is that the JES file name is Welcome_jsp.java and class name is Welcome_jsp.class and all implicit object is visible in _jspService (-,-) method. You can see the implicit objects are visible inside _jspService (-,-) method.
 Dinesh Thakur holds an B.C.A, MCDBA, MCSD certifications. Dinesh authors the hugely popular