• Skip to main content
  • Skip to primary sidebar
  • Skip to secondary sidebar
  • Skip to footer

Computer Notes

Library
    • Computer Fundamental
    • Computer Memory
    • DBMS Tutorial
    • Operating System
    • Computer Networking
    • C Programming
    • C++ Programming
    • Java Programming
    • C# Programming
    • SQL Tutorial
    • Management Tutorial
    • Computer Graphics
    • Compiler Design
    • Style Sheet
    • JavaScript Tutorial
    • Html Tutorial
    • Wordpress Tutorial
    • Python Tutorial
    • PHP Tutorial
    • JSP Tutorial
    • AngularJS Tutorial
    • Data Structures
    • E Commerce Tutorial
    • Visual Basic
    • Structs2 Tutorial
    • Digital Electronics
    • Internet Terms
    • Servlet Tutorial
    • Software Engineering
    • Interviews Questions
    • Basic Terms
    • Troubleshooting
Menu

Header Right

Home » Troubleshooting » Troubleshooting

Troubleshooting

How to Troubleshoot ALL-IN-ONE PCS

By Dinesh Thakur

IT’S A BIT MORE DIFFICULT TO TROUBLEshoot an all-in-one PC than a desktop PC, because all of the internal components are tightly fit in the same case that contains the monitor. Thus, some hardware could be difficult to access and other hardware may not be reachable.

PC Doesn’t Display Anything

Examine the display for signs of power, such as a light or LED near the power button. Remove the peripherals, such as USB flash drives or memory cards, and restart; this will eliminate the possibility of a conflict caused by an external device. If the screen still doesn’t display anything, turn off the PC and disconnect the power cord.
Wait for 10 seconds to ensure that everything inside the computer is reset and turn the computer on. An all-in one that still won’t boot up may need to be taken to a repair shop.

PC Unexpectedly Shuts Down

When computers work hard the internal components produce more heat. The snug design of an all-in-one PC may make it difficult to vent the heat, especially when the PC is under heavy load, such as when playing a game or editing video. To fix the issue, you may need to turn off some programs that are running in the background and which may be contributing to the overheating problem.

Wireless Internet Won’t Connect

Verify that the PC’s Wi-Fi is turned on. (You may need to physically flip a switch on the PC to enable it.) Try using a different Wi-Fi-enabled device to see if the Internet connection is down or if there’s something wrong with the router. A working connection on another device would suggest that there’s something wrong with the network adapter in your PC. Run the Network Diagnostic tool. Click Start, select Control Panel, choose Network And Internet, and select Network And Sharing Center. Under View Your Active Networks, select the link next to Connections and click the Diagnose button.

Prevention

All-in-one PCs are like laptops: the hardware fits tightly in the case, which makes the entire system vulnerable to heat. To prevent heat-related damage, keep the all-in one computer is a well-ventilated area, and check the vents to ensure that they aren’t clogged with dust.
How to Troubleshoot SOFTWARE & OS UPDATES

By Dinesh Thakur

THE PROCESS OF UPDATING YOUR PC and applications is a relatively straightforward one, but that doesn’t mean that updates are always successful. In this article, we’ll help you troubleshoot some common update and patch issues.

Windows 7 Issues

When updating Windows, you may see an error message that indicates that Windows could not install an update. There are several possible reasons for this. If you haven’t updated in a while, there could be a series of previous updates that need to be installed and one update that was installed out-of-order from the rest. Try manually installing the problem update. Click Start, select All Programs, and click Windows Update. Select Check For Updates, and once the process finishes, click Install Updates and look for the one that was unable to install.
Another common issue arises when Windows won’t install because you have too little free space. Try using the Disk Cleanup tool to regain some space. Click Start, type disk cleanup and press ENTER. Next, choose the drive where your operating system is installed, click OK, and follow the on-screen instructions.

Failed Application Patches

One of the most common causes of a failed application update is a dropped or lost Internet connection. Unlike Windows updates (during which the operating system will remember where a download stopped), a dropped connection may prevent the application download from finishing. Check that your firewall is set to allow downloads, because it’s possible that the firewall is preventing the download.

Be sure that the download matches the version of the program you own. For example, an update for the 2007 edition of Microsoft Office won’t be a viable addition for those who own Microsoft Office 2010, and vice versa. If you continue to experience the error, report it to the software vendor and see if the company can help you.

Prevention

Large downloads can take time and increase the risk of a dropped connection during download. Regular checks for updates will help to decrease both the size of the files and the time they take to download, because you’ll be installing them more frequently.

How To Troubleshoot Computer

By Dinesh Thakur

In an ideal world, a new PC or laptop would operate without hiccups or errors when you unbox and set it up for the first time. But, we all know computers aren’t perfect. The good news is that there are plenty of troubleshooting actions you can perform to get your computer to do what it’s supposed to do. In this article, we walk you through some of the common issues that might arise when you’re getting to know your computer.

My Computer Won’t Turn On

1) Start by making sure that you pressed the Power button on the tower and the monitor. The Power button typically has an icon that resembles a circle with a vertical line at the top.
2) If you have a desktop, unplug the power cable from your PC (and the wall outlet) and then plug it back in. A loose cable is usually to blame for a PC that won’t start. If the power cable isn’t the problem, look for a switch near the cable at the back of the PC. Some computer power supplies have a switch that can be flipped to cut off power. The On symbol is a vertical or horizontal line and the Off symbol is a circle. Flip the switch and then press the Power button again.
3) If you have a laptop, start by removing and reinserting the battery. If the battery isn’t firmly locked into place, it may not provide any power to the laptop. If this doesn’t solve the problem, connect the laptop to the wall outlet and let the battery fully charge.

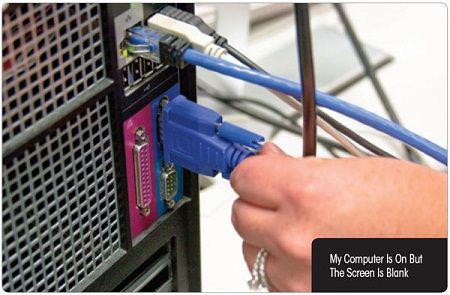
My Computer Is On But The Screen Is Blank

If your monitor appears blank but your PC is active, be sure to double-check the monitor-to-computer video connection.

    My Computer Is On But The Screen Is Blank

1) Unplug the monitor’s power cable from the monitor (and the wall outlet) and then plug the cable back in. Also, make sure the video cable is firmly connected to your computer and the monitor. Reconnect any unplugged or loose cables.
2) Is there a small colored light illuminated in the corner of your monitor? If not, push the Power button to turn it on.
3) Open the monitor’s Brightness Settings. To do so, find the button on the front of the monitor that has an icon that resembles a light bulb or sun. Push it to adjust the brightness level to your desired setting. You may have to consult your monitor’s manual for help if there is no dedicated brightness button.
4) Your PC might be in Sleep or Hibernation mode. To “wake” it and view your desktop, try pressing the ENTER key, moving your mouse, and pressing the Power button.

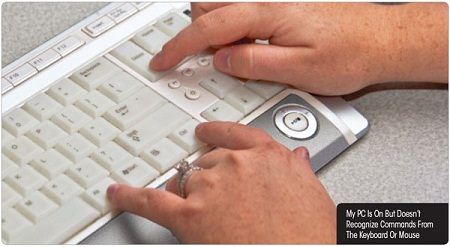
My PC Is On But Doesn’t Recognize Commands From The Keyboard Or Mouse

Press CTRL-ALT-DELETE to access the Shut down button if your PC doesn’t respond to mouse clicks or use your mouse to shut down and restart the system if the keyboard is causing the issue.

  My PC Is On But Doesn’t Recognize Commands From The Keyboard Or Mouse
1) If your programs and applications don’t respond to the keyboard commands, use your mouse to shut down the computer. Unplug the keyboard from your PC and then reconnect it. Restart your PC to determine if the reconnection corrected the problem. (If necessary, you can press and hold the Power button to shut down the PC.)
2) If your mouse doesn’t respond, but your keyboard does, use the WINDOWS, ARROW, and ENTER keys to open the Start menu and shut down the computer. Unplug your mouse and then reconnect it. (If necessary, you can press and hold the Power button to shut down the PC.)
3) If you’re using a wireless keyboard and mouse, ensure that the peripherals are synced and in range of the wireless receiver. Install new batteries.
4) If these steps don’t enable peripheral communication with the PC, try reinstalling your device drivers. You can often download these from the manufacturer’s Web site.

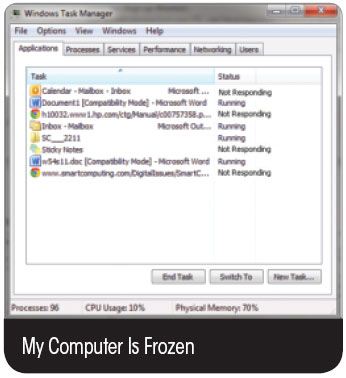
My Computer Is Frozen

The Windows Task Manager helps you find programs that are not running properly.

   My Computer Is Frozen

1) Press and hold the Power button until it shuts down. Wait approximately 10 seconds before you restart the system.
2) If your PC is working, but a program is frozen, press CTRLALT- DELETE and click the Start Task Manager. Select the program that is frozen and then click End Task. (The Task Manager’s Status column will probably say “Not Responding” next to that program.)

My Laptop Won’t Connect To The Internet Via Wi-Fi

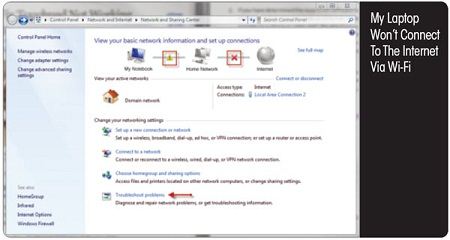
If you notice a red X or yellow triangle in the Network And Sharing Center, click Troubleshoot Problems to determine the cause of the disconnection.

   My Laptop Won’t Connect To The Internet Via Wi-Fi

1) Locate the network icon in the bottom-right corner of the Taskbar. Right-click it and select Open Network And Sharing Center. If you see an exclamation point in a yellow triangle or a red X between your network and Internet icons, click Troubleshoot Problems. Next, click Internet Connections to run a diagnostic and follow any subsequent instructions.
2) If you have determined that the issue is not software-related, check your wireless networking hardware, which should include a broadband modem (connected by your Internet service provider to a phone or cable jack), the attached wireless router, and a power source. Ensure that all cables are properly connected and that both the modem and the router are operating normally. Consult the device manufacturer manuals for more information. If necessary, press any Reset buttons you see or unplug the power cables from both devices, wait 10 seconds, and retry.
3) If you’re trying to connect via a hotspot, you may need to enter a password. Many wireless networks are encrypted.

My Computer Doesn’t Play Any Sounds

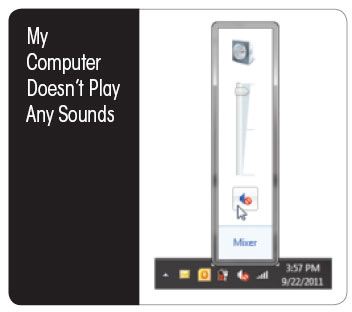
Speakers that don’t produce sound may only need to be unmuted. To turn on the sound, click the speaker icon in the Volume slider.

   My Computer Doesn’t Play Any Sounds

1) Locate the speaker power or volume knob on your PC or laptop. Ensure that the speakers are on and the volume is turned up and audible.
2) Click the speaker icon in the Notifications Area of the Taskbar. Click and drag the Volume slider up if it’s positioned at a low level. Also, make sure that there is no mute symbol next to the speaker under the volume slider. Click the bottom speaker icon to turn off Mute.

The Touchpad On My Laptop Doesn’t Work

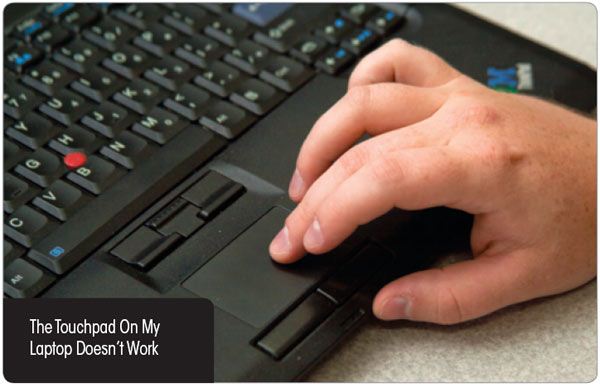
When the touchpad on your laptop is unresponsive, try pressing the appropriate function key and the touchpad activation key.

   The Touchpad On My Laptop Doesn’t Work
1) You can often reactivate a disabled touchpad by simply locat-ing and pressing a couple of keys. To do so, find the FN (function) key on your laptop’s keyboard. Next, locate the corresponding F key (between F1 through F12). Press FN and then press the F key. A device settings dialogue should appear and give you the option to enable your touchpad. If this doesn’t work, press both buttons simultaneously and test the touchpad again. If these steps fail to activate your touchpad, consult your laptop’s manual.

How To Troubleshoot Wi-fi Connection

By Dinesh Thakur

Internet connectIvIty has become synonymous with “smart” when it comes to consumer electronics and appliances. But if your Wi-Fi connection goes down, you might have a hard time adjusting to a Blu-ray player that just plays Blu-ray Discs, a phone that only makes phone calls, and a tablet that just plays games. Follow these Wi- Fi connection troubleshooting tips to “smarten up” your favorite gadgets.

Device Fails To Detect A Wi-Fi Network

The first thing you should do is find another Wi-Fi-capable device and attempt to connect to the Wi-Fi network. If the second device also cannot locate the SSID (Service Set Identifier), or Wi-Fi network name, then turn your attention to the wireless router. Most routers have LEDs that indicate connection status, so consult your manual and determine if the router appears to be operating normally. The manual also provides instructions for accessing the configuration menu, so check this to make sure you actually have a wireless network up and running. Reset your security password if necessary. Make sure that your router is configured to broadcast the SSID, at least while you’re troubleshooting. (You may wish to stop broadcasting once the problem is resolved.) Also, check the wired devices plugged into your router to determine if the router itself is malfunctioning. Finally, restart your PC and any device that has failed to connect to the wireless network. If the connectivity issue is isolated to a single device, disabling and re-enabling Wi-Fi may solve the problem.

The Wi-Fi Network Is Working, But There’s No Internet

You may need to reset your Internet connection. Unplug the wireless router and modem. Next, plug in the modem and wait ten to twenty seconds for the lights to come on and then plug in the router. If your modem has a battery backup, you may need to press a recessed button to reset it. Check all Ethernet cables for loose connections and then try to find your Wireless network with your Wi-Fi-based devices.

Prevention

A Wi-Fi network requires little maintenance. If you regularly maintain your PC, modem, router, and wireless devices, the network should continue to operate flawlessly. You may experience speed fluctuations if there are too many devices or appliances nearby that operate on the same frequency; minimize this problem by keeping your wireless router and Wi-Fi devices away from cordless phones, microwaves, wireless game controllers, Bluetooth devices, and even fluorescent lights.

How To Troubleshoot Networking

By Dinesh Thakur

A down, slow, or unreliable network can lead to significant downtime and frustration. Here, we’ll help you troubleshoot a few of the most common network problems.

Try The Power Cycle

When it comes to the physical network, there are two devices that can possibly fail: the router and the modem. Both have simple fixes. Turn them off, wait ten seconds or so, and turn them back on again. This “power cycling” will resolve many network issues. For example, the router may have had a problem renewing its IP address or releasing new IP addresses for the computers on your network. Restarting the router or modem resets the device’s software, often solving
these sorts of problems.

Examine Your Network Adapter

If that didn’t solve the issue, check the PC’s network adapter. The Network Diagnostic utility built into Windows 7 can renew your computer’s IP address and ensure that the network adapter is enabled. To run Network Diagnostic in Windows 7, click the Start orb, select Control Panel, choose Network And Internet, and select Network And Sharing Center. Under View Your Active Networks, select the link next to Connections and click the Diagnose button. Windows will run a few tests to try and fix the problem.

Weak Wireless Signal

Watch out for nearby devices such as microwaves, Bluetooth devices, baby monitors, and phones, all of which can cause interference in the signal. Move your router someplace where it’s less likely to experience interference.

Intermittent Connection

You’ll want to check the physical connections to your router to see if all the cords are securely connected. A loose connection may explain why the Web drops intermittently. It’s possible that the cable may have a cut or kink that causes a fault in the connection. Try replacing the Ethernet cable.

Prevention

Wireless signal interference will typically be worse if the device causing the problem is close to the router. Try moving your router or PC to a different location, where the interference will have less of an effect.

How To Troubleshoot Digital Cameras

By Dinesh Thakur

We’ve come to rely on digital cameras to capture the special moments in our lives. And if you miss a moment because your camera isn’t working or produces poor-quality images, it can be frustrating. Here, we’ll provide some quick tips for resolving a few of the most common issues.

Clean Off The Lens

So you’ve just snapped a few photos of the family dog, only to find that most of them have been ruined because a certain pooch left his noseprints on the lens. The same problem can occur if dust builds up or when you accidentally touch the lens with your finger. Breathing across the lens and wiping it off with a soft, microfiber cloth will remove most marks. For stubborn fingerprint oils, you may need to use a lens cleaner. Lenses typically have special coatings, so you’ll want to avoid any household cleaning products that could mar the coating.

Battery Life

When you first got your digital camera, the battery lasted for several hours before it needed to be recharged. But over time, a battery wears out; eventually, it may only give you enough juice for a few shots. If you’re experiencing this problem, you’ll likely need to invest in a new battery. If you see a white flaky material on the old battery, it’s likely that it was leaking and that residual acid has corroded the con-tacts. You’ll need to clean the contact pads with a brush and fine sandpaper before you install a new battery.

Shots Are Dark Or Off-Color

Many point-and-shoot cameras use small image sensors that have trouble gathering enough light in low-light environments. You may be able to compensate by switching to a shooting mode in which the camera opens the shutter for a longer period of time, but then the camera must be held steady to avoid blur. It may be easier to move the subject to a location where there is more light, or to better illuminate the scene by adding more light with a flash or by opening a curtain.

Prevention

Digital cameras are fairly durable devices, but you’ll want to keep them away from liquid, sand, and dirt. Liquid can short out the internal circuitry, while sand and dirt can scratch the lens and other parts inside the camera. The internal circuitry and glass lens (and internal mirror, if your camera has one) can also be damaged if you drop the camera, so remember to keep the neck strap on while using it.

How To Troubleshoot Memory (Random Access Memory)

By Dinesh Thakur

Problems with your PC’s memory, or RAM (Random Access Memory), can result in a variety of issues, including seemingly random freezes, crashes, and system errors. When you’re seeing these types of issues, there are no obvious error messages that indicate something is wrong with the memory in your computer. Here, we’ll show you how to discover if your RAM is the problem and give you some ways to fix it.

Is It A Memory Issue?

The most common manifestations of RAM problems are operating system crashes or applications that hang or won’t respond. If you’re experiencing these issues, try running an antivirus scan with your security software just to be safe, because a virus can cause similar symptoms.

Memory Analysis

Windows 7 includes the Windows Memory Diagnostics Tool, which will help you detect problems with your computer’s RAM;. To manually run the utility, click the Start button, select Control Panel, and type memory into the search box. Select Diagnose Your Computer’s Memory Problems under Administrative Tools, and you’ll see two options. You can choose to have Windows restart right now and check the memory, or you can tell it to wait until the next time you reboot your PC.

If the Windows Memory Diagnostic finds errors, you’ll see a pop-up that tells you where the memory failed. In this case, you’ll likely need to replace the memory to fix the problem. If the utility detects no errors, no message will be displayed and Windows will go ahead and load your Desktop.

Quick Fix

Nearly all PCs contain more than one memory module. It’s possible that only one of the sticks of RAM is causing the problem, so try removing one and see if that fixes the issue. Continue switching out the memory until you find the memory stick that’s causing the problem.

Prevention

Some memory errors can occur when the modules are not securely placed in the socket. Therefore it’s a good idea to occasionally open up your case and ensure that each stick is securely seated in its slot.

Primary Sidebar

Trubleshooting

Troubleshoot Tutorials

  • How to - Solve Tablet Problems
  • How to - Windows 7 Backup
  • How to - Windows 7 Recover
  • Troubleshoot - Computer
  • Troubleshoot - Memory
  • Troubleshoot - All-in-One PC
  • Troubleshoot - Networking
  • Troubleshoot - Software Update
  • Troubleshoot - Wi-fi Connection
  • Troubleshoot - Digital Cameras

Footer

Basic Course

  • Computer Fundamental
  • Computer Networking
  • Operating System
  • Database System
  • Computer Graphics
  • Management System
  • Software Engineering
  • Digital Electronics
  • Electronic Commerce
  • Compiler Design
  • Troubleshooting

Programming

  • Java Programming
  • Structured Query (SQL)
  • C Programming
  • C++ Programming
  • Visual Basic
  • Data Structures
  • Struts 2
  • Java Servlet
  • C# Programming
  • Basic Terms
  • Interviews

World Wide Web

  • Internet
  • Java Script
  • HTML Language
  • Cascading Style Sheet
  • Java Server Pages
  • Wordpress
  • PHP
  • Python Tutorial
  • AngularJS
  • Troubleshooting

 About Us |  Contact Us |  FAQ

Dinesh Thakur is a Technology Columinist and founder of Computer Notes.

Copyright © 2025. All Rights Reserved.

APPLY FOR ONLINE JOB IN BIGGEST CRYPTO COMPANIES
APPLY NOW