JFrame with Multiple JPanels Example
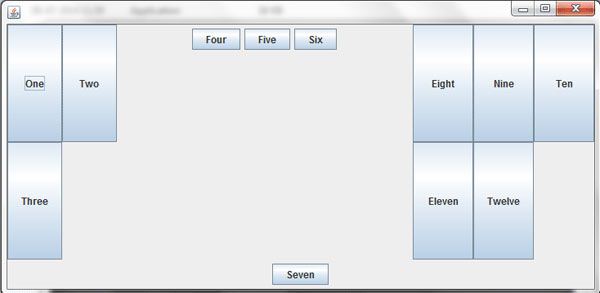
A JPanel is an invisible window on which they are located and arranged the elements in the window. We can insert any type of components within a panel, including other panels. This feature is essential when creating complex graphical interfaces you have to use different Layout Managers.
The usual procedure is to put a panel on first build, add components you want and then insert it into the appropriate container.
• public JPanel () constructor;
• public JPanel (LayoutManager layout) Creates a new JPanel with the given design that is passed;
• public Component add (Component comp) is the method used to Add components to the panel. Returns the same component that is passed;
• public setLayout (Layout Manager l): sets the given layout manager;
• public void remove (Component c) removes the component
import javax.swing.*;
 import java.awt.*;
 public class MultiplePanelsJavaExample extends JFrame
    {
        private JButton BtnOne = new JButton("One");
        private JButton BtnTwo = new JButton("Two");
        private JButton BtnThree = new JButton("Three");
        private JButton BtnFour = new JButton("Four");
        private JButton BtnFive = new JButton("Five");
        private JButton BtnSix = new JButton("Six");
        private JButton BtnSvn = new JButton("Seven");
        private JButton BtnEight = new JButton("Eight");
        private JButton BtnNine = new JButton("Nine");
        private JButton BtnTen = new JButton("Ten");
        private JButton BtnElvn = new JButton("Eleven");
        private JButton BtnTwlv = new JButton("Twelve");
        private JPanel PnlOne = new JPanel(new GridLayout(2, 0));
        private JPanel PnlTwo = new JPanel(new FlowLayout());
        private JPanel PnlThree = new JPanel(new FlowLayout());
        private JPanel PnlFour = new JPanel(new GridLayout(2, 0));
         public MultiplePanelsJavaExample()
            {
               setLayout(new BorderLayout());
               add(PnlOne, BorderLayout.WEST);
               add(PnlTwo, BorderLayout.CENTER);
               add(PnlThree, BorderLayout.SOUTH);
               add(PnlFour, BorderLayout.EAST);
               PnlOne.add(BtnOne);
               PnlOne.add(BtnTwo);
               PnlOne.add(BtnThree);
               PnlTwo.add(BtnFour);
               PnlTwo.add(BtnFive);
               PnlTwo.add(BtnSix);
               PnlThree.add(BtnSvn);
               PnlFour.add(BtnEight);
               PnlFour.add(BtnNine);
               PnlFour.add(BtnTen);
               PnlFour.add(BtnElvn);
               PnlFour.add(BtnTwlv);
               setSize(400,250);
               setVisible(true);
            }
               public static void main(String[] args)
                   {
                       MultiplePanelsJavaExample frame = new MultiplePanelsJavaExample();
                   }
    }
JFrame with JPanel Example in Java
JFrame: Represents a basic, capable of containing other components window. Almost all applications built one JFrame.
JPanel: Panel is a container to hold different Swing components. One can add any number of components to a panel and there can be multiple panels in the same frame. It also supports double buffering which is used in animation to avoid flickering. In double buffering, object is first written to an off-screen memory before display and then switched over to the panel. Flow layout is the default layout for the panel. A panel is an object of class JPanel which is present in package javax.swing.
Some of the constructors defined by JPanel class are as follows:
JPanel ()
JPanel(boolean isDoubleBuffered)
JPanel(LayoutManager layout)
JPanel(LayoutManager layout, boolean isDoubleBuffered)
where,
isDoubleBuffered defines whether the panel is double buffered or not. It can have one of the values: true (double buffered) or false (not double buffered).
layout defines the layout of the panel.
import javax.swing.*;
import java.awt.*;
public class PanelsWithJFrameJavaExample extends JFrame
  {
      private final int WIDTH = 250;
      private final int HEIGHT = 120;
      private JButton BtnOne = new JButton("One");
      private JButton BtnTwo = new JButton("Two");
      private JButton BtnThree = new JButton("Three");
      public PanelsWithJFrameJavaExample()
         {
              super("Panels in Java swing");
              setDefaultCloseOperation(JFrame.EXIT_ON_CLOSE);
              JPanel PnlOne = new JPanel();
              JPanel PnlTwo = new JPanel();
              Container cntnr = getContentPane();
              cntnr.setLayout(new FlowLayout());
              cntnr.add(PnlOne);
              cntnr.add(PnlTwo);
              PnlOne.add(BtnOne);
              PnlOne.setBackground(Color.BLUE);
              PnlTwo.add(BtnTwo);
              PnlTwo.add(BtnThree);
              PnlTwo.setBackground(Color.BLUE);
              setSize(300,450);
              setVisible(true);
          }
              public static void main(String[] args)
                {
                    PanelsWithJFrameJavaExample panel = new PanelsWithJFrameJavaExample();
                }
   }
CardLayout in Java Swing Example
The CardLayout constitutes a more enhanced manager that can group multiple containers in the form of cards each showing a time, or that is, only one container at a time is visible. This layout manager is based on the idea of the tabs. Each container can have its layout specific, allowing different layout managers are used in a same window space.
We usually serve some sort of event to move from one component to another. As seems logical, it may be appropriate in many cases to know what the previous and next component, which is why this layout manager provides some own methods:
• public CardLayout()
• public CardLayout(int hgap, int vgap)
• void first(Container parent)
• public void last(Container parent)
• public void next(Container parent)
• public void previous(Container parent)
• public void show(Container parent, String name)
It is essential to know the layout of the parent Container. To add components to a Container using this layout manager we use the method.
void add(Component to, String name)
The name parameter identifies the components and is the same name as a parameter to pass on the show (…) method.
import javax.swing.*;
import java.awt.*;
import java.awt.event.*;
public class CardLayoutJavaExample extends JFrame implements ActionListener
  {
      private CardLayout cards = new CardLayout();
      private JButton BtnWalking = new JButton("The Walking Dead");
      private JButton BtnGalactic = new JButton("Galactic Phantasy Prelude");
      private JButton BtnFarm = new JButton("Farm Heroes Saga");
      public CardLayoutJavaExample()
         {
              setLayout(cards);
              add("Dead", BtnWalking);
              BtnWalking.addActionListener(this);
              add("Galactic", BtnGalactic);
              BtnGalactic.addActionListener(this);
              add("Farm", BtnFarm);
              BtnFarm.addActionListener(this);
              setSize(250, 150);
              setVisible(true);
         }
              public void actionPerformed(ActionEvent e)
                {
                    cards.next(getContentPane());
                }
                    public static void main(String[] args)
                       {
                            CardLayoutJavaExample frame = new CardLayoutJavaExample();
                       }
    }
GridLayout in Java Swing Example
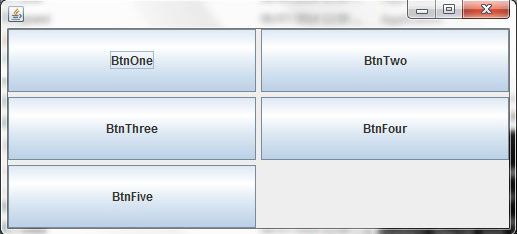
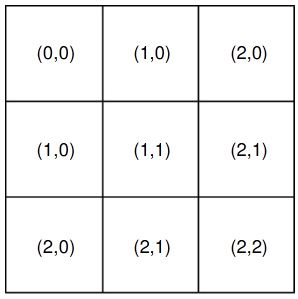
The GridLayout manager is one that divides a container into a set of cells spread on a rectangular grid , so that they all possess the same dimension. You can split a container into rows and columns according to their need . The components are arranged in the order in which they appear, with inserted in the grid from left to right and top to bottom.
Any change in the size of the container will automatically change the size of the components added to it , ie the components are resized depending on the size of the new container .
To define a layout in the form of “grid” use the following syntax : nameconteiner.setLayout (new GridLayout (rows, columns, horizontal-spacing, vertical – spacing )
rows – > number of rows that have the container.
columns – > number of columns that have the container.
horizontal – spacing -> horizontal distance between the components.
vertical spacing -> vertical distance between the components.
Example of GridLayout as shown in Figure.
• Configuration Management – must be specified number of rows and columns of the grid. You can also specify the space in pixels between components. The following constructors are used:
• public GridLayout(int rows, int cols)
• public GridLayout(int rows, int cols, int hgap, int vgap)
• preferred container size – One size considered the size of each cell as the greatest preferred size between all components.
import javax.swing.*;
import java.awt.*;
public class JavaExampleGridLayout extends JFrame
{
     private JButton BtnOne = new JButton("BtnOne");
     private JButton BtnTwo = new JButton("BtnTwo");
     private JButton BtnThree = new JButton("BtnThree");
     private JButton BtnFour = new JButton("BtnFour");
     private JButton BtnFive = new JButton("BtnFive");
     private GridLayout layout = new GridLayout(3, 2, 5, 5);
     public JavaExampleGridLayout()
        {
           setLayout(layout);
           add(BtnOne);
           add(BtnTwo);
           add(BtnThree);
           add(BtnFour);
           add(BtnFive);
           setVisible(true);
           setSize(200, 200);
        }
           public static void main(String[] args)
              {
                   JavaExampleGridLayout frame = new JavaExampleGridLayout();
              }
  }
FlowLayout in Java Swing Example
The FlowLayout is the simplest manager. The components are arranged from left to right in the order in which they appear, i.e., in the order they are added. When there is no more space on a line, another line is created, resembling a text editor. This process is automatically done according to the container size.
• Configuration Management – It is possible to specify the space between components, default is 5 pixels. You can also specify the alignment of the components in a line, for this, one of the following constants are used: FlowLayout.CENTER, FlowLayout.RIGHT or FlowLayout.LEFT . for configured administrator have the following distribution builders:
• public FlowLayout()
• public FlowLayout(int align)
• public FlowLayout(int align, int hgap, int vgap)
Where align is the alignment, hgap is the horizontal space and vgap is the vertical space.
• preferred container size – The preferred size of the container is one that makes all the components fit in a single line. The container will as a height size higher and width as the sum of the preferred widths of all component parts, in addition to the gap between them.
import javax.swing.*;
import java.awt.*;
import java.awt.event.*;
public class JavaExampleFlowLayout extends JFrame implements ActionListener
  {
      private JButton LBtn = new JButton("Left Button");
      private JButton RBtn = new JButton("Right Button");
      private Container cntnr = getContentPane();
      private FlowLayout layout = new FlowLayout();
      public JavaExampleFlowLayout()
        {
            cntnr.setLayout(layout);
            cntnr.add(LBtn);
            cntnr.add(RBtn);
            LBtn.addActionListener(this);
            RBtn.addActionListener(this);
            setSize(500, 100);
            setVisible(true);
        }
            public void actionPerformed(ActionEvent evnt)
              {
                  Object src = evnt.getSource();
                   if(src == LBtn)
                   layout.setAlignment(FlowLayout.LEFT);
                   else
                   layout.setAlignment(FlowLayout.RIGHT);
                   cntnr.invalidate();
                   cntnr.validate();
             }
                  public static void main(String[] args)
                    {
                       JavaExampleFlowLayout frame = new JavaExampleFlowLayout();
                    }
   }
BorderLayout in Java Swing Example
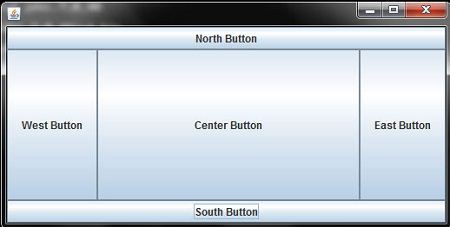
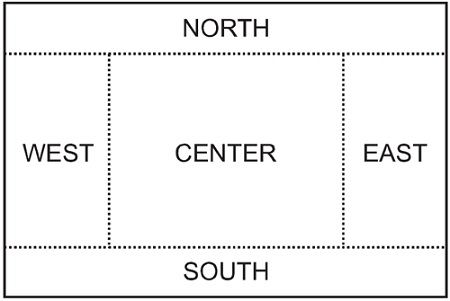
The BorderLayout manager is one that divides a container into five regions distinct : north ( upper region ) , south ( lower region ) , west ( left region ) , east ( right region ) and center ( central region ) . Unlike managers seen previously, the order in which the components are added is irrelevant , because at the time we add the component , in which we define the region it will stay. In each region, managed to put only one component , or is, only five (5) components may be included in this layout. if an component is inserted in a region that already contains another , this will be overlapped. Likewise the grid layout, the components are resized according to the dimensions of the container.
It may be a disadvantage we can add only 5 components, but if you add a panel in each region , we have 5 panels that have their own components and their layout managers .
For defining the BorderLayout, use the following syntax: -name container.setLayout ( new BorderLayout ( horizontal – spacing , vertical – spacing ) spacing – horizontal and vertical – spacing – > optional parameters that define the space between objects .
Distribution Manager BorderLayout divides the container JPanel into five zones, one for each component, as can be seen in Figure.
import javax.swing.*;
import java.awt.*;
public class BorderLayoutJavaExample extends JFrame
 {
     private JButton NrthBtn = new JButton("North Button");
     private JButton SthBtn = new JButton("South Button");
     private JButton EstBtn = new JButton("East Button");
     private JButton WstBtn = new JButton("West Button");
     private JButton CntrBtn = new JButton("Center Button");
     public BorderLayoutJavaExample()
     {
       setLayout(new BorderLayout());
       add(NrthBtn,BorderLayout.NORTH);
       add(SthBtn, BorderLayout.SOUTH);
       add(EstBtn, BorderLayout.EAST);
       add(WstBtn, BorderLayout.WEST);
       add(CntrBtn, BorderLayout.CENTER);
       setVisible(true);
       setSize(400, 150);
     }
       public static void main(String[] args)
        {
          BorderLayoutJavaExample frame = new BorderLayoutJavaExample();
        }
  }
JFrame Color in Java Swing Example
Frame is the most common container used to create top-level window having title, border and window-management buttons. It can also be used to create secondary windows for an application. A frame is an object of JFrame class.
The constructors defined by this class JFrame class are as follows.
JFrame ()
JFrame(String title)
where,
title specifies the title for the frame
Example :
import java.awt.*;
 import javax.swing.*;
 public class JFrameColor extends JFrame
  {
     private final int SIZE = 100;
     private Container cntnr = getContentPane();
     private JButton BtnClckHere = new JButton("Click Here");
     public JFrameColor()
      {
        super("JFrame Color in Java Swing Example");
        setSize(200,150);
        setVisible(true);
        cntnr.setLayout(new FlowLayout());
        cntnr.add(BtnClckHere);
        cntnr.setBackground(Color.YELLOW);
        BtnClckHere.setBackground(Color.blue);
        BtnClckHere.setForeground(Color.cyan);
      }
        public static void main(String[] args)
           {
             JFrameColor frame = new JFrameColor();
           }
  }
ContentPane with FlowLayout in Java Swing Example
The flow layout manager is the simplest of all the layout managers. It positions the components in the order they are added to the container. It places the components from left to right, that is, horizontally. Once a row gets completely filled with components then the remaining components are placed in the next row. It is the default layout manager for Applet and Panel. Each component is evenly separated from its neighboring components by leaving a small space not only from above and below it, but also from left and right.
The flow layout manager can be created by using any of the following constructors.
FlowLayout ()
FlowLayout (int alignment)
FlowLayout (int alignment, int hor, int ver)
where,
alignment specifies the alignment of laid out components. It can take one of these constants-FlowLayout.LEFT, FlowLayout.RIGHT, and FlowLayout.CENTER
hor and ver specify the horizontal and vertical space left between each component, respectively
[Read more…] about ContentPane with FlowLayout in Java Swing Example
JFrame ContentPane Layout in Java Swing Example
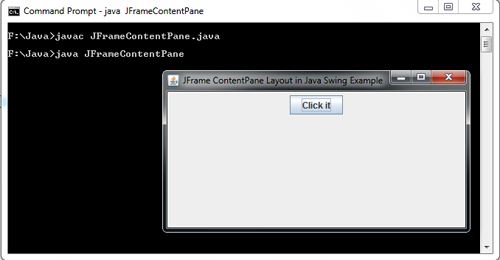
In a Java Swing, A JFrame is the class that represents the window in which graphics applications running on Java. JFrame Class is the top-level container that contains content pane all visible components contain in the content pane. The usual procedure to be used to create a new class that inherits from JFrame. Normally JFrame’s are used as primary containers, that is, not contained in other containers.
A frame is often put a main panel from which the other elements are organized. To place this main panel method is used.
public void setContentPane(Cantainer contentPane)
import java.awt.*;
 import javax.swing.*;
 public class JFrameContentPane  extends JFrame
 {
      private final int SIZE = 200;
      private Container con = getContentPane();
      private JButton BtnClckIt = new JButton("Click it");
      public JFrameContentPane()
        {
           super("JFrame ContentPane Layout in Java Swing Example");
           setSize(500,500);
           setVisible(true);
           con.setLayout(new FlowLayout());
           con.add(BtnClckIt);
        }
          public static void main(String[] args)
           {
             JFrameContentPane JFrameCP = new JFrameContentPane();
           }
   }
Example of Nested Class in Java
Inner class in java with Example
A nested class as the name suggests is a class that is defined inside another class. It is merely a convenient way of grouping two or more classes together into a single unit or module. A class that contains a nested class is known as the enclosing or outer class of the nested class. [Read more…] about Inner class in java with Example
Nested Class in Java Example
Nested class is also defined as a static member in a top level class. And the nested class can be instantiated using its full name and no instance of the enclosing class is required to instantiate a top level nested class. [Read more…] about Nested Class in Java Example
Function Overloading and Method Overloading in Java
When in a class, we have more then one method with similar name but with different type signatures i.e. with different number of parameters or with different types of parameters, then we say that the method is overloaded. Compiler will recognize which method to execute on the basis of the type and number of parameters used while calling the method.
class Rectangle
           {
               int length,breath,a;
               void getData(int x,int y)
                  {
                      length=x;
                      breath=y;
                  }
                      void getData(int x)
                       {
                           length=x;
                           breath=15;
                        }
                           void getData()
                             {
                                 length=60;
                                 breath=15;
                             }
                                 int getArea()
                                    {
                                        a=length*breath;
                                        return(a);
                                     }
            }
                      class FunctionMethod
                         {
                              public static void main(String args[])
                                {
                                    Rectangle Rect = new Rectangle();
                                    Rectangle Rect1 = new Rectangle();
                                    Rectangle Rect2 = new Rectangle();
                                    Rect.getData();
                                    Rect1.getData(30);
                                    Rect2.getData(40,60);
                                    System.out.println("Area of First Rectangle is : "+Rect.getArea());
                                    System.out.println("Area of Second Rectangle is : "+Rect1.getArea());
                                    System.out.println("Area of Third Rectangle is : "+Rect2.getArea());
                                 }
                        }

Java Example for Method Overloading
Example of Method Overloading in Java
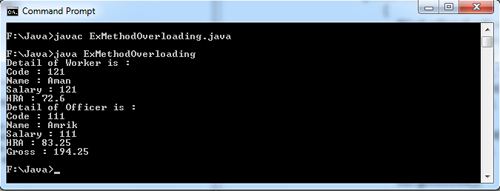
In a class hierarchy, when a method in a subclass has the same name and type signature as a method in its superclass, then the method in the subclass is said to override the method in the superclass. When an overridden method is called from within a subclass, it certainly refer to the version of that method defined by the subclass. The version of the method defined by the superclass will be hidden.
class WorkerDetail
           {
               int c,s;
               String n;
               float h;
               void SetSalary(int x, String y, int z)
                    {
                       c=x;
                       n=y;
                       s=x;
                    }
                       void ShowDetail()
                         {
                             System.out.println("Code : "+ c);
                             System.out.println("Name : "+n);
                             System.out.println("Salary : "+s);
                         }
                             void getHra()
                               {
                                  h=(float)s*60/100;
                                  System.out.println("HRA : "+h);
                               }
           }
                  class officerDetail extends WorkerDetail
                     {
                        float h,g;
                        void getHra()
                           {
                              h=(float)s*75/100;
                              System.out.println("HRA : "+h);
                           }
                              void getGross()
                                   {
                                       g=s+h;
                                       System.out.println("Gross : "+g);
                                   }
                    };
                        class ExMethodOverloading
                                  {
                                      public static void main(String args[])
                                           {
                                               WorkerDetail wD = new WorkerDetail();
                                               officerDetail oD = new officerDetail();
                                               wD.SetSalary(121,"Aman",13000);
                                               oD.SetSalary(111,"Amrik",30000);
                                               System.out.println("Detail of Worker is :");
                                               wD.ShowDetail();
                                               wD.getHra();
                                               System.out.println("Detail of Officer is :");
                                               oD.ShowDetail();
                                               oD.getHra();
                                               oD.getGross();
                                           }
                                  };
Example of Inheritance in Java
Calculate Area of Rectangle and Triangle using Single Inheritance
Single Inheritance in Java Example
Inheritance is one the most powerful concepts in an object-oriented language. Through inheritance the code developed for one class can be used in another class. That is, the data members made in a class can be used in another class. Inheritance is done by creating new classes that are extensions of other classes. The new class is known as a subclass. The original class is known as a superclass. The subclass has all the attributes of the superclass, and in addition has attributes that it defines itself. A class can have only one superclass. This is known as single inheritance. A superclass can have multiple subclasses.
Declaring Inheritance
A class inherits a super class with the help of keyword: extends
Syntax :
class classname extends anotherclass
{
… body of class
}
The extends keyword immediately follows the class name. It is followed by the name of the superclass from which this class will inherit characteristics. There can be only one class name following the extends keyword. Hence, inheritance provides a powerful mechanism for reusing existing code.
class Rectangle
           {
               int l,b;
              void Setval(int x,int y)
                {
                   l=x;
                   b=y;
                }
                    int GetRect()
                      {
                          return l*b;
                      }
            }
                      class Triangle extends Rectangle
                          {
                              int b,h;
                              float a;
                              void SetData(int v,int u)
                                  {
                                      b=u;
                                      h=v;
                                  }
                                      float GetTri()
                                         {
                                             a=(float)l/2*b*h;
                                             return (a);
                                         }
                           }
                                     class SingleInheritance
                                        {
                                             public static void main(String args[])
                                                 {
                                                     Triangle Tri=new Triangle();
                                                     Tri.Setval(50,8);
                                                     Tri.SetData(17,7);
                                                     System.out.println("Area of Rectangle is :" +Tri.GetRect());
                                                     System.out.println("Area of Triangle is :"+Tri.GetTri());
                                                 }
                                        }

Java Static Variables Example
Static are the members or variables which are defined independently of any object of that class. Static members are the members that can be used by itself, without reference to a specific instance. We can declare both methods and variables to be static. The variables declared as static are global variables. When objects of the class are declared, no copy of a static variable is made. Instead, all instances of the class share the same static variable. [Read more…] about Java Static Variables Example
Enter Code, Name And Salary Of 3 Employees And Print Then, Using Array of Objects
Enter Detail of Worker using Constructor Overloading
Calculate Average of Three Variable using Constructor Overloading
Calculate Area of Rectangle using Constructor Overloading
Constructor Overloading means a class having multiple constructors with the same name, but with different number of arguments or different type of arguments. The compiler differentiates the constructors based on the number of parameters in the list and their types. That means, on the basis of the number and type of the arguments that we pass into the constructor, the compiler determines which constructor to call. [Read more…] about Calculate Area of Rectangle using Constructor Overloading
Enter Student Detail and Print them Using parameterized constructor
Calculate Area of Rectangle using Parameterised Constructor
Calculate Area of Rectangle Using Default Constructor
Constructors are the methods having the same name as that of the class and are automatically executed on defining an object. The main purpose of a constructor is to initialize a new object. [Read more…] about Calculate Area of Rectangle Using Default Constructor
Scrolling Text in Java Applet Example
MediaTracker Class in java Example
When the images are initially loaded, they are only partially displayed as they may not have been loaded completely. Mediatracker tracks the status of the number of media objects which includes audio clips as well as images. Secondly, it also determines if an image has been completely loaded.
To use a media tracker, create an instance of MediaTracker and call its addImage method for each image to be tracked. In addition, each image can be assigned a unique identifier. This identifier controls the priority order in which the images are fetched. It can also be used to identify unique subsets of the images that can be waited on independently. Images with a lower ID are loaded in preference to those with a higher ID number.
          import java.applet.Applet;
           import java.awt.*;
           import java.awt.event.*;
           /* <APPLET CODE=MediaTrackerClass.class WIDTH=400 HEIGHT=200 > </APPLET> */
           public class MediaTrackerClass  extends Applet implements AdjustmentListener
               {
                     Image image;
                    Scrollbar horiz=new Scrollbar(Scrollbar.HORIZONTAL,0,400,0,500);
                    Scrollbar vert=new Scrollbar(Scrollbar.VERTICAL,0,400,0,500);
                    public void init()
                     {
                    setLayout(new BorderLayout());
                    loadImage();
                   add(vert,BorderLayout.EAST);
                   add(horiz,BorderLayout.SOUTH);
                   horiz.addAdjustmentListener(this);
                   vert.addAdjustmentListener(this);
                }
                       void loadImage()
                         {
                           Toolkit toolkit=getToolkit();
                       image=toolkit.getImage("DineshThakur.gif");
                       MediaTracker tracker=new MediaTracker(this);
                       tracker.addImage(image,7);
                          try
                         {
                                tracker.waitForID(7);
                         }
                                    catch(InterruptedException ex)
                                  {
                                  }
                     }
                                   public void paint(Graphics g)
                                     {
                                       g.drawImage(image,0-horiz.getValue(),0-vert.getValue(),this);
                             }
                                       public void adjustmentValueChanged(AdjustmentEvent e)
                                 {
                                    repaint();
                                 }
            }
![]()
Interthread Communication in Java Example
Multithreading replaces event loop programming by dividing the tasks into discrete and logical units. Threads also helps in avoiding polling. Polling is usually implemented by a loop that is used to check some condition repeatedly. Once the condition is true, appropriate action is taken, this results in wastage of CPU time. Suppose that the producer has to wait until the consumer is finished before it generates more data. In a polling system, the consumer would waste many CPU cycles while it waits for the producer to produce. Once the producer has finished, it would start polling, wasting more CPU cycles waiting for the consumer to finish, and so on. [Read more…] about Interthread Communication in Java Example
