• Skip to main content
  • Skip to primary sidebar
  • Skip to secondary sidebar
  • Skip to footer

Computer Notes

Library
    • Computer Fundamental
    • Computer Memory
    • DBMS Tutorial
    • Operating System
    • Computer Networking
    • C Programming
    • C++ Programming
    • Java Programming
    • C# Programming
    • SQL Tutorial
    • Management Tutorial
    • Computer Graphics
    • Compiler Design
    • Style Sheet
    • JavaScript Tutorial
    • Html Tutorial
    • Wordpress Tutorial
    • Python Tutorial
    • PHP Tutorial
    • JSP Tutorial
    • AngularJS Tutorial
    • Data Structures
    • E Commerce Tutorial
    • Visual Basic
    • Structs2 Tutorial
    • Digital Electronics
    • Internet Terms
    • Servlet Tutorial
    • Software Engineering
    • Interviews Questions
    • Basic Terms
    • Troubleshooting
Menu

Header Right

Home » Java » Awt and Applet

How to Displaying Images in java

By Dinesh Thakur

There are four different overloaded drawImage methods in Graphics.

First, we’ll show you the least complicated call:

if (image != null) {
   g.drawImage (image,xloc,yloc, this) ;
}

This causes the image to be drawn lifesize (no scaling is applied), with the upper left corner of the image positioned at (xloc,yloc) in the current graphics context clipping rectangle. If any errors or events occur while the image is being rendered, they are ignored (potentially leaving the image in some strange display state). If the image contains transparent pixels, the destination pixels are left as they were before the drawImage call was made.

Next we’ll show you the image-loading call we used in the How to loading images in java

if (image != null) {
   g.drawImage (image,xloc,yloc, getBackground() ,this);
}

This call draws the image scaled normally (100%) with the upper left corner of the image positioned at (xloc,yloc). If the image has transparent pixels, those pixels in the destination graphics context are drawn in the color passed to drawImage. Our example passes the background color of the container we’re drawing in. This is different than the previous call, where the destination pixels were left alone.

Both of the methods we just discussed draw the image at a one-to-one ratio. Each pixel in the source image is drawn directly into the destination graphics context. While this works for the vast majority of cases, there are situations where the source image needs to be scaled (up or down) to fit into a particular region of the destination graphics context. Two variations of drawImage provide width and height parameters to be used in scaling the destination image. Regardless of the source image size, the destination image is rendered to the size specified in the width and height. This example leaves the transparent pixels as they were before the call to drawImage.

if (image != null) {
   g.drawImage(image,xloc,yloc,width,height,this) ;
}

The next example draws the transparent pixels in light gray. All pixels other than the transparent pixels are drawn in the source pixel color.

if (image != null) {
 g.drawImage{image,xloc,yloc, width,height,Color.lightGray,this);
}

If something interesting happens while an image is being drawn, the AWTimage-drawing code notifies this. imageUpdate. For most of your code, you can just pass this as the image observer. The default behavior implemented by Component is usually sufficient to get the image drawn. If your application is using incremental drawing, you may need to implement your own imageUpdate method. When the imageUpdate method is called, it receives a small block of status information:
• Image img-the image being referenced
• int infoflags-the logical OR of the following bits, each of which indicates that the related information is available
• WIDTH
• HEIGHT
• PROPERTIES
• SOMEBITS
• FRAMEBITS
• ALLBITS
• ERROR
• ABORT
• int x-the X location of the image
• int y-the Y location of the image
• int width-if (infoflags&WIDTH), then this is the width of the image
• int height-if (infoflags&HEIGHT), then this is the height of the image
How to loading images in java

By Dinesh Thakur

The Java AWT provides several classes to manage loading and displaying images. The most common image code you see on the Web is called an animator. There are numerous animation applets and classes available on the WWW. The Java Developer’s Kit provides a set of demo applications that draw images using static, single-buffered, and double-buffered animation. [Read more…] about How to loading images in java

What are the Uses of Class java.awt.Insets

By Dinesh Thakur

When you override the Container.insets () method, you are instructing the AWT to provide a margin around your container. The inset is used mostly by the Layout Manager to calculate sizing and positioning for contained objects. The Layout Manager will fit everything inside the insets you provide to it. The most common use of the inset space is to provide white space around a set of components to make them stand out as a group or just to provide more pleasing balance to a window.Remember that the insets indicate the distance from the border of the container to the contained objects. Effectively, you are setting the margins for your container. The space between the top, left, right, and bottom inset and the border of the container would be considered the margin.

For instance, Insets (20,10,10,1) would cause the Layout Manager to leave a 20 pixel top margin, 10 pixels on the left and right, and only 1 pixel at the bottom. We’ve started using a standard inset of 10 pixels for most of our containers, but you should follow your environment’s guidelines for code of your own.

The method can be implemented very simply:

public Insets insets() {
   return new Insets(10,10,10,10);
}

This produces a new Insets object every time insets is called. If you want to enhance performance, and the specific constant insets will always be appropriate, you can instantiate a private object in the constructor and always return that object. Also, the four values allow you to vary the inset width on each of the top, left, bottom, and right.

You will often combine the inset with a simple border. In the container paint () method, you can call drawRect () to draw a simple pixel wide border around the container. The border is at the outside of the container, and contained components will be inset from the line by the active inset amount.

 public void paint (Graphics g) {
    Dimension d = size();
    g.drawRect(0,0,d.width-1,d.height-1);
}

Of course, just as on paper, you can draw in the margins of your container. You can use things other than drawRect to give the special effect you desire. A custom container might draw a shadow or other 3D effect that consumes all the space between the container border and it’s inset. You are definitely not limited to lines, either. You can draw images, text, or any other graphic component in the margin of your container.

Adding Sound To An Applet using AudioClip Class

By Dinesh Thakur

The AudioClip class is used to load and play sound files. To load a sound file the getAudioClip () Method of the AudioClip class is used. The general form of the getAudioClip () method is


AudioClip getAudioClip (URL pathname, String filename)

AudioClip getAudioClip (URL pathname)

where,

pathname is the address of the sound file. When the image file and the source file are in the same directory, getCodeBase () method is used as first parameter to the method.


filename is the name of the sound file

Some of the methods of AudioClip class along with their description are listed in Table

Method

Description

void play()

used to play the sound for once

void loop()

used to play the sound in loop

void stop ()

used to stop playing the sound

Example: An applet code to demonstrate the use of AudioClip class


import java.applet.*;

import java.awt.*;

public class SoundExample extends Applet

{

       private AudioClip mysound;

       public void init()

        {

                 mysound=getAudioClip(getCodeBase(), “chimes.wav”);

          }

      public void start()

       {

             mysound.loop();

         }

     public void stop()

       {

             mysound.stop();

       }

The HTML code for SoundExample is

<HTML>

        <HEAD>

        </HEAD>

<BODY>

        <CENTER>

                <APPLETCODE=”SoundExample.class” WIDTH=”200″ HEIGHT=”l30″>

                 </APPLET>

        </CENTER>

</BODY>

</HTML>


Draw and Filling Rectangles in Java Applet

By Dinesh Thakur

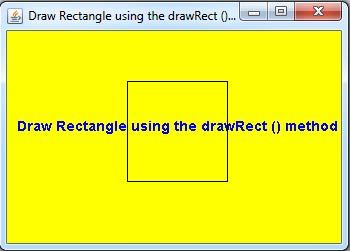
A rectangle can be drawn by using the drawRect () method. This method also takes the four parameters.

The general form of the drawRect () method is

void drawRect(int al, int bl, int w, int h)

where,

a1, b1 is the coordinate of the top left comer of the rectangle

w is the width of the rectangle

h is the height of the rectangle

For example, the statement g.drawRect (20 , 20 , 50 , 30 ) will draw a rectangle starting at (20, 20) with width of 50 pixels and height of 30 pixels as shown in Figure

             Figure A Rectangle with Width 50 pixels and Height 30 pixels

Example : Draw Rectangle using the drawRect () method.

import java.applet.Applet;

import java.awt.*;

import java.awt.event.*;

public class shapeRectangle extends Applet

{

      public static void main(String[] args)

   {

     Frame DrawingApplet = new Frame(“Draw Rectangle using the drawRect () method.”);

     DrawingApplet.setSize(350, 250);

     Applet shapeRectangle = new shapeRectangle();

     DrawingApplet.add(shapeRectangle);

     DrawingApplet.setVisible(true);

     DrawingApplet.addWindowListener(new WindowAdapter() {

     public void windowClosing(WindowEvent e) {System.exit(0); }

                                                                             });

  }

           public void paint(Graphics g)

            {

                     setBackground(Color.yellow);

                     g.setColor(Color.blue);  // Now we tell g to change the color

                     g.setFont(new Font(“Arial”,Font.BOLD,14)); // Now we tell g to change the font

                     g.drawString(“Draw Rectangle using the drawRect () method”, 10, 100);


            // draws a Rectangle

            g.setColor(Color.black);

            g.drawRect(120, 50, 100, 100);


       }

}

      Draw Rectangle using the drawRect () method

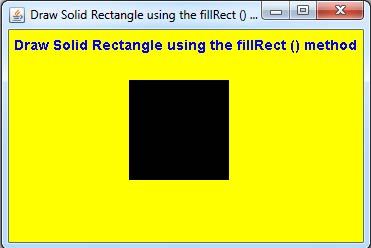
Note that the drawRect () method draws only the boundary of the rectangle. To draw a solid (filled) rectangle, fillRect () method is used. This method also takes four parameters similar to the drawRect () method.

To draw a solid rectangle having same parameters as above we use the statement g.fillRect (20 , 20 , 50, 30) which draws the rectangle as shown in Figure

              A Filled Rectangle with Width 50 pixels and Height 30 pixels

Exampel: Draw Solid Rectangle using the fillRect () method


import java.applet.Applet;

import java.awt.*;

import java.awt.event.*;

public class shapefillRectangle extends Applet

{

      public static void main(String[] args)

   {

     Frame DrawingApplet = new Frame(“Draw Solid Rectangle using the fillRect () method.”);

     DrawingApplet.setSize(370, 250);

     Applet shapefillRectangle = new shapefillRectangle();

     DrawingApplet.add(shapefillRectangle);

     DrawingApplet.setVisible(true);

     DrawingApplet.addWindowListener(new WindowAdapter() {

     public void windowClosing(WindowEvent e) {System.exit(0); }

                                                                             });

  }

           public void paint(Graphics g)

            {

                     setBackground(Color.yellow);

                     g.setColor(Color.blue);  // Now we tell g to change the color

                     g.setFont(new Font(“Arial”,Font.BOLD,14)); // Now we tell g to change the font

                     g.drawString(“Draw Solid Rectangle using the fillRect () method”, 5, 20);


            // draws a Rectangle

            g.setColor(Color.black);

            g.fillRect(120, 50, 100, 100);


       }

}

        Draw Solid Rectangle using the fillRect () method

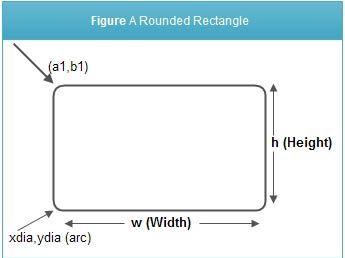
A rounded outlined rectangle can be drawn by using the drawRoundRect () method. This method takes the six parameters.

The general form of the drawRoundRect () method is:

void drawRoundRect (int al, int bl, int w, int h, int xdia, int ydia)   

           Figure A Rounded Rectangle  

where,

xdia is the diameter of the rounding arc (along X-axis)

ydia is the diameter of the rounding arc (along Y-axis)

Similarly, a rounded filled rectangle can be drawn using drawfillRoundRect () method. This method also takes six parameters similar to the drawRoundRect () method.


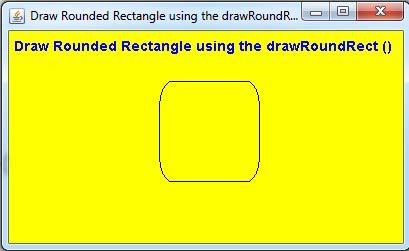
Example : Draw Rounded Rectangle using the drawRoundRect () method.

import java.applet.Applet;

import java.awt.*;

import java.awt.event.*;

public class shapeRoundRectangle extends Applet

{

      public static void main(String[] args)

   {

     Frame DrawingApplet = new Frame(“Draw Rounded Rectangle using the drawRoundRect () method.”);

     DrawingApplet.setSize(410, 250);

     Applet shapeRoundRectangle = new shapeRoundRectangle();

     DrawingApplet.add(shapeRoundRectangle);

     DrawingApplet.setVisible(true);

     DrawingApplet.addWindowListener(new WindowAdapter() {

     public void windowClosing(WindowEvent e) {System.exit(0); }

                                                                             });

  }

           public void paint(Graphics g)

            {

                     setBackground(Color.yellow);

                     g.setColor(Color.blue);  // Now we tell g to change the color

                     g.setFont(new Font(“Arial”,Font.BOLD,14)); // Now we tell g to change the font

                     g.drawString(“Draw Rounded Rectangle using the drawRoundRect ()”, 5, 20);


            // draws a Rectangle

            g.setColor(Color.black);

            g.drawRoundRect(150, 50, 100, 100, 25, 50);


       }

}

       Draw Rounded Rectangle using the drawRoundRect () method

Note: All the shapes are drawn relative to the Java coordinate system. The origin (0, 0) of the coordinate system is located at its upper-left corner such that the positive x values are to its right and the positive y values are to its bottom.

AppletContext and showDocument in java Example

By Dinesh Thakur

Java allows the applet to transfer the control to another URL by using the showDocument () Method defined in the AppletContext interface. For this, first of all, it is needed to obtain the Context of the currently executing applet by calling the getAppletContext () method defined by the Applet. Once the context of the applet is obtained with in an applet, another document can be brought into view by calling showDocument () method.

There are two showDocument () methods which are as follows:

showDocument(URL url)

showDocument(URL url,string lac)

where,

url is the URL from where the document is to be brought into view.

loc is the location within the browser window where the specified document is to be displayed.

Example An applet code to demonstrate the use of AppletContext and showDocument ().

import java.applet.Applet;

import java.applet.AppletContext;

import java.net.*;

/*

<applet code=”LoadHTMLFileSample” width=”700″ height=”500″></applet>

*/

public class LoadHTMLFileSample extends Applet

{

    public void start()

    {

          AppletContext context= getAppletContext();

          //get AppletContext

          URL codeBase = getCodeBase(); //get Applet code base

          try{

                 URL url = new URL(codeBase + “Test.html”);

                 context.showDocument(url,”_blank”);

                 repaint();

               }catch(MalformedURLException mfe) {

                         mfe.printStackTrace();

                         }

     }

}

Java Event Handling Model

By Dinesh Thakur

In Java, an event is an object which specifies the change of state in the source. It is generated whenever an action takes place like a mouse button is clicked or text is modified. Java’s AWT (Abstract Window Toolkit) is responsible for communicating these actions between the program and the user. Java packages such as java. util, java. awt, java. awt. event and javax. swing support event handling mechanism.

When an action takes place, an event is generated. The generated event and all the information about it such as time of its occurrence, type of event, etc. are sent to the appropriate event handling code provided within the program. This code determines how the allocated event will be handled so that an appropriate response can be sent to the user.

Event Handling Model

The working of an event-driven program is governed by its underlying event-handling model. Till now two models have been introduced in Java for receiving and processing events. The event handling mechanisms of these models differ a lot from each other.

Java 1.0 Event Model

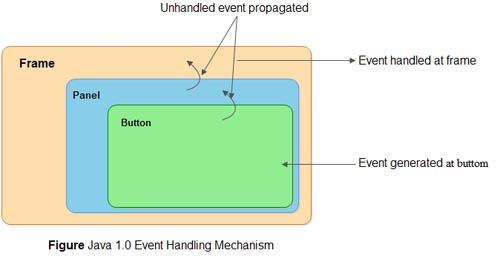
The Java 1.0 Event model for event processing was based on the concept of containment. In this approach, when a user-initiated event is generated it is first sent to the component in which the event has occurred. But in case the event is not handled at this component, it is automatically propagated to the container of that component. This process is continued until the event .is processed or it reaches the root of the containment hierarchy.

For example, as shown in the Figure, Button is contained in the Panel which itself is contained within the Frame. When the mouse is clicked on Button, an event is generated which is first sent to the Button. If it is not handled by it then this event is forwarded to the Panel and if it cannot handle the event, it is further sent to the Frame. Frame being the root of the given hierarchy processes this event. So the event is forwarded up the containment hierarchy until it is handled by a component.

              Figure Java 1.0 Event Handling Mechanism

The major drawback in this approach is that events could be handled by the component that generated it or by the container of that component. Another problem is that events are frequently sent to those components that cannot process them, thus wasting a lot of CPU cycles.

Delegation Event Model

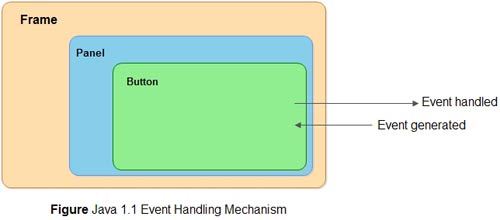
The advanced versions of Java ruled out the limitations of Java 1.0 event model. This model is referred to as the Delegation Event Model which defines a logical approach to handle events. It is based on the concept of source and listener. A source generates an event and sends it to one or more listeners. On receiving the event, listener processes the event and returns it. The notable feature of this model is that the source has a registered list of listeners which will receive the events as they occur. Only the listeners that have been registered actually receive the notification when a specific event is generated.

For example, as shown in Figure, when the mouse is clicked on Button, an event is generated. If the Button has a registered listener to handle the event, this event is sent to Button, processed and the output is returned to the user. However, if it has no registered listener the event will not be propagated upwards to Panel or Frame.

               Figure Java 1.1 Event Handling Mechanism

Now we discuss Event Source and Event Listener in detail.

• Event source: An event source is an object that generates a particular kind of event. An event is generated when the internal state of the event source is changed. A source may generate more than one type of event. Every source must register a list of listeners that are interested to receive the notifications regarding the type of event. Event source provides methods to add or remove listeners.

The general form of method to register (add) a listener is:

public void addTypeListener(TypeListener eventlistener)

Similarly, the general form of method to unregister (remove) a listener is:

public void removeTypeListener(TypeListener eventlistener)

where,

Type is the name of the event

eventlistener is a reference to the event listener

• Event listener: An event listener is an object which receives notification when an event occurs. As already mentioned, only registered listeners can receive notifications from sources about specific types of events. The role of event listener is to receive these notifications and process them.


Class Hierarchy for Applets

By Dinesh Thakur

The AWT allows us to use various graphical components. When we start writing any applet program we essentially import two packages namely – java.awt and java.applet.

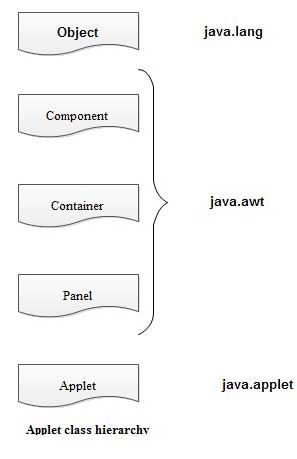
The java.applet package contains a class Applet which uses various interfaces such as AppletContext, AppletStub and AudioCIip. The applet class is an extension of Panel class belonging to java.awt package.

To create an user friendly graphical interface we need to place various components on GUI window. There is a Component class from java.awt package which derives several classes for components. These classed include Check box, Choice, List, buttons and so on. The Component class in java.awt is an abstract class.

The class hierarchy for Applets is as shown in Fig.

                       Applet class hierarchy

Drawing with Graphics Class

By Dinesh Thakur

The Graphics class provides different methods for drawing shapes such as lines, rectangles and ovals. Table shows the methods that are used to draw shapes. Each drawing method takes.

                                       Methods in the Graphics Class


Method

Description

public void drawLine( int x1, int y1, int x2, int y2 )

Draws a line between the point (xl, yl) and the point (x2, y2).

public void drawRect( int x, int y, int width, int height)

Draws a bordered rectangle of specified ‘width’ and ‘height’ starting at the point ‘x’ and ‘y’.

Public void fillRect(int x, int y, int width, int height)

Fills a rectangle of specified ‘width’ and ‘height’ starting from the position ‘x’ and ‘y’.

public void clearRect( int x, int y. int width, int height)

Draws a filled rectangle of specified ‘width’ and ‘height’ starting from the position ‘x’ and ‘y’ with the current background colour.

public void drawRoundRect( int x, int y,int width. int height, int arcWidth, int arcHeight )

Draws a rectangle with rounded comers with the specified ‘width’ and ‘height’ starting from the position ‘x’ and’y’. The shape of the rounded comers are specified by parameters ‘arcWidth’ and ‘arcHeight.

Pubic void fillRoundRect(int x, int y,int width, int height, int arcWidth. Int arcHeight )

Draws a rectangle with rounded comers with the specified ‘width’ and ‘height’ starting from the position ‘x’ and’y’. Rounded comers are specified with the ‘arcWidth’ and ‘arcHeight’.

Public void draw3DRect( int x, int y, int width, int height, boolean b )

Draws a three-dimensional rectangle with specified ‘width’ and ‘height’ starting from the position ‘x’ and ‘y’.

Public void fill3DRect( int x, int y, int width, int height, boolean b )

Draws a three-dimensional filled rectangle with specified ‘width’ and ‘height’ starting from the position ‘x’ and ‘y’.

public void drawOval( int X, int y, int width, int height)

Draws an oval with specified ‘width’ and ‘height’ starting with the location ‘x’ and ‘y’.

Public void fillOval(int x, int y, int width,int height)

Draws a filled oval with specified ‘width’ and ‘height’ starting with the location ‘x’ and ‘y’.


the width and height of the shape as parameters” These parameters should be non-negative” These methods do not return any value and instead draw the shapes with the current colour of the Graphics object.

What is Abstract Window Toolkit (AWT)?

By Dinesh Thakur

The Abstract Windowing Toolkit (AWT) is the first set of nontrivial, publicly available, basic objects with which to build Java programs, with the focus on graphical user interfaces, or GUls. The AWT was built by Sun’s JavaSoft unit and is provided free for anyone to use for any reason whatsoever, in binary form. There is some controversy as to whether the AWT in its present condition will survive, but it does have three things going for it:


• It is the first Java toolkit available,
• It has gained rapid acceptance, and
• JavaSoft is committed to it.

The Java Foundation Class (JFC) provides two frameworks for building GUI-based Applications Abstract Window Toolkit (AWT) and swings.

The AWT package can be used by importing java.awt.* as follows:

   import java.awt.*

The AWT has a set of Java classes that provide the standard set of user-interface elements (windows, menus, boxes, buttons, lists and so on). That is, AWT provides several facilities for drawing two-dimensional shapes, controlling colours and controlling fonts. Before using Java AWT classes, understanding the Java coordinate system is essential. By default, the top left comer of the component has coordinates (0,0). Here, the x-coordinate denotes the horizontal distance and the y-coordinate is the vertical distance from the upper left comer of the component, respectively. The applet’s width and height are 200 pixels each, in which the upper left comer is denoted by (0,0) and lower right comer is (200, 200).

Event Handlers An event is generated when an action occurs, such as a mouse click on a button or a carriage return (enter) in a text field. Events are handled by creating listener classes which implement listener interfaces. The standard listener interfaces are found in java.awt.event.

Layout Manager A layout manager is automatically associated with each container when it is created. Examples of this are BorderLayout and GridLayout.

The HTML APPLET Tag

By Dinesh Thakur

The APPLET tag of HTML is used to start an applet either from a web browser or an applet viewer. The HTML tag allows a Java applet to be embedded in an HTML document.

A number of optional attributes can be used to control an applet’s appearance, for example, the dimensions of the applet panel. Also, parameters can be independently defined which can be passed to the applet to control its behavior.

The complete syntax of the applet tag is given below:

<applet

code = “appletFile” -or- [object = “serializedApplet”]

width = “pixels”

height = “pixels” [codebase = “codebaseURL”]

[archive = “archiveList”]

[alt = “alternateText”]

[name = “appletlnstanceName”]

[align = “alignment”]

[vspace = “pixels”]

[hspace = “pixels”]

> 

[<param name = “appletAttribute1” value = “value”>]

[<param name = “appletAttribute2” value = “value”>]

….

….

[alternateHTML]

</applet>

Attributes in the applet tag.

The attributes code, width and height are mandatory and all other attributes are options, which are shown in brackets ([]). The attributes need not follow the order that was specified in the above syntax. The description of each attribute is given below:

codeThe name of the Java applet. Class file, which contains the compiled applet code. This name must be relative to the base URL of the Applet and cannot be an absolute URL. The extension in the file name is optional.

width This refers to the width of the applet panel specified in pixels in the browser window.

height This refers to the height of the applet panel specified in pixels in the browser window. The width and height attributes specify the applet’s, display area. This applet area does not include any windows or dialogue boxes that the applet shows.

Codebase This refers to the base URL of the applet. That is, the URL of the directory that contains the applet class file. If this attribute is not specified then the HTML document’s URL directory is taken as the CODEBASE.

archive There are one or more archive files containing Java classes and other resources that will be preloaded. The classes are loaded using an instance of the AppletClassLoader class with the given codebase. The archives in archivelist are separated by a comma (,).

alt This refers to text to be displayed if the browser understands the applet tag but cannot run Java applets.

name This refers to a name for the applet instance which makes it possible for applets to

communicate with each other on the same HTML page. The getApplet () method, which is defined in the AppletContext interface, can be used to get the applet instance using name.

align This refers to the alignment of the apple!. The possible attribute values are LEFT, RlGHT, TOP, BOTTOM, MIDDLE, BASELINE, TEXTTOP, ABSMIDDLE and ABSBOTTOM.

vspace This refers to the space, specified in number of pixels, used as a margin above and below the applet.

hspace This refers to the space, specified in number of pixels, used as a margin to the left and right of the applet.


param The param tag, specifies an applet parameter as a name-value pair. The name is the parameters name, value is. its value. The values of these parameters can be obtained using the getParameter () method.

alternateHTML This is ordinary HTML to be displayed in the absence of Java or if the browser does not understand the applet tag. This is different from the alt attribute which understands the· applet tag but cannot run, whereas the alternateHTML tag is provided when a browser does not support applets.

Passing parameters to applets

The applet tag helps to define the parameters that are to be passed to the applets. Programs illustrate the method of passing parameters to an applet. In this example the first parameter that is presented contains text whose location is specified by the other two parameters. Program is the HTML code for this.

Program HTML code for the applet program for passing parameters.

<! DOCTYPE HTML PUBLIC“-//W3C//DTD HTML4.0 Transitional//EN”>

<HTML>

<HEAD>

<TITLE>Example for Parameter passing to applet </TITLE>

</HEAD>                                                      

<BODY>

<H3>This is an example for passing parameters to Applet</H3> <p>

The parameters are<p>

text= Text Parameter <p>

x = 50 <p>

y = 50 <p>

<H5> THE TEXT PARAMETER WILL BE DISPLAYEDIN THE APPLETAT THE

X, Y LOCATION </H5>

<APPLETCODE = “ParamApplet.c1ass” WIDTH = 300 HEIGHT = 100>

<PARAMNAME = “text” VALUE = “Text Parameter”>

<PARAM NAME = “x” VALUE = “50”>

<PARAM NAME = “y” VALUE = “50”>

</APPLET>

</BODY>

</HTML>

After writing the HTML code let us write the applet program that will retrieve the parameters specified in the HTML tag by using the getParameter () method. This method has one argument, which specifies the name of the argument and returns the value of the argument in the form of a string. The Integer.parselnt () method is used to convert the parameters to the integer datatype from the string datatype.

Program passing parameters to an applet.


import java.applet*;

import java.awt.*;

import java.awt.event.*;

import java.net.*;

public class Para Applet extends Applet

{

    public void init (){}

    public void start (){}

    public void destroy (){}

    public void stop (){}

          public void paint (Graphics g)

          {

              String text=getParameter (“text”);

              g.drawString (text, 50, 50);

          }

}

Working with Applets

By Dinesh Thakur

Applets can be executed in two ways: from Browser or from Appletviewer. The JDK provides the Appletviewer utility.

Browsers allow many applets on a single page, whereas applet viewers show the applets in separate windows.

Program, named SampleApplet, demonstrates the life-cycle methods of applets:

Program: A demonstration of life-cycle methods of applets.

import java.applet*;

import java.awt.*;

import java.awt.event.*;

/*<APPLETcode = “SampleApplet” width=300 height=150> </APPLET>*/

public class SampleApplet extends Applet implements ActionListener

{

    Button b = new Button (“Click Me”);

    boolean flag = false;

    public void init ()

    {

         System.out.println (“init () is called”);

         add(b);

         b.addActionListener (this );

    }

     public void start ()

     {

         System.out.println (“start () is called”);

    }

     public void destroy ()

     {

         System.out.println(“destroy () is called”);

     }

     public void stop ()

     {

        System.out.println(“stop () is called”);

     }

     public void actionPerformed (ActionEvent ae)

    {

         flag = true;

         repaint ();

     }

     public void paint(Graphics g)

     {

          System.out.println (“paint () is called”);

          if (flag)

          g.drawString (”This is a simple Applet”,50,50);

     }

}

For executing the program using the AppletViewer or the web browser, first the program is to be compiled in the same way as the Java application program as shown below:

C:\>Javac SampleApplet.java

Running the applet using AppletViewer

AppletViewer is a program which provides a Java run-time environment for applets. It accepts a HTMLfile as the input and executes the <applet> reference, ignoring the HTML statements. Usually, AppletViewer is used to test Java applets.

To execute any applet program using AppletViewer the applet tag should be added in the

comment lines of the program. These comment lines will not be considered when the programs are compiled. The command AppletViewer <appletfile.java> is used to view the applet .To execute Program, we can invoke the same as follows:

c:\>appletviewer SampleApplet.java

The reader can thus execute Program. It is suggested as an exercise.

The drawstring () method draws the String ‘This is a sample applet’ on the applet panel, starting at the coordinate (50, 50). Note that the applet panel provides a graphical environment in which the drawing will paint rather than print. Usually, the panel is specified in terms of pixels in which the upper left comer is the origin (0, 0).

As mentioned earlier, applets interact with the user through AWT. In Program we have used one AWT component-button. Observe the SampleApplet class header:

public class SampleApplet extends Applet implements ActionListener

The ActionListener interface is implemented by a class to handle the events generated

by components such as buttons. The method actionPerformed () available in this interface is overridden so that some action is performed when the button is pressed. In Program, it can be observed that when the applet is first executed, the paint () method does not display anything on the applet window. This is because flag is set to false. When the button is pressed (observe the actionPerformed () method) the flag is set to true and repaint () method is called. This time since the flag is set to true, the repaint () method will display the string ‘This is a simple applet’.

In Program we use the System.out.println () method to print the sequence of the methods executed when the applet is running.

The output shown in the console is in the following:

init () is called;

start () is called;

paint () is called;

stop () is called;

start () is called;

paint () is called;

stop () is called;

destroy () is called;

When the applet program is first executed, three methods-init (), start (), paint () are executed. Later, if the applet window is minimized, the stop () method is executed. If the applet window is maximized again, the start () and the paint () methods will be executed simultaneously, When the applet window is closed, the stop () and the destroy () methods will be called simultaneously.

Running the applet using the web browser

The browsers that support applets include Netscape Navigator, Internet Explorer and Hot Java. The applet can be viewed from a web browser by writing the APPLET tag within the HTML code. To run the Program in the web browser, the following html code has to be written:

<html>

<head>

<title> A sample Applet</title >

</head>

<body>

<applet code=”SampleApplet” width=200 height=200>

</applet>

</body>

</html>

To run the applet, the browser, which could be the Internet Explorer for instance, has to be opened, the options File     Open have to be selected. Then, the applet code HTML file is opened by using the Browse button.

To show the difference between running the applet in the applet viewer and the web browser Program is modified a little to the form shown in Program:

Program An alternate way of running an applet.

import java.applet.*;

import java.awt. *;

public class SampleApplet extends Applet

{

     String msg = “”;

     public void init ()

     {

        msg = msg + “init ();”

     }

     public void start ()

     {

          msg = msg+ “start ();”

     }

     public void destroy ()

     {

          msg = msg+ “destroy ();”

     }

     public void stop ()

     {

        msg = msg+ “stop ();”

    }

    public void paint(Graphics g)

    {

         msg = msg+ “paint ();”

         g.drawString(msg,10,20);

    }

}

The button is removed and the life-cycle methods are displayed on the applet window instead of on the console. The difference between the output of the above applet when called using the AppletViewer and the web browser is in Figure.

The output of Program shows the applet with the sequence of the methods executed. When the applet program is first executed, the init (), start () and paint () methods are called.

When the web browser is minimized, the paint () method is called, and when it is maximized, paint () is called again. In the case of the applet viewer the stop (), start () and paint () methods are called when the applet is maximized. The same things happen when the applet viewer and the web browser are’ closed. That is, the stop () method and the destroy () method are called. When moving from the web page containing the applet to another web page and back, the start () method in the applet is called.

Java Applications Versus Java Applets

By Dinesh Thakur

Java programs consist of applications and applets. Java applications are stand-alone programs and typically executed using the Java interpreter. On the other hand, Java applets are executed in a web browser or in a special window known as the Appletviewer; however, the compilation stages of both are the same.

The structure of applets differs from that of application programs; for example applets do not have the main () method. Applets do not interact with the console operations (that is, I/O operations) like application programs do. Applets allow the user to interact through the AWT .

Applets differ from applications in the way they are executed. An application is started when its main () method is called. In the case of applets, an HTML file has to be created, which tells the browser what to load and how to run the applet. Java, however, allows a programmer to create software code that can function both as a Java application and as a Java applet using a single class file. Table illustrates the similarities and differences between Java applications and applets.


                   Table Similarities and differences between applications and applets.


Java applications

Java applets

These run on stand-alone systems.

These run in web pages

These run from the command line of a computer.

These are executed using a web browser.

Parameters to the application are given at the command prompt (for example, args [0], args [1] and so on )

Parameters to the applet are given in the HTML file.

In an application, the program starts at the main () method. The main () method runs throughout the application.    

In an applet, there is no main () method that is executed continuously throughout the life of an applet.

These have security restrictions.

These have security restrictions.

They support GUI features.

They support GUI features too. Java-compatible browsers provide capabilities for graphics, imaging, event handling and networking.   

These are compiled using the javac command.

These are compiled using the javac command also.

These are run by specifying the command prompt as follows: javaclassFileName  

These are run by specifying the URL in a web browser, which opens the HTML file, or run using the appletviewer by specifying at the command prompt: appletviewer htmlFileName

Java Example Image Size Increaser

By Dinesh Thakur

[Read more…] about Java Example Image Size Increaser

Java Example Event Image

By Dinesh Thakur

[Read more…] about Java Example Event Image

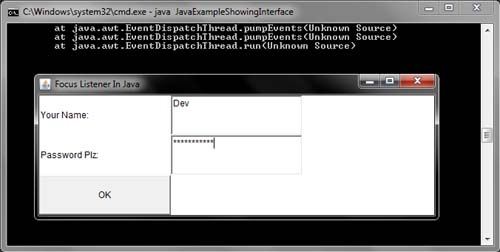
FocusListener in Java Example

By Dinesh Thakur

When a component receives focus, ie, is the element of the screen that is active FocusEvent type events occur. 

To make an object can listen to events FocusEvent FocusListener type must implement the interface, and it must be added as to the method FocusListener

public void addFocusListener(FocusListener fl)
The methods of this interface are:
public void focusGained(FocusEvent e)
public void foculsLost(FocusEvent e)

Given the existence of temporary changes in focus (for example when using scroll bars associated with a TextArea, Choice List or component) or permanent (when you use the “Tab” key to navigate between components interface), the method is useful below:


Method

Description

isTemporary()

Determines whether the event focus change is temporary or permanent.


import java.awt.Dimension; 
import java.awt.GridLayout;
import java.awt.Frame;
import java.awt.Label;
import java.awt.Color;
import java.awt.Button;
import java.awt.Panel;
import java.awt.TextField;
import java.awt.event.FocusEvent;
import java.awt.event.FocusListener;
import java.awt.event.WindowAdapter;
import java.awt.event.WindowEvent;
class JavaExampleShowingInterface extends Frame
  {
    private Label LblPass;
    private Label LblUsrNm;
    private TextField TxtNm;
    private TextField TxtPass;
    JavaExampleShowingInterface(String TTL)
     {
       setTitle(TTL);
       setLayout(new GridLayout(3,3));
       setSize(new Dimension(550,200));
       addWindowListener(new WindowAdapter()
        {
           public void windowClosing(WindowEvent ee)
             {
                System.exit(0);
             }
        });
               TxtNm=new TextField(30);
               TxtNm.addFocusListener(new FocusList());
               add(new Label("Your Name:")); 
               add(TxtNm);
               LblPass=new Label();
               add(LblPass);
               TxtPass=new TextField(30);
               TxtPass.setEchoChar('*');
               TxtPass.addFocusListener(new FocusList());
               add(new Label("Password Plz:"));
               add(TxtPass);
               LblPass=new Label();
               add(LblPass); 
               add(new Button("OK"));
               setVisible(true);
               validate();
    }
          class FocusList implements FocusListener
            {
               public void focusGained(FocusEvent ee){}
                    public void focusLost(FocusEvent ee)
                  {
                         TextField Txt=(TextField)ee.getSource();
                          if(Txt.getText().equals("") && Txt==TxtNm)
                        {
                               LblUsrNm.setForeground(Color.RED);
                               LblUsrNm.setText("User name can not be blank.");
                            }
                               else
                               LblUsrNm.setText("");
                               if(Txt.getText().equals("") && Txt==TxtPass)
                              {
                                     LblPass.setForeground(Color.RED);   
                                     LblPass.setText("Password can not be blank.");
                                 }
                                    else
                                    LblPass.setText("");
                      }
            }
                     public static void main(String[] aa)
                    {
                           new JavaExampleShowingInterface("Focus Listener In Java");
                        }
 }


FocusListener in Java Example

TextField in Java Example

By Dinesh Thakur

The AWT provides java.awt.TextField class through the component box input text or just text box. This component enables the editing and input a single line of text in a very convenient way for the user.Hence, this control is called editable control. Any data entered through this component is treated primarily as text, should be explicitly converted to another type if desired.

The TextField control is a sub-class of the TextComponent class. It can be created using the following constructors:

TextField text=new TextField( );
TextField text=new TextField(int numberofchar);
TextField text=new TextField(String str);
TextField text=new TextField(String str, int numberolchar);

The first constructor creates the default TextField. The second creates a TextField of size specified by the number of characters. The third type creates a text field with the default constructor. The text field control has the methods getText() and set Text(String str) for getting and setting the values in the text field. The text field can be made editable or non-editable by using the following methods:
setEditable(Boolean edit);
isEditable()
The isEditable() method returns the boolean value true if the text field is editable and the value false if the text field is non-editable. Another important characteristic of the text field is that the echo character can be set, while entering password-like values. To set echo characters the following method is called:
void setEchoCharacter(char ch)
The echo character can be obtained and it can be checked it the echo character has been set using the following methods:
getEchoCharacter();
boolean echoCharlsSet();
Since text field also generates the ActionEvent, the ActionListener interface can be used to handle any type of action performed in the text field. The selected text within the text field can be obtained by using the TextField Interface.

The java.awt.TextField class contains, among others, the following constructors and methods:
Following is a table that lists some of the methods of this class:

Method

Description

TextField()

Constructs new text box with no content.

TextField(String)

Constructs new text box with content given.

TextField(String, int)

Constructs new text box with content and given the specified width in columns.

addActionListener(ActionListener)

Registers a listener class (processor events) ActionListener for the TextField.

echoCharIsSet()

Verifies that character echo is triggered.

getColumns()

Gets the current number of columns.

getEchoChar()

Obtain current character echo.

SetColumns(int)


setEchoChar(char)               

specifies the number of columns.


Specifies character echo.


import java.awt.*; 
import java.awt.event.*;
public class TextFieldJavaExample extends Frame
{
       TextField textfield;
       TextFieldJavaExample()
       {
           setLayout(new FlowLayout());
           textfield = new TextField("Hello Java", 12);
           add(textfield);
           addWindowListener(new WindowAdapter(){
           public void windowClosing(WindowEvent we)
           {
              System.exit(0);
           }
           });
       }
       public static void main(String argc[])
             {
                    Frame frame = new TextFieldJavaExample();
                    frame.setTitle(" TextField in Java Example");
                    frame.setSize(320, 200);
                    frame.setVisible(true);
                   
             }
}

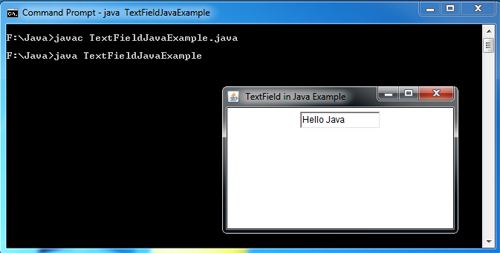
TextField in Java Example

Java MediaTracker Example

By Dinesh Thakur

The java.awt.MediaTracker class is a useful class.It can monitor the progress of any number of images, so you can expect to all images are loaded or to be loaded only specific. Furthermore, can check for errors. The constructor is: public MediaTracker (Component comp) This constructor creates a new MediaTracker for pictures to be displayed in the variable comp, but really this parameter is not particularly important. 

To upload images, a MediaTracker object provides the method following :
public void addImage ( Image image , int id)
This method adds the thumbnail image to the image list to load the object MediaTracker receiving the message . The id variable is used as the number of image identification when using other methods concerning this class.

import java.awt.*; 
import java.applet.*;
public class JavaExampleMediaTrackerInJavaApplet extends Applet
{
    Image Img;
    public void init()
     {
        MediaTracker Trckr = new MediaTracker(this);
        Img = getImage(getDocumentBase(),"Koala.jpg");
        Trckr.addImage(Img,0);
        try
           {
              Trckr.waitForAll();
           }
            catch (InterruptedException e1) { }
     }
            public void paint(Graphics gr)
             {
               gr.drawImage(Img, 10, 10, this);
             }
}
/*<APPLET CODE=JavaExampleMediaTrackerInJavaApplet.class WIDTH=600 HEIGHT=150> </APPLET>*/

Java MediaTracker Example

DoubleList Java Example

By Dinesh Thakur

[Read more…] about DoubleList Java Example

Draw Image and ImageObserver in Java Applet

By Dinesh Thakur

 The Image class is used to load and display images. To load an image the getimage ()method of the Image class is used and to display the image the draw Image ()method of the Graphics class is used.

The general form of the getImage () method is

Image getimage(URL pathname, String filename)

Image getimage(URL pathname)

where,

pathname is the address of the image file on web. When the image file and the source file are in the same directory, getCodeBase ()method is used as first parameter to the method.

filename is the name of the image file

The general form of the drawimage ()method is

boolean drawimage(Image image, int startx, int starty,

int width, int height, ImageObserver img_obj)

where,

image is the image to be loaded in the applet.

startx is the pixels space from the left comer of the screen.

starty is the pixels space from the upper comer of the screen.

width is the width of the image.

height is the height of the image.

img_obj is object of the class that implements ImageObserver interface.

import java.awt.*; 
import java.applet.*;
/*<APPLET CODE=JavaExampleIObserverInApplet.class WIDTH=610 HEIGHT=160></APPLET>*/
public class JavaExampleIObserverInApplet extends Applet
 {
    Image img;
    public void init()
    {
        img = getImage(getDocumentBase(),"Koala.jpg");
    }
        public void paint(Graphics gr)
         {
           gr.drawImage(img,10,10,this);
         }
           public boolean imageUpdate(Image img1,int flags, int xAxis, int yAxis, int width, int height)
          {
            if ((flags & ALLBITS) != 0)
               {
                  repaint(xAxis,yAxis,width,height);      
                } 
                  return (flags & ALLBITS) == 0;
          }
 }

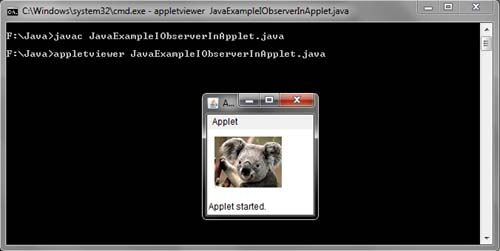
Draw Image and ImageObserver in Java Applet

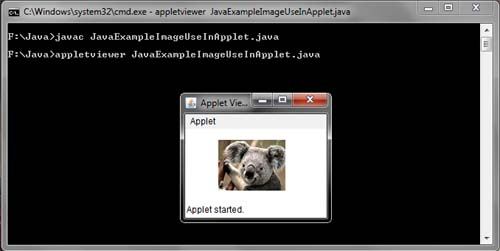
Image Use in Applet Java Example

By Dinesh Thakur

Usually java.awt.Image class can be used to display GIF (Graphics Interchange Format) or JPEG (Joint Photographic Experts Group.) One way to get a image is using the getImage method available in the Toolkit object that encapsulates  specific methods of the platform used, as below:

Yet this class introduces some methods of interest, as listed below:

Method

Description

flush ()

Releases all resources used by a picture.

getGraphics ()

obtained a graphic context for off-screen rendering.

getHeight (ImageObserver)

obtained the image height is known.

getWidth (ImageObserver)

obtained the width of the image is known.

import java.awt.*; 
import java.applet.*;
public class JavaExampleImageUseInApplet extends Applet
{
    Image img;
    public void init()
    {
        img = getImage(getDocumentBase(),"Koala.jpg");
    }
        public void paint(Graphics gr)
         {
           gr.drawImage(img,45,15,this);
         }
}
/*<APPLET CODE=JavaExampleImageUseInApplet.class WIDTH=520 HEIGHT=170 ></APPLET>*/

Image Use in Applet Java Example

HashTable Java Example

By Dinesh Thakur

[Read more…] about HashTable Java Example

HashSet Java Example

By Dinesh Thakur

[Read more…] about HashSet Java Example

HashMap Java Example

By Dinesh Thakur

[Read more…] about HashMap Java Example

GrayScale in Java Example

By Dinesh Thakur

[Read more…] about GrayScale in Java Example

Find in Java Applet Example

By Dinesh Thakur

[Read more…] about Find in Java Applet Example

Emboss Java Applet Example

By Dinesh Thakur

[Read more…] about Emboss Java Applet Example

PixelGrabber in Java Awt Example

By Dinesh Thakur

[Read more…] about PixelGrabber in Java Awt Example

Check Images in Java Applet Example

By Dinesh Thakur

[Read more…] about Check Images in Java Applet Example

Java AWT Canvas Example

By Dinesh Thakur

The java.awt.Canvas component is a “web” rectangular area for supporting drawing operations defined by the application as well as monitor input events performed by the user. This component does not encapsulate another feature except the support for rendering, providing a base class for creating new components.

This object can be used for double buffering techniques to avoid the effects of blinking, first painting on canvas and then adding to the canvas once already built screen.

Once we have drawn only the Canvas add any other ingredient. It is quite usual to derive a class of Canvas to redefine the functions we want to draw shapes and then add this new component to the relevant panel or window. The method that will schedule what we always draw.
public void paint(Graphics g)
This class provides a constructor and two methods of which we selected:

Method

Description

Canvas ()

Constructs a new Canvas object.

paint (Graphics)

Renders the Canvas object through its graphics context.

[Read more…] about Java AWT Canvas Example

Next Page »

Primary Sidebar

Java Tutorials

Java Tutorials

  • Java - Home
  • Java - IDE
  • Java - Features
  • Java - History
  • Java - this Keyword
  • Java - Tokens
  • Java - Jump Statements
  • Java - Control Statements
  • Java - Literals
  • Java - Data Types
  • Java - Type Casting
  • Java - Constant
  • Java - Differences
  • Java - Keyword
  • Java - Static Keyword
  • Java - Variable Scope
  • Java - Identifiers
  • Java - Nested For Loop
  • Java - Vector
  • Java - Type Conversion Vs Casting
  • Java - Access Protection
  • Java - Implicit Type Conversion
  • Java - Type Casting
  • Java - Call by Value Vs Reference
  • Java - Collections
  • Java - Garbage Collection
  • Java - Scanner Class
  • Java - this Keyword
  • Java - Final Keyword
  • Java - Access Modifiers
  • Java - Design Patterns in Java

OOPS Concepts

  • Java - OOPS Concepts
  • Java - Characteristics of OOP
  • Java - OOPS Benefits
  • Java - Procedural Vs OOP's
  • Java - Polymorphism
  • Java - Encapsulation
  • Java - Multithreading
  • Java - Serialization

Java Operator & Types

  • Java - Operator
  • Java - Logical Operators
  • Java - Conditional Operator
  • Java - Assignment Operator
  • Java - Shift Operators
  • Java - Bitwise Complement Operator

Java Constructor & Types

  • Java - Constructor
  • Java - Copy Constructor
  • Java - String Constructors
  • Java - Parameterized Constructor

Java Array

  • Java - Array
  • Java - Accessing Array Elements
  • Java - ArrayList
  • Java - Passing Arrays to Methods
  • Java - Wrapper Class
  • Java - Singleton Class
  • Java - Access Specifiers
  • Java - Substring

Java Inheritance & Interfaces

  • Java - Inheritance
  • Java - Multilevel Inheritance
  • Java - Single Inheritance
  • Java - Abstract Class
  • Java - Abstraction
  • Java - Interfaces
  • Java - Extending Interfaces
  • Java - Method Overriding
  • Java - Method Overloading
  • Java - Super Keyword
  • Java - Multiple Inheritance

Exception Handling Tutorials

  • Java - Exception Handling
  • Java - Exception-Handling Advantages
  • Java - Final, Finally and Finalize

Data Structures

  • Java - Data Structures
  • Java - Bubble Sort

Advance Java

  • Java - Applet Life Cycle
  • Java - Applet Explaination
  • Java - Thread Model
  • Java - RMI Architecture
  • Java - Applet
  • Java - Swing Features
  • Java - Choice and list Control
  • Java - JFrame with Multiple JPanels
  • Java - Java Adapter Classes
  • Java - AWT Vs Swing
  • Java - Checkbox
  • Java - Byte Stream Classes
  • Java - Character Stream Classes
  • Java - Change Color of Applet
  • Java - Passing Parameters
  • Java - Html Applet Tag
  • Java - JComboBox
  • Java - CardLayout
  • Java - Keyboard Events
  • Java - Applet Run From CLI
  • Java - Applet Update Method
  • Java - Applet Display Methods
  • Java - Event Handling
  • Java - Scrollbar
  • Java - JFrame ContentPane Layout
  • Java - Class Rectangle
  • Java - Event Handling Model

Java programs

  • Java - Armstrong Number
  • Java - Program Structure
  • Java - Java Programs Types
  • Java - Font Class
  • Java - repaint()
  • Java - Thread Priority
  • Java - 1D Array
  • Java - 3x3 Matrix
  • Java - drawline()
  • Java - Prime Number Program
  • Java - Copy Data
  • Java - Calculate Area of Rectangle
  • Java - Strong Number Program
  • Java - Swap Elements of an Array
  • Java - Parameterized Constructor
  • Java - ActionListener
  • Java - Print Number
  • Java - Find Average Program
  • Java - Simple and Compound Interest
  • Java - Area of Rectangle
  • Java - Default Constructor Program
  • Java - Single Inheritance Program
  • Java - Array of Objects
  • Java - Passing 2D Array
  • Java - Compute the Bill
  • Java - BufferedReader Example
  • Java - Sum of First N Number
  • Java - Check Number
  • Java - Sum of Two 3x3 Matrices
  • Java - Calculate Circumference
  • Java - Perfect Number Program
  • Java - Factorial Program
  • Java - Reverse a String

Other Links

  • Java - PDF Version

Footer

Basic Course

  • Computer Fundamental
  • Computer Networking
  • Operating System
  • Database System
  • Computer Graphics
  • Management System
  • Software Engineering
  • Digital Electronics
  • Electronic Commerce
  • Compiler Design
  • Troubleshooting

Programming

  • Java Programming
  • Structured Query (SQL)
  • C Programming
  • C++ Programming
  • Visual Basic
  • Data Structures
  • Struts 2
  • Java Servlet
  • C# Programming
  • Basic Terms
  • Interviews

World Wide Web

  • Internet
  • Java Script
  • HTML Language
  • Cascading Style Sheet
  • Java Server Pages
  • Wordpress
  • PHP
  • Python Tutorial
  • AngularJS
  • Troubleshooting

 About Us |  Contact Us |  FAQ

Dinesh Thakur is a Technology Columinist and founder of Computer Notes.

Copyright © 2025. All Rights Reserved.

APPLY FOR ONLINE JOB IN BIGGEST CRYPTO COMPANIES
APPLY NOW