Whether you’re looking to replace a failed drive or upgrading to get more capacity and faster access times, installing a hard drive is simple. Just follow these steps to insert, secure, and power a new HDD in your desktop PC.
We’ll be covering the following topics in this tutorial:
Crack The Case
First, seek out the instruction manual that came with your PC and look for the particulars of how to remove the side panels. Next, turn off the PC and unplug it. For most desktop PC cases, you can remove the left side panel (when facing the front panel of the PC) to open it. Inside the case, the hard drive cage is typically located on the right side, near the front panel. Take steps to reduce any static charges: Consider using an anti-static wristband or mat.
HDD Mounts
Modern PC cases can have a variety of HDD mounts. There may be one or more stationary or removable cages that hold multiple bare 3.5-inch HDDs, or you may see removable rails or trays that screw or snap into place on each HDD. If you already have an HDD installed, look at it closely to see how it was mounted; chances are you’ll want to install the new drive very close to the existing drive and using the same method. 
If you’re replacing the existing drive, start by disconnecting the power and data cables from the drive, making sure to press the metal locking tab (if one is present) on your SATA (Serial Advanced Technology Attachment) cable connector. Next, remove the screws or disengage the tool-free locking mechanism; you may need to remove both side panels to access all the screws. If the drive uses rails or a tray, you may need to pinch the protruding tabs on either side of the HDD to move it. Slide the drive out of the HDD bay and install the new one in its place. If you’re installing an additional drive, locate an empty HDD bay, slide the new drive into place, and then secure it using the screws. If your case uses trays or rails, install the new HDD into the tray or attach the rails and then slide the drive in until it snaps into place.
Power & Data
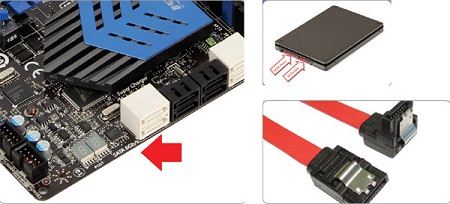
Connect the power cable required by the drive (most commonly a long L-shaped SATA power connector), followed by the SATA data cable, which looks like a short L shaped connector. Your power supply (the box that feeds power to the rest of the system) should have several SATA power connectors available. If your HDD has two power connectors, only supply power to one of them. 
If you’re replacing an existing drive, you can reattach the side panels, plug in the system and boot up. If you’re adding a new drive, connect the SATA data cable to one of the fastest available SATA ports on your motherboard. Most new PCs provide you with both 6 gigabits per second (also known as SATA 3) and 3 gigabits per second (also known as SATA 2) SATA ports. To determine which ports operate at the fastest speed, look at the labels on the motherboard or consult your motherboard or system manual.
Install An SSD
The biggest difference between installing an HDD and an SSD is the mounting method. If you own a newer PC, then it will likely have dedicated mounts for 2.5-inch drives. If not, you’ll need an adapter tray or an alternate way to secure the SSD. One way is to use a few strips of hook-and-loop fastener tape on a flat surface of the case, such as on the bottom panel, and on the bottom of the SSD itself. Because SSDs are solid-state and lightweight, vibration is not likely to be a problem. Then just connect power and data cables to complete the installation.
 Dinesh Thakur holds an B.C.A, MCDBA, MCSD certifications. Dinesh authors the hugely popular