In this Example we Reading amount, Year and interest in the class Scanner becomes analogous to reading string. In this example, the three numbers are read from the console, and then perform Simple Interest,Compound Interest operations and results printed on the screen in formatted output. [Read more…] about Write a java program to calculate the simple and compound interest using Scanner class.
Write a java program to get the input through the keyboard using scanner class.
In this Example we Reading the numbers and string in the class Scanner becomes analogous to reading string. In this example, the two numbers are read from the console, results printed on the screen formatted output. [Read more…] about Write a java program to get the input through the keyboard using scanner class.
Primitive Data Types in Java | Java Primitive Types
Java’s built-in data types called primitive types. The java primitive types are int, byte, short, long, float, double, char, and boolean. A variable of any of these data types is called a primitive variable. We explain primitive data types in more detail as follows: [Read more…] about Primitive Data Types in Java | Java Primitive Types
Type Wrapper in java
It is better to have all numerical, strings and characters in terms of objects so to avail the facility of methods supplied with those objects. In that case, even if we want to perform any arithmetical operation, we do it with the help of methods instead of using arithmetical operators. But by this approach, performance decreases because method calls are relatively expensive. [Read more…] about Type Wrapper in java
Java Operators – Explain Operator in Java
Operator is a symbol that represents some operation that can be performed on data. The operators are applied to operands (onto which processing is desired). These operands can be literals, variables etc. The operators supported by Java are as follows: [Read more…] about Java Operators – Explain Operator in Java
Write a Java program for triangle of asterisks with maximum length of user input
import java.util.Scanner;

     public class ScanTri
 {
         public static void main (String[] args)
     {
             System.out.println("Enter the Size of a triangle, an integer from 1 to 50 please.");

             Scanner scan = new Scanner(System.in);
             int min, max;
             int tot = scan.nextInt();

             for(min = 0; min <= tot; min++)
           {
                 for(max = 0; max < min; max++)
                {
                     System.out.print("*");
                 }
                 System.out.println();
             }
             for(min = tot-1; min >= 0; min--)
            {
                 for(max = min-1; max >= 0; max--)
                {
                     System.out.print("*");
                 }
                 System.out.println();
             }

         }

     }
One dimensional array – Java Examples
Perhaps one of the most important of all concepts that you need to learn in order to be effective is the array. Until now, we have looked at variables that hold just one value – the ints hold one number and the strings hold one text string. Arrays are used when we want to hold two or more values, perhaps a list. Arrays can be thought as columns in a spreadsheet – a spreadsheet can have one or it can have many columns.
An Array is a (fixed length) data structures used to store multiple data elements, that share a common name with the same data type. Array is a predefined class present in java.lang.package. It is a final class which can’t be inherited. The memory allocated to an array is consecutive. Each data item is an element of the array.
All the elements of an array are under one variable name. Its position accesses every data element of an array, and an integer value indicates that position that starts from 0 (zero) called index or subscript and go up for each position that has a value. The array size is fixed and cannot change at runtime of the program. Setting up an array requires that you inform Java what type of data is being stored in it – strings, Booleans, integers, and so on. Then you need to tell Java the number of positions in the array and do this to set them up:
int[] aryNums;
In Java, arrays can be of either type, primitive data types or references types. In primitive data type array, all elements are of a specific primitive data type. In references type array all elements are of specific reference type. There is only one way to reference the items: by using a subscript to indicate which element number to access. The number used to reference the specific element of an array is called the component.
A primitive type variable,such as int, holds a value. A reference type variable, such as an array, holds a memory address where the value is stored. In other words, array names contain references, as do all Java object names.
We can define an array name rollno to represent a set of roll no of a group of students — a particular value indicated by a number called index number. An index number is present in brackets after the array name.

To create an One dimensional array, you need to perform three steps:
Declaration of an One dimensional array
We can declare an array in java using subscript operator. The general form is
datatype var_name[];
is equivalent to
datatype[] var_name[];
Here, datatype is valid java datatype and var_name is the name of the array.
Example
int number[];
int[] number;
Create memory space
As defined earlier array length is fixed at its creation time and cannot be changed, i.e., using new operator an array can create for a definite number of elements of a homogeneous type. The constructing statement of array return reference value of resulting array and that assigned to the corresponding type array variable. The general form is:
array_name = new datatype[size];
Example
number = new int[10];
avg = new float[10];
It is also possible to combine the declaration and creation into one.
The general form is
datatype arrayname[] = new datatype [size];
Example
int number[] = new int[10];
float avg[] = new float[10];
<array-size> can be minimum 0, because Java support zero-length arrays constructions. But it can never be negative, otherwise it will throw NegativeArraySizeException. The length of constructed array will be the <array-size> given at the creation time. Later you can find the length of an array using <array-name>.length.
Initialization of One dimensional array
We can store values at the time of declaration. The compiler allocates the required space depending upon the list of values. The general form is:
datatype array_name[] = {list of values};
Example of One dimensional array
class arraynote {
public static void main(String args[]){
int days[]={30,28,29,31,30};
System.out.println(“January has “+days[3]+” days”);
}
}
class ArrayExample {
public static void main(String args[]){
int days[]=newint[5];
days[0]=28; days[1]=31; days[2]=30; days[3]=31; days[4]=30;
System.out.println(“January has “+days[1]+” days”);
}
}
class arraynote {
public static void main(String args[]){
double arraynote[] = new double[3];
arraynote [0] = 22.58;
arraynote [1] = 60.48;
arraynote [2] = 32.58;
System.out.println(arraynote[0]);
System.out.println(arraynote[1]);
System.out.println(arraynote[2]);
}
}
Representation of array in memory
• In java when the array is declared it captures a chunk of memory from the stack.
• Array is constructed at the run time.At the construction time by specifying the size of the array through new operator garbage collector allocates consecutive memory location from the heap.
• In java the compiler implicitly calls the new operator to allocates memory from heap for creation of an array without using new operator.
How to access array elements?
To access elements of an array, there is one array expression with a specific format that contains an array reference followed by an index number. An expression can calculate an index number, that must lie between integers 0 (zero) to n-1 (n is the length of the array).
At run time array accesses are checked which is an attempt to check whether an index is less than zero or greater than or equal to n (n is the length of the array) then ArraylndexOutOfBoundsException thrown.
Array index must be int value, but it can be short, byte, or char because they are implicitly converted to unary numeric value and become int values. A long index value generates a compile-time error.
For Example:
int an_Array = {1, 2, 3, 4, 5, 6, 7, 8 ,9}; //One dimensional array
for(int i=0; i<10;i++)
System.out.println(anArray[i]); //Accessing ith index value.
int matrix[][] = {{1, 2, 3}, {4, 5, 6}, {7, 8, 9}};
//Two dimensional array
for(int i=0; i<3; i++) {
for(int j=0; j<3; j++)
System.out.print(matrix[i][j]);
System.out.println();
}
What are Comments in Java? – Definition
When you create new projects, you should see that there is quite a lot of text that is greyed-out and contains slashes and asterisks. These are called comments and, when you run your program, the compiler will ignore them. Comments are usually non executable statements which are meant for the programmers own convenience. [Read more…] about What are Comments in Java? – Definition
Types of Java Program
Java program has two types. They are: [Read more…] about Types of Java Program
How to compiling and running a Java program
The first step of compiling and running a Java program is to write the text of your program in a document and save it on the hard drive. This document is called a source file, and you must name it with a .java extension. Next, compile this program using a Java compiler. The compiler checks the program for errors and, if no errors are found, it generates a new document containing Java bytecode. This document is called a class file, and its name ends with a .class extension. [Read more…] about How to compiling and running a Java program
How to JProgressBar Control using in Swing.
Progress indicators or progress bars are the new controls that give the users some indications of the progress of an operation. When we call JProgressBar, we can set the maximum and minimum value for the progress bar.
A JProgressBar is a Swing component that indicates progress. A ProgressMonitor is a dialog box that contains a progress bar. A ProgressMonitorinputStream displays a progress monitor dialog box while the stream is read. A progress bar is a simple component just a rectangle that is partially filled with color to indicate the progress of an operation. By default, progress is indicated by a string “n%”.
You construct a progress bar much as you construct a slider, by supplying the minimum and maximum value and an optional orientation:
progressBar = new JProgressBar(O, 1000);
progressBar = new JProgressBar(SwingConstants.VERTICAL, 0, 1000);
A progress bar is a simple component that can be placed inside a window. In contrast, a ProgressMonitor is a complete dialog box that contains a progress bar (see Fig below). The dialog box contains a Cancel button. If you click it, the monitor dialog box is closed.
The example below shows a simple application for creating a progress bar
import java.awt.*;
 import javax.swing.*;
 import java.awt.event.*;
 class ProgressBar extends JFrame
 {
                        JProgressBar current;
                        JTextArea ta;
                         int num = 0;
                         public ProgressBar()
                 {
                         Container pane=getContentPane();
                         ta=new JTextArea("");
                         pane.setLayout(new GridLayout());
                        current = new JProgressBar(0, 100);
                        current.setValue(0);
                        current.setStringPainted(true);
                        pane.add(current);
                        pane.add(ta);
                 }
                           public void iterate()
                     {
                             while (num <= 100)
                                    {
                                         current.setValue(num);
                                             try
                                             {
                                                 Thread.sleep(500);
                                             }
                                                  catch (InterruptedException e) { }
                                                  num += 10;
                                                  if (num>100)
                                                      {
                                                           break;
                                                       }
                                                 else
                                                   ta.setText(num+"%completed");
                                      }
                       }
             public static void main(String[] args)
            {
                     ProgressBar pb = new ProgressBar();
                     pb.pack() ;
                     pb.setVisible(true);
                     pb.iterate ( );
             }
 }

How to LISTS Control using in Swing.
Lists are supported in Swings by the JList class. It is a very popular control as it allows the user to present a list of items in an easier and efficient manner. It also allows hiding the long list of items by making the lists scrollable. JList has been inherited from a long list of classes.
Table below shows the constructors of the JList class:

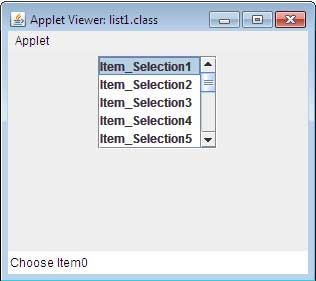
The simple example for creating a list using Swings that displays 15 items and reports which ones the user clicks is illustrated below.
import java.awt.*;
import javax.swing.*;
import javax.swing.event.*;
/*<APPLET code=list1.class WIDTH=300 HEIGHT=200> </APPLET>*/
public class list1 extends JApplet implements ListSelectionListener
{
    JList jlist;
    public void init()
      {
          Container c= getContentPane();
          String[] str=new String[15];
          for(int i=0;i<15;i++)
               {
                   str[i]="Item_Selection" +(i+1);
               }
                   jlist = new JList(str);
                   JScrollPane scp= new JScrollPane(jlist);
                   jlist.setVisibleRowCount(5);
                   jlist.setSelectionMode(ListSelectionModel.SINGLE_SELECTION);
                   jlist.addListSelectionListener(this);
                   c.setLayout(new FlowLayout());
                   c.add(scp);
       }
             public void valueChanged(ListSelectionEvent lse)
             {
                 String st="Choose Item";
                 st+=jlist.getSelectedIndex();
                 showStatus(st);
             }
}

The output for the same would look like:
How to Passing Parameters to Applets.
Java allows users to pass user-defined parameters to an applet with the help of <PARAM>tags. The <PARAM>tag has a NAME attribute which defines the name of the parameter and a VALUE attribute which specifies the value of the parameter. In the applet source code, the applet can refer to the parameter by its NAME to find its value. The syntax of the <PARAM>tag is:
<APPLET>
<PARAMNAME=parameter1_name VALUE=parameter1_value>
<PARAMNAME=parameter2_name VALUE=parameter2_value>
<PARAMNAME=parametern_name VALUE=parametern_value>
</APPLET>
For example, consider the following statements to set the text attribute of applet to This is an example of Parameter! ! !
<APPLET>
<PARAMNAME=text VALUE=This is an example of Parameter!!!>
</APPLET>
Note that the <PARAM>tags must be included between the <APPLET> and</ APPLET> tags. The init () method in the applet retrieves user-defined values of the parameters defined in the <PARAM>tags by using the get Parameter () method. This method accepts one string argument that holds the name of the parameter and returns a string which contains the value of that parameter. Since it returns String object, any data type other than String must be converted into its corresponding data type before it can be used.
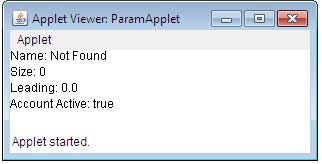
import java.awt.*;
import java.applet.*;
/*
<applet code="ParamApplet" width=300 height=80>
<paramname=fontName value=Courier>
<param name=fontSize value=14>
<param name=leading value=2>
<param name=accountEnabled value=true>
</applet>
*/
public class ParamApplet extends Applet
{
         String name;
         int size;
         float lead;
         boolean active;
         public void start()
        {
              String pa;
              name = getParameter("Name");
              if(name == null)
              name = "Not Found";
              pa = getParameter("Size");
              try
                {
                   if(pa != null)
                      size = Integer.parseInt(pa);
                   else
                      size = 0;
                }
                  catch(NumberFormatException e)
                       {
                          size = -1;
                       }
                          pa = getParameter("lead");
                     try
                       {
                         if(pa != null)
                           lead = Float.valueOf(pa).floatValue();
                         else
                           lead = 0;
                        }
                     catch(NumberFormatException e)
                          {
                            lead = -1;
                          }
                            pa = getParameter("AccountEnabled");
                            if(pa != null)
                            active = Boolean.valueOf(pa).booleanValue();
         }
        public void paint (Graphics g)
        {
           g.drawString("Name: " + name, 0, 10);
           g.drawString("Size: " + size, 0, 26);
           g.drawString("Leading: " + lead, 0, 42);
           g.drawString("Account Active: " + active, 0, 58);
        }
}
How can output a message on status window.
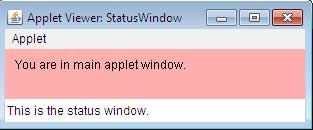
An applet can output a message to the status window of the browser or applet viewer on which it is running. For this, it makes a call to showStatus( ) with the string that we want to be displayed. The status window is a place where the user can give feedback about what is occurring in the applet, suggest options, or report some types of errors. The status window also makes an excellent debugging aid, because it gives an easy way to output information about the applet. The applet below shows the use of showStatus( ):
import java.awt.*;
 import java.applet.*;
 /*
 <applet code="StatusWindow" width=300 height=50> </applet>
 */
 public class StatusWindow extends Applet
 {
            public void init()
       {
            setBackground(Color.pink);
       }
            public void paint (Graphics g)
        {
           g.drawString("You are in main applet window.", 10, 20);
           showStatus("This is the status window.");
        }
 }
The output of the above Applet code is as follows:
What is Repainting method in java?
One of the important architectural constraints that have been imposed on an applet is that it must quickly return control to the AWT run-time system. It cannot create a loop inside paint( ). This would prevent control from passing back to the AWT. Whenever your applet needs to update the information displayed in its window, it simply calls repaint( ). The repaint( ) method is defined by the AWT that causes AWT run-time system to execute a call to your applet’s update() method, which in turn calls paint(). The AWT will then execute a call to paint( ) that will display the stored information. The repaint( ) method has four forms. The simplest version of repaint( ) is:
void repaint ( )
This causes the entire window to be repainted. Other versions that will cause repaint are:
void repaint(int left, int top, int width, int height)
If your system is slow or busy, update( ) might not be called immediately. If multiple calls have been made to AWT within a short period of time, then update( ) is not called very frequently. This can be a problem in many situations in which a consistent update time is necessary. One solution to this problem is to use the following forms of repaint( ):
void repaint (long maxDelay)
void repaint (long maxDelay, int x, int y, int width, int height)
Here, maxDelay specifies the maximum number of milliseconds that can elapse before update( ) is called. If the time elapses before update( ) can be called, it isn’t called. It is possible for a method other than paint( ) or update( ) to output to an applet’s window. To do so, it must obtain a graphics context by calling getGraphics( ) and then use this context to output to the window. For most applications, it is better and easier to route window output through paint( ) and to call repaint( ) when the contents of the window change .
What are the Applet Display Methods?
Applets are displayed in a window and they use the AWT to perform input and output functions. To output a string to an applet, use drawString( ), which is a member of the Graphics class. Typically, it is called from within either update() or paint( ). It has the following general form:
void drawString(String message, int x, int y)
Here, message is the string to be output beginning at x, y. In a Java window, the upper-left corner is location 0, 0. The drawString( ) method will not recognize newline characters. If we want to start a line of text on another line, we must do it manually, specifying the X,Y location where we want the line to begin.
To set the background color of an applet’s window, we use setBackground( ). To set the foreground color, we use setForeground(). These methods are defined by Component, and have the general forms:
void setBackground(Color newColor)
void setForeground(Color newColor)
Here, newColor specifies the new color. The class Color defines the following values that can be used to specify colors:
Color.black Color.magenta Color.blue Color.orange Color.cyan Color.pink Color.darkGray Color. red Color.gray Color.white Color. green Color.yellow Color.lightGray
For example, this sets the background color to blue and the text color to yellow:
setBackground(Color.blue);
setForeground(Color.yellow);
We can change these colors as and when required during the execution of the applet. The default foreground color is black. The default background color is light gray. We can obtain the current settings for the background and foreground colors by calling getBackground( ) and getForeground( ), respectively. They are also defined by Component and bear the general form:
Color getBackground()
Color getForeground()
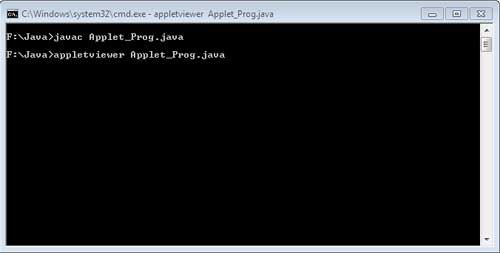
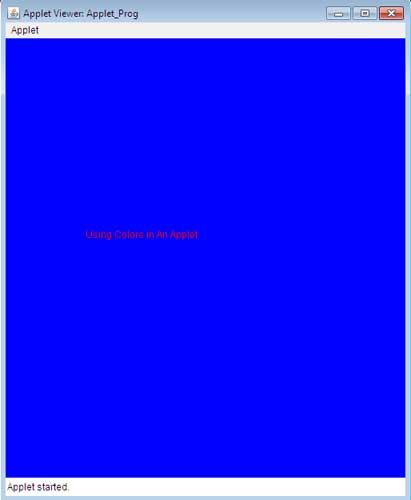
The example below shows a simple applet to change the color of the foreground and background.
import java.awt.*;
 import java.applet.*;
 /* <applet code="Applet_Prog" width=500 height=550> </applet>*/
 public class Applet_Prog extends Applet
 {
           public void paint (Graphics g)
        {
            setBackground(Color.BLUE);
            setForeground(Color.RED);
            g.drawString("Using Colors in An Applet" , 100,250);
         }
 }
The output of the Applet would look like:
Explain Applet Life Cycle
Java applet inherits features from the class Applet. Thus, whenever an applet is created, it undergoes a series of changes from initialization to destruction. Various stages of an applet life cycle are depicted in the figure below:
Initial State
When a new applet is born or created, it is activated by calling init() method. At this stage, new objects to the applet are created, initial values are set, images are loaded and the colors of the images are set. An applet is initialized only once in its lifetime. It’s general form is:
public void init() {
//Action to be performed
}

Running State
An applet achieves the running state when the system calls the start() method. This occurs as soon as the applet is initialized. An applet may also start when it is in idle state. At that time, the start() method is overridden. It’s general form is:
public void start() {
//Action to be performed
}
Idle State
An applet comes in idle state when its execution has been stopped either implicitly or explicitly. An applet is implicitly stopped when we leave the page containing the currently running applet. An applet is explicitly stopped when we call stop() method to stop its execution. It’s general form is:
public void stop() {
//Action to be performed
}
Dead State
An applet is in dead state when it has been removed from the memory. This can be done by using destroy() method. It’s general form is:
public void destroyed() {
//Action to be performed
}
Apart from the above stages, Java applet also possess paint() method. This method helps in drawing, writing and creating colored backgrounds of the applet. It takes an argument of the graphics class. To use The graphics, it imports the package java.awt.Graphic.
Comparing Applets And Applications
Although Java applets are small applications and both applets and application are implemented by Java API, but there are some differences between applets and applications. Some of these differences are :
• An application’s main class contains a unique static method called main. This main serves as the execution entry point for applications. In contrast, applets don’t have a static main method. Instead, a method named init is called to get the applet started.
• Applications are the standalone programs which need Java Virtual Machine for its execution while an applet must be embedded in an HTML file and run under the control of Java-enabled web browser.
• When an application starts to run, no application object exists. In contrast, an applet cannot run until an applet object has created.
• An applet is embedded in HTML pages whereas an application has no support for HTML.
• By default, applications are not subjected to security restrictions, although the security manager can installed. On the other hand, because applets distributed over the web, so they are subject to security restrictions under the control of the web browser’s security manager.
• Swing based applications extend the JFrame class whereas applets extend the JApplet class.
• An application can run with or without graphical user interface whereas an applet must run with a graphical user interface.
• When an applet starts running, it inherits and overrides the life cycle methods such as init(), start(), stop() and destroy(). The web browser calls these methods at various time during an applet’s life. In contrast, applications have no life cycle methods.
• While it is natural for an application class to use a constructor method for initialization, this is not the case with applets. In the former case, initialization is implicit at object instantiation. In the latter case, applets cannot always initialize at instantiation, since some properties derived from its environment which determined after applet instantiation. As such, applet initialization is thus best via the init() method.
What is Applet?
One of the main features of Java is the applet. Applets are dynamic and interactive programs. Applets are usually small in size and facilitate event-driven applications that can be transported over the web. [Read more…] about What is Applet?
Random Access Files
RandomAccessFile provides you to read or write data from or to in a file at any location. It supports you to move around the file, and read from it and write to it, where ever you like.
It has these two constructors:
RandomAccessFile(File fileObj, String accessType) throws FileNotFoundException
here, fileObj specifies the name of the file to open as a File object.
RandomAccessFile(String filename, String accessType) throws
FileNotFoundException
here, the name of the file is passed in filename as string.
Example:
RandomAccessFile fileObj = new RandomAccessFile(“a.txt”, “rw);
In both constructors, accessType determines what type of file access is permitted. There are following cases, if access Type is:
“r”, then the file can be read, not written
“rw”, then file is opened in read-write mode.
“rws”, then file is opened in read-write mode, both operations can be performed, and every changes to file will update to underlying file written on physical device.
To search or seek a position to perform either operation seek() method is used and it’s prototype is
given below:
void seek(long newposition) throws IOException
Here, newPosition specifies the new position, in bytes, of the file pointer from where next read or write operation will occur at the new file position.
The current position of the file pointer can be obtained by calling the getPilePointer() method.
Example:
RandomAccessFile fileObj = new RandomAccesSFile(“a.txt”, “rw);
fileObj.seek(40);
long pointer = fileObj.getFilepointer();
fileObj.close();
RandomAccessFile includes some additional methods. One of them is setLength( ). It has this signature:
void setLength(long length) throws IOException
This method is used to fix the length of the file.
Reading from a RandomAccessFile is done using one read() methods.
Example:
RandomAccessFile fileObj = new RandomAccesSFile(“a.txt”, “rw);
int a = fileObj.read();
fileObj.close();
Writing to a RandomAccessFile can be done using one it its many write() methods.
Example:
RandomAccessFile file = new RandomAccesSFile(“c:\\data\\file.txt”, “rw);
file.write(“Hello World”.getBytes());
file.close();
Example: Write to a file
import java.io.FileNotFoundException;
import java.io.IOException;
import java.io.RandomAccessFile;
public class RandomAccess
{
public static void main(String ar[])
{
try
{
RandomAccessFile raObject = new RandomAccessFile(“a.txt”, “rw”) ;
String data[] = new String[5];
data[0] =”Learning”;
data[1] = “Random”;
data[2] = “Access”;
data[3] = “File”;
data [4] = ” class.”;
for (int i = 0; i < data. length; i++)
{
raObject.writeUTF(data[i]);
}
raObject.seek(raObject.length());
raObject.writeUTF(“Now I now how to work with RandomAccessFile”);
}
catch (FileNotFoundException e)
{
e.printStackTrace();
}
catch (IOException e)
{
e.printStackTrace();
}
}}
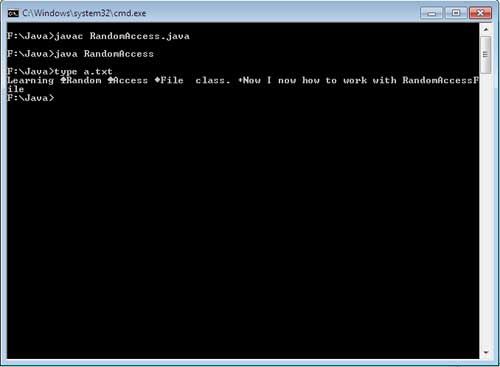
Output
How to Reading and Writing on Files
Java makes available a set of classes and methods that allows you to read from and write to files. Java supports both streams and methods to read from and write to file respectively.
Example: Read file using FilelnputStream
import java.io.*;
class ShowFile
{
public static void main(String ar[]) throws IOException
{
int ch;
FileInputStream finObj;
try
{
finObj = new FileInputStream(“ShowFile.java”);
}
catch(FileNotFoundException e)
{
System.out.println(“File Not Found”);
return;
}
do
{
ch = finObj.read();
if(ch != -1)
System.out.print((char) ch);
} while(ch != -1);
finObj.close();
}
}
Output
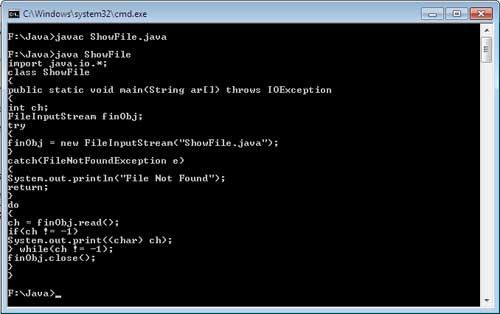
Print contents of own source file, read character by character and write character by character.
Example: Read file using FileReader
import java.io.*;
class FileRead
{
public static void main(String arg[]) throws IOException
{
FileReader frObj = new FileReader(“FileRead.java”);
BufferedReader brObj = new BufferedReader(frObj);
String str;
while ((str = brObj.readLine ())!=null)
System.out.println(str);
frObj.close();
}
}
Output
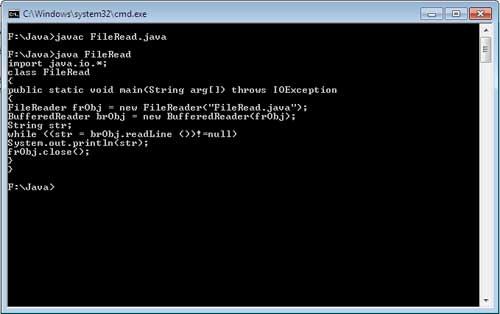
Read the file content line by line, and print in the same manner.
Example: Writing data using FileOutputStream
import java.io.*;
class CopyFile
{
public static void main(String arg[]) throws IOException
{
int i;
FileInputStream finObj;
FileOutputStream foutObj;
try
{
try
{
finObj = new FileInputStream(arg[0]);
}
catch(FileNotFoundException e)
{
System.out.println(“File ” + arg[0] + ” not Found”);
return;
}
try
{
foutObj = new FileOutputStream(arg[1]);
}
catch(FileNotFoundException e)
{
System.out.println(“File” +arg[1]+” not found”);
return;
}
}
catch(ArrayIndexOutOfBoundsException e)
{
System.out.println(“Argument missing”);
return;
}
try
{
do
{
i = finObj.read();
if(i != -1)
foutObj.write(i);
}while(i != -1);
}
catch(IOException e)
{
System.out.println(“Some file error occurd”);
}
finObj.close();
foutObj.close();
}
}
Output:
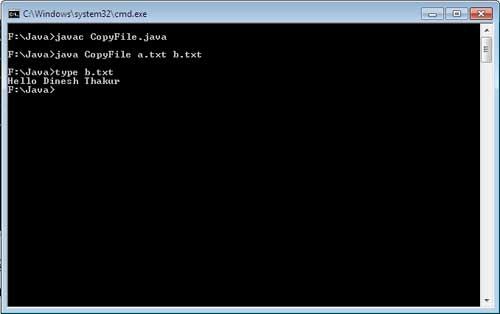
Copy content of a.txt to b.txt
It is clear form the output window given above that content of a.txt has been copied to b.txt.
Example: Writing data using FileWriter
import java.io.*;
public class WriteFile
{
public static void main(String[] args) throws IOException
{
File inputFileObj = new File(“a.txt”);
File outputFileObj = new File(“b.txt”);
FileReader finObj = new FileReader(inputFileObj);
FileWriter foutObj = new FileWriter(outputFileObj);
int c;
while ((c = finObj.read()) != -1)
foutObj.write(c);
finObj.close();
foutObj.close();
}
}
Output:
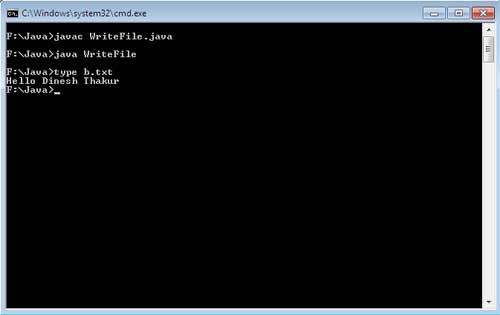
Copy content of a.txt to b.txt
How to Writing on Console Output
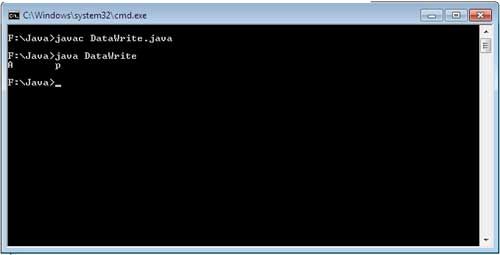
System.out.println() and System.out.print() are only used method for output on console. But there is a class PrintStream a drived class of OutputStream having a implemented method write(), it can be used to write to the console. The simplest form of write() is :
void write (int byteValue)
The method writes to the stream in byte format by byte Value. The byte Value is declared as an integer but only low-order eight bits are written.
Example:
class DataWrite
{
public static void main(String args[])
{
int x;
x = ‘A’;
System.out.write(x);
System.out.write(‘\t’);
x= ‘p’ ;
System.out.write(x);
System.out.write(‘\n’);
}
}
Output:
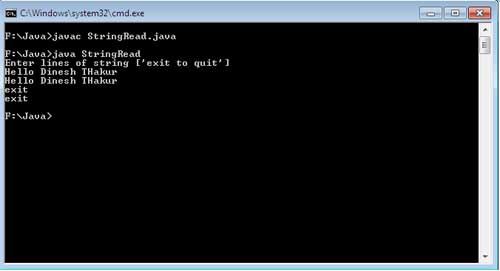
How To Reading String From The Buffered Reader Object.
To read a string form the Buffered Reader object, use the following version of readLine() method.
String readLine( ) throws IOException
Example:
import java.io.*;
class StringRead
{
public static void main(String args[]) throws IOException
{
BufferedReader brObj = new BufferedReader(new InputStreamReader(System.in));
String strObj;
System.out.println(“Enter lines of string [‘exit to quit’]”);
do
{
strObj = brObj.readLine();
System.out.println(strObj);
} while(!strObj.equals(“exit”));
}
}
Output:
How to read a character from the Buffered Reader object.
To read a character form the Buffered Reader object, use the following version of read() method. int read( ) throws IOException
The method read() will return a integer value corresponding the character from the input stream and if end of the stream come across then it will return -1.
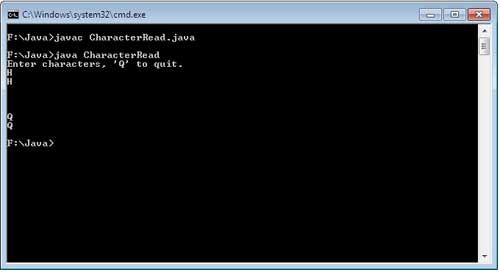
Example: To read characters.
import java.io.*;
class CharacterRead
{
public static void main(String args[]) throws IOException
{
char ch;
BufferedReader brObj = new BufferedReader(new InputStreamReader(System.in));
System.out.println(“Enter characters, ‘Q’ to quit.”);
do
{
ch = (char) brObj.read();
System.out.println(ch);
} while(ch != ‘Q’);
}
}
Output:
Explain Inter-Thread Communication in Multithreading
If we talk about the mechanism of synchronization, then as one thread exits from the monitor then it must inform the waiting threads that it has left the monitor, now suspended thread can proceed to acquire the lock on the resources or entered in the monitor. If that is not possible then the waiting thread will always be in the waiting list. So, to solve this problem threads must communicate with each other.
Java provides a set of methods by which they can communicate to each other.
Object class has some final methods for such purposes. All these methods can be called only from the synchronized context.
wait(): tells the calling thread to leave the monitor and go to sleep until some other thread enters the same monitor and calls notify( ).
notify(): give a wake up signal or call to the first thread that called wait( ) on the same object.
notify All( ): give a wake up signal or call to all the threads that called wait( ) on the same object. The highest priority thread will run first.
These methods are declared within Object, as shown here:
final void wait ( ) throws InterruptedException
final void notify( )
final void notifyAll( )
Example:
public class CubbyHole {
private int contents;
private boolean available false;
public synchronized int get() {
while (available == false) {
try { wait (); }
catch (InterruptedException e) { }
}
available = false;
notifyAll();
return contents;
}
public synchronized void put(int value) {
while (available == true) {
try { wait(); }
catch (InterruptedException e) { }
}
contents = value;
available = true;
notifyAll();
}
}
Explain Thread Priorities in Multithreading
Priority allow the scheduler to take the decision when the thread should be allowed to run, and in which order. The higher priority threads get more CPU time then lower priority threads. A lower priority thread can be preempted by higher priority thread. The threads having equal priority get equal CPU time.
To set a thread’s priority, use the setPriority( ) method, which belongs to Thread class. Prototypes is as
final void setPriority(int priorityValue)
Here, priority Value give the new priority for the calling thread. The value of priorityValue must be within the range MIN_PRIORITY and MAX_PRIORITY. Values of these constants are I and 10, respectively. A thread default priority is NORM_PRIORITY, which is currently 5. These priorities constants are defined as final variables within Thread.
You can get current priority value of the thread by calling the getPriority( ) method of Thread, shown here.
final int getPriority( )
Example:
public class Main
{
public void setPrioritiesOnThreads()
{
Thread thread1 = new Thread(new TestThread(1));
Thread thread2 = new Thread(new TestThread(2));
thread1.start();
thread2.start();
try
{
thread1.join ();
thread2.join ();
}
catch (InterruptedException ex)
{
ex.printStackTrace();
}
System.out.println(“Done.”);
}
public static void main(String[] args)
{
new Main().setPrioritiesOnThreads();
}
class TestThread implements Runnable
{
int id;
public TestThread(int id)
{
this.id = id;
}
public void run()
{
for (int i = 1; i <= 10; i++)
{
System.out.println(“Thread” + id + “: ” + i);
}
}
}
}
Output:
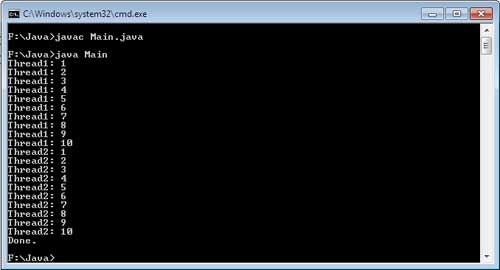
The output is without priority assigning to the thread. Both thread are executing not in exact order, but executing concurrently.
If we assign the priority to the thread then the code is given below.
public class Main
{
public void setPrioritiesOnThreads()
{
Thread thread1 = new Thread(new TestThread(1));
Thread thread2 = new Thread(new TestThread(2));
thread1.setPriority(Thread.MAX_PRIORITY);
thread2.setPriority(Thread.MIN_PRIORITY);
thread1.start();
thread2.start();
try
{
thread1.join ();
thread2.join ();
}
catch (InterruptedException ex)
{
ex.printStackTrace();
}
System.out.println(“Done.”);
}
public static void main(String[] args)
{
new Main().setPrioritiesOnThreads();
}
class TestThread implements Runnable
{
int id;
public TestThread(int id)
{
this.id = id;
}
public void run()
{
for (int i = 1; i <= 10; i++)
{
System.out.println(“Thread” + id + “: ” + i);
}
}
}
}
Now the thread1 has the highest priority so it executes first:
Write a program with join() and isAlive()
class NewThreadDemo implements Runnable
{
Thread t;
NewThreadDemo(String threadName)
{
t=new Thread(this, threadName);
System.out.println(“New userdefined child thread created” +threadName);
t.start();
}
public void run()
{
try
{
for(int i = 1; i <=10; i++)
{
System.out.println(“Child Thread: [” +Thread.currentThread().getName()
+ “] ” + i);
Thread.sleep(500);
}
}
catch (InterruptedException e)
{
System.out.println(“UseDefine Child interrupted.”);
}
System.out.println(“Exiting UserDeinfed child thread.”);
}
}
class MultiThreadDemo
{
public static void main(String args[])
{
NewThreadDemo ch1 = new NewThreadDemo(“Child_One”);
NewThreadDemo ch2 = new NewThreadDemo(“Child_Two”);
NewThreadDemo ch3 = new NewThreadDemo(“Child_Three”);
NewThreadDemo ch4 = new NewThreadDemo(“Child_FOur”);
System.out.println(“Child Thread One is alive: ” + ch1.t.isAlive());
System.out.println(“Child Thread Two is alive: “+ ch2.t.isAlive());
System.out.println(“Child Thread Three is alive: “+ ch3.t.isAlive());
System.out.println(“Child Thread Four is alive: “+ch4.t.isAlive());
try
{
System.out.println(“Waiting for child threads to finish.”);
ch1.t.join ();
ch2.t.join ();
ch3.t.join ();
ch4.t.join ();
}
catch (InterruptedException e)
{
System.out.println(“Main thread Interrupted”);
}
System.out.println(“Child Thread One is alive: ” + ch1.t.isAlive());
System.out.println(“Child Thread Two is alive: “+ ch2.t.isAlive());
System.out.println(“Child Thread Three is alive: “+ ch3.t.isAlive());
System.out.println(“Child Thread Four is alive: “+ch4.t.isAlive());
System.out.println(“Main thread exiting.”);
}
}
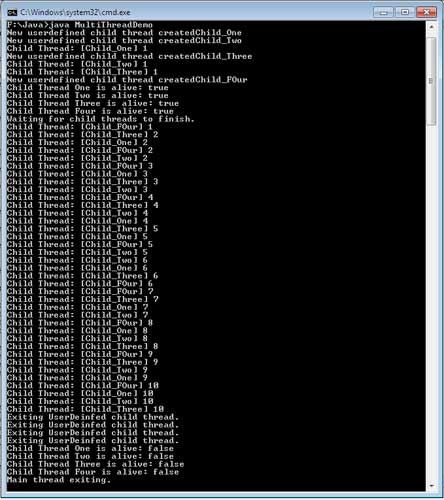
In the code all child thread are join(). If see the output, the main thread exited in the mid of the running code. It wait for all child to be exit. At last it exits from the code.
Output
What is Multithreading in Java? – Definition
The ability of the Operating system to execute several programs simultaneously is known as multitasking. In system terminology, it is is a powerful programming tool that makes it possible to achieve concurrent execution of multiple units of a program called multithreading. In multithreading, the application (process) is divided into two or more subprograms (processes), Several such processes originating from a single task, can be simultaneously started and handled by Java, which can be implemented at the same time in parallel. The processor is doing only one thing at a time, but it switches between the processes so fast that it appears to human beings that all of them are being done simultaneously. This mechanism of treating a single task as several independent processes simultaneously is called multithreading. Each separate process is called a thread. Each thread is executed one at a time in the CPU. Multithreading enables a program to do more than one task at a time and also to synchronize these tasks. [Read more…] about What is Multithreading in Java? – Definition
Implementing Runnable
By implementing the Runnable interface the thread creation is the easiest way. You can construct a thread on any type of object that implements Runnable. To implement Runnable interface, a new class need only to implement run() method. When you implement the Runnable interface then create an instance of Thread from within that class. The Thread class has several constructor.
public Thread ()
public Thread(String thread_Name)
public Thread(Runnable threadObj)
public Thread(Runnable threadObj, String thread_Name)
public Thread(ThreadGroup groupObj, Runnable threadObj)
public Thread(ThreadGroup groupObj, Runnable threadObj, String name)
After the new thread is created, the start( ) method has to be used to start running, otherwise it will not be started. In essence, start( ) executes a call to run( ).
Example:
class NewThreadDemo implements Runnable
{
Thread t;
NewThreadDemo()
{
t=new Thread(this, “User Define Thread”);
System.out.println(“New userdefined child thread created” + this);
t.start();
}
public void run ()
{
try
{
for(int i = 1; i <=10; i++)
{
System.out.println(“UserDefined Child Thread: ” + i);
Thread.sleep(500);
}
}
(InterruptedException e)
{
System.out.println(“UseDefine Child interrupted.”);
}
System.out.println(“Exiting UserDeinfed child thread.”);
}
}
class ThreadDemo
{
public static void main(String args[])
{
new NewThreadDemo();
try
{
for(int i = 1; i <10; i++)
{
System.out.println(“Main Thread: ” + i);
Thread.sleep(500);
}
}
catch (InterruptedException e)
{
System.out.println(“Main thread interrupted.”);
}
System.out.println(“Main thread exiting.”);
}
}
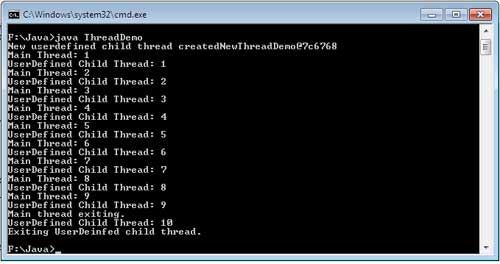
Output:
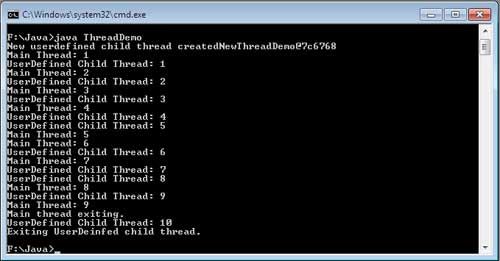
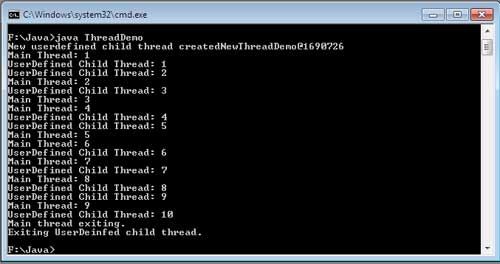
The program was run three times, and all time different output was generated.
How to Create Threads in Java by Extending Thread Class
In Java, a user defined thread can be created to implement the Runnable interface. The Runnable interface has only one method run() that you must have to implement in your class, that you want to create as thread. The run() is the method in which that code is written, which is counted as thread task.
The content of the run() method will be counted as thread portion, but the method written outside the Run() counts as part of the main thread. Both the new thread and main thread can run concurrently. The thread terminates· with the termination of run method. Control is returned to the caller method of the run method, or can say from where it starts. The run() method should not be called directly, the start() method of thread class is called, and that is responsible to call run() for the corresponding thread.
Another way to create a thread is to inherit the Thread class. Thread class has a number of methods. Few of them are static and few are non-static. As per the need you can override non-static methods. But run() method must override, because it defines new thread functionality.
Extending Thread
A new thread is created by creating a new class that extends Thread, and then create an instance of that class. The extending class must override the method run(), which is the entry point of the new thread (user defined). To begin the execution of the new thread, it must call start() method. Inside the run() method, you’ll write the code, which is considered as the functionality of the thread. The run() method can call other method of the same class or other class using their objects. It is an entry point of the thread. As the run() method returns (exit or terminate) the thread ends.
Example:
class NewThreadDemo extends Thread {
public NewThreadDemo() {
super(“User Define Thread”);
System.out.println(“New userdefined child thread created “ + this);
start();
}
public void run() {
try {
for(int i = 1; i <=10; i++) {
System.out.println(“UserDefined Child Thread: “ + i);
Thread.sleep(500);
}
}
catch (InterruptedException e) {
System.out.println(“UseDefine Child interrupted.”);
}
System.out.println(“Exiting UserDeinfed child thread.”);
}
}
class ThreadDemo {
public static void main(String args[]) {
new NewThreadDemo();
try {
for(int i = 1; i <10; i++) {
System.out.println(“Main Thread: “ + i);
Thread.sleep(500);
}
}
catch (InterruptedException e) {
System.out.println(“Main thread interrupted.”);
}
System.out.println(“Main thread exiting.”);
}
}
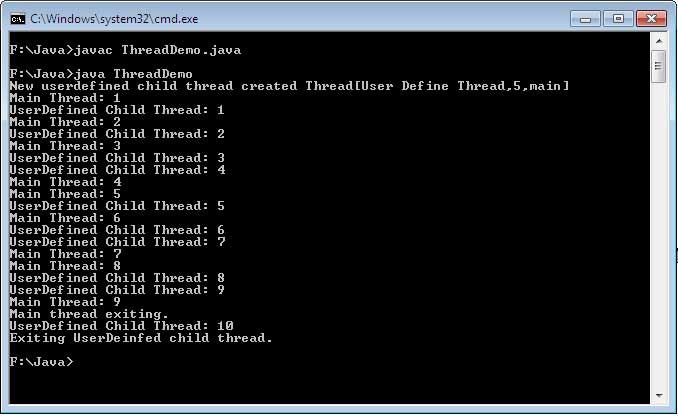
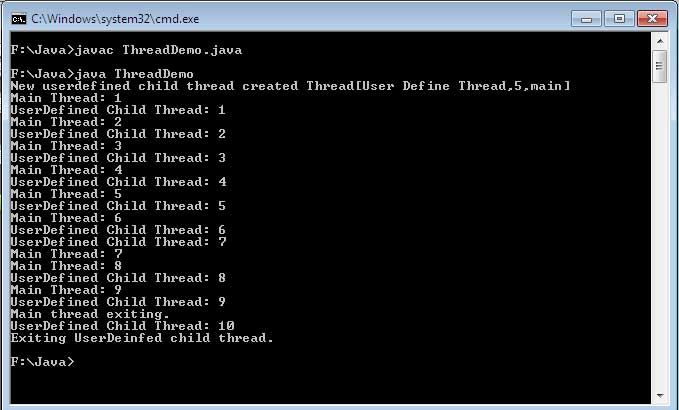
There are two output of the same thread code. Because it is not always sure that a thread executes in the same manner. The output can be same or vary every time. The super() inside the NewThreadDemo constructor invokes the following form of Thread constructor:
public Thread(String thread_Name)
Main Thread
As any Java program comes under execution, first thread starts immediately, called the main thread. There are two importance’s of main thread as follows:
It is the parent of all the threads of the program and all other “child” threads will be spawned form it.
It must be the last thread to finish the execution of the program.
As your program start, the main thread is created automatically, under the control of Thread object. But, if you want the reference of the main thread then there is a static method curentThread() of Thread class, which returns the reference of thread in which it is called. Its general form is shown here:
static Thread currentThread( )
Example:
class MainThreadDemo
{
public static void main (String ar[] )
{
Thread t = Thread.currentThread();
System.out.println(“Current thread: ” + t);
t.setName(“Main Thread Demo”);
System.out.println(“New name of main Thread: ” + t);
try
{
for(int n=1;n<=10;i++)
{
System.out.print(i + ‘\t’);
Thread.sleep(500);
}
}
catch(InterruptedException ie)
{
System.out.println(ie);
}
}
}
Output:
Current thread: Thread[main,S,main]
New name of main Thread: Thread[Main Thread Demo,5,main]
1 2 3 4 5 6 7 8 9 10
Output is showing three line statement. In first statement within square brackets “[]” first value is the name of thread “main”, second is priority “5” and the last is the name of thread group “main”, the current (main) thread belongs to. Similarly in the second printed statement first value is name of the thread after modification “Main Thread Demo”, second is priority “5” and the last is thread group name “main”. The default created group by java is “main”. In the last it will print I to 10 and each digit after 0.5 second. In the above example setName() is used to change the name of the thread. You can get the name of the thread by calling getName(). Both of these methods are of Thread class. There prototype is given below:
final void setName(String threadName)
final String getName() ,
To give a pause to the thread sleep() method is used in the given example. The argument passed to sleep() method are in milliseconds. There are two versions of sleep() methods of Thread class as following:
static void sleep(long time_in_milliseconds) throws InterruptedException
static void sleep(long time_in_milliseconds, int additional_nanoseconds)
throws InterruptedException
