• Skip to main content
  • Skip to primary sidebar
  • Skip to secondary sidebar
  • Skip to footer

Computer Notes

Library
    • Computer Fundamental
    • Computer Memory
    • DBMS Tutorial
    • Operating System
    • Computer Networking
    • C Programming
    • C++ Programming
    • Java Programming
    • C# Programming
    • SQL Tutorial
    • Management Tutorial
    • Computer Graphics
    • Compiler Design
    • Style Sheet
    • JavaScript Tutorial
    • Html Tutorial
    • Wordpress Tutorial
    • Python Tutorial
    • PHP Tutorial
    • JSP Tutorial
    • AngularJS Tutorial
    • Data Structures
    • E Commerce Tutorial
    • Visual Basic
    • Structs2 Tutorial
    • Digital Electronics
    • Internet Terms
    • Servlet Tutorial
    • Software Engineering
    • Interviews Questions
    • Basic Terms
    • Troubleshooting
Menu

Header Right

Home » Java » Java

JDBC ResultSet Interface Example

By Dinesh Thakur

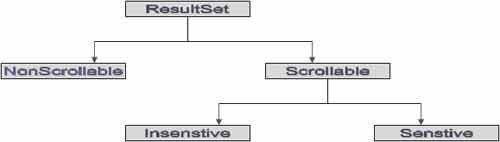
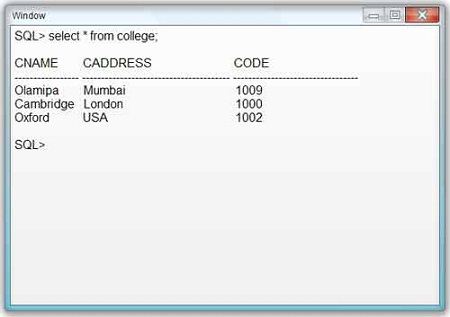
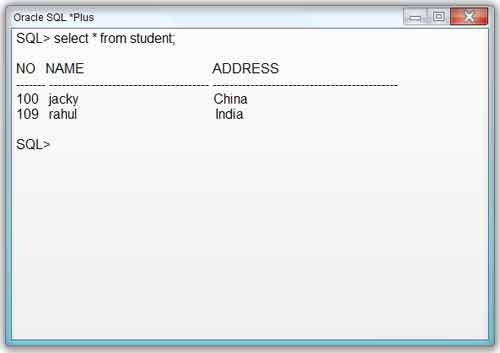
The execution of SQL statement results in a table which consists of rows and columns containing the resultant data. The data can be retrieved from the table by using methods of the ResultSet interface. Some methods of the ResultSet interface are as follows.

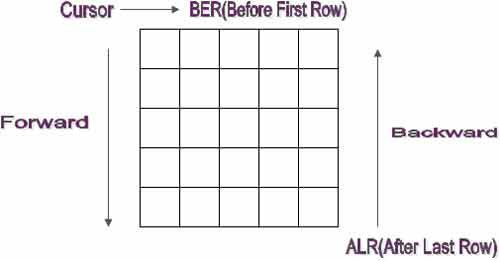
• boolean next(): This method is used to move the ResultSet cursor to the next row of the data. Initially, the ResultSet cursor is pointed before the first row. It returns the false value if there are no more rows in the ResultSet object.

• String getString (int index): This method returns the string value that is stored in the column indicated by the column number, index. For example, if the value of index is 2 then it will return the value stored in second column number.

• String getString (String column):This method returns the string value that is stored in the column indicated by the column name column.

JDBC Program to establish connection and retrieve data from Student database

import java.sql.*;

public class SimpleJDBCProgram

{

      public static void main(String args[])

      {

         try

            { //loading the driver class

                  Class.forName(“sun.jdbc.odbc.JdbcOdbcDriver”);

                  //defines the datasource for the driver

                  String url = “jdbc:odbc:ITLESL”;

                  //creating the connection through DriverManager

                  Connection con = DriverManager.getConnection (“url”, “login”, “password”);

                  //creating the statement object

                  Statement st= con.createStatement();

                  //executing the query through Resultset object

                  ResultSet rs = st.executeQuery(“Select Roll,Marks, Grade FROM Student”);

                  //output the resultset data

                  while (rs.next())

                          {

                              //retrieve columns

                              int roll= rs.getInt(“Roll”);

                              int marks= rs.getInt(“Marks”);

                              String grade= rs.getString(“Grade”);

                              //display values

                              System.out.println(“Roll No :”+ roll);

                              System.out.println(“Marks :”+marks);

                              System.out.println(“Grade :”+grade);

                          }

                              //cleaning up the environment

                              rs.close();

                              st.close() ;

                              con.close();

               }

                        catch(Exception e)

                            {

                                 System.out.println(“Error “+e);

                             }

      }

}

In this program, the following steps are taken to access the data from the database.

1. Appropriate drivers for the database are loaded by using Class.forName ().

2. The getConnection() method of DriverManager class of JDBC is used to create the Connection object. An application may have more than one connection objects to connect with one or more databases.

3. The first parameter URL (“jdbc:odbc: ITLESL”)identifies the database. This URL has three parts: protocol, subprotocol and DSN name. To connect to the database username and password are also required which are specified by the other two parameters of getConnection () method ,login and password.

4. The statement Statement st= con. createStatement () is used to createStatement object, st for querying the database. It is created by calling the createStatement () method using the Connection object, con.

5. In this example, st.executeQuery is used to execute the SELECT statement of SQL. The try{ .. } catch {.. } is used to catch any exceptions that may arise as a result of executing this query statement. The result of this query may consist of set of tuples, which is assigned to rs object of type Result Set. Initially, it places the cursor at the beginning of the first tuple. The statement rs. next () moves the cursor to the next tuple.

6. The next () method is used to fetch one tuple at a time from the resultset rs. The statement int roll = rs. get Int (“Roll”) ; is used to access data from the database and System.out.println(“Roll No :”+roll); is used to display data.

7. The connection must be closed after it is no more required at the end of the procedure. The statement rs. close (),st. close (),con. close () closes all the open connections

JDBC program to establish connection and retrieve data from Employee database

import java.io.*;

import java.sql.*;

public class ExampleSelectStatement

{

      public static void main(String args[])

      {

         Connection con=null;

         try

           {

              Class.forName(“sun.jdbc.odbc.JdbcOdbcDriver”);

              //loads driver

              con=DriverManager.getConnection(“jdbc:odbc:Emp”);

              // establishes connection

              Statement st= con.createStatement();

              //creates Statement object

              ResultSet rs = st.executeQuery(“select * from Employee”);

              // creates ResultSet object

              System.out.println(“—————————Employee Details————————“);

              System.out.println(“\n”);

              System.out.print(“Eno “) ;

              System.out.print(“Name “) ;

              System.out.print(“Department “) ;

              System.out.print(“Designation “) ;

              System.out.println(“Salary “) ;

              System.out.println(“———————————————————————“);

             // displays data till there are no more //rows

             while(rs.next())

                 {

                      System.out.print(rs.getString(“ENumber”));

                      System.out.print(” “);

                      System.out.print(rs.getString(“EName”));

                      System.out.print(” “);

                      System.out.print(rs.getString(“Department”));

                      System.out.print(” “);

                      System.out.print(rs.getString(“Designation”));

                      System.out.print(” “);

                      System.out.println(rs.getString(“Salary”));

                  }

                       // closes the connection

                       rs.close();

                       st.close() ;

                       con.close();

                       System.in.read();

           }

                catch(Exception e)

               {

                    System.out.println(e.getMessage());

               }

      }

}

JDBC – Statement Interface (Handling database queries statically)

By Dinesh Thakur

The statement interface provides methods that are used to execute static SQL statements. The SQL statements are queries, insertions, updates and deletions, etc.

Some of the methods of the Statement interface are as follows.

• void close(): This method closes database connections associated with Statement’s object and releases JDBC resources.

• boolean execute (String sql): This method is used to execute an SQL statement that might produce multiple result sets or multiple counts. It returns true if multiple result sets are produced and returns false if multiple counts are generated.

• int executeUpdate(String sql): This method is used to execute an SQL statement that gives information about number of affected rows. For example, if we execute the statements like INSERT, DELETE, the result will only be a number of rows affected.

• ResultSet executeQuery(String sql): This method executes a query and returns a Resu1ts et object. A result set isjust like a table containing the resultant data.

• ResultSet getResultSet () : This method returns the first result set or multiple count generated on the execution of execute (String sql) method. If there is no result set, it returns null value.

• int getUpdateCount():After the execution of the execute (String sql) method updates counts may be generated. This method returns the first update count and clears it. More update counts can be retrieved by getMoreResults ().Note that this method returns value -1 if there is no update count or when only result sets are generated on execution of execute (String sql) method.

• boolean getMoreResults () : This method is used to retrieve the next result set in multiple result set or to the next count in multiple update count generated on execution of execute (String sql) method. It returns a true value if multiple sets are available and returns a false value if multiple update counts are available.

JDBC – Connection Interface

By Dinesh Thakur

The Connection interface helps to establish a connection with the required database. Other than establishing connection, it provides lot of functionality including transaction management, maintaining database sessions and creating SQL statements.

Some of the commonly used methods of connection interface are as follows.

• void close(): This method closes database connection associated with Connection’s object and releases JDBC resources.

• Statement createStatement(): This method creates a Statement object which is used to send SQL statement to the database. It is usually used when SQL statement without parameters is to be executed.

• CallableStatement prepareCall (String sql): This method creates an instance of CallableStatement which is used to handle database stored procedures.

• PreparedStatement prepareStatement (String sql): This method creates PreparedStatement object which is used to create SQL statement specified in string sql. It is usually used when parameterized SQL statement is to be executed.

JDBC – DriverManager Class

By Dinesh Thakur

The DriverManager class is responsible for loading the driver specific classes. The drivers are registered with the DriverManager class either when an instance of driver is created using registerDriver (Driver driver) method of the DriverManager class or DriverManager class is initialized.

The static method forName () of the Class class can be used by DriverManager class to locate and load the drivers listed in system variable jdbc.drivers is as follows.

Class.forName(“sun.jdbc.odbc.JdbcOdbcDriver”)

Here, the driver class specified in the string parameter is loaded dynamically at the run time.

Some of the methods of the DriverManager are as follows.

• Connection getConnection (String url): This method attempts to establish a connection to a given database URL–does not require password.

• Connection getConnection(String url, String user, String password): This method attempts to establish a connection to a given database URL.

• void registerDriver (Driver driver): This method is used to register a driver specified by driver with the DriverManager.

• void deregisterDriver (Driver driver): This method removes the driver specified by driver from the DriverManager’s list.

JDBC-ODBC Bridge

By Dinesh Thakur

Microsoft’s ODBC is the most commonly used driver to connect to the database as it can connect to almost all databases on most of the platforms. However, ODBC uses the concept of pointers and other constructs that are not supported by Java.


Therefore, JDBC-ODBC bridge driver was developed which translates the JDBC API to the ODBC API and vice versa. This bridge acts as interface that enables all DBMS which support ODBC (Open Data Base Connectivity) to interact with Java Applications. JDBC-ODBC bridge is implemented as a class file and a native library. The name of the class file is JdbcOdbc.class. On windows platform, native library called JDBCODBC.DLL is used.

Figure shows the JDBC application architecture in which a front-end application uses JDBCAPI for interacting with JDBC Driver Manager. Here, JDBC Driver Manager is the backbone of JDBC architecture. It acts as interface that connects a Java application to the driver specified in the Java program. Next, is the JDBC-ODBC bridge which helps the JDBC to access ODBC data sources.

                   JDBC Architecture with JDBC-ODBC Bridge

METADATA in JDBC

By Dinesh Thakur

Data about data is called metadata. That means data about column names, data type names of database software etc. JDBC supported Metadata programming areas follows:

1 Database Metadata

2 ResultSet Metadata

Database Metadata

By this programmer can get limitations and capabilities of underlying Database software like database software name, versions, max chars in table, etc. Database- Metadata object means it the object of a java class that implements java.sql. Database Metadata (interface). Programmer call various methods on Database Metadata object to gather much information about underlying database software.


Example:

DatabaseMetaDatadbmd=con.getMetaData();


Use

DatabaseMetaData programming is useful while developing GUI tools for Database software like sqlyog, mysql front, etc.

JDBC Metadata Programming is in no way related to performing CURD operations on database. It is given to gather additional details about database software and its tables. If certain JDBC driver cannot retrieve certain information about database then it returns zero “0” or “null” value while working with DatabaseMetaData object.


Example application


//DBMetaData.java

import java.io.*;

import java.sql.*;

public class DBMetaData

{

                  public static void main (String args[ ]) throws SQLException,ClassNotFoundException

                  {

                       Class.forName(“Sun.jdbc.odbc.JdbcOdbcDrivet”) ;

                       Connection con=DriverManager.getConnection(“jdbc:odbc:oradsn”,”scott”,”tiger”);

                       DatabaseMetaData dbmd=con.getMetaData();

                       System.out.println(“database version:”+dbmd.getDatabaseProductVersion()+”\n”);

                       System.out.println(“database name:”+dbmd.getDatabaseProductName()+”\n”);

                       System.out.println(“sql keywords:” +dbmd.getSQLKeywords() +”\n”);

                       System.out.println(“numeric functions: “+dbmd.getNumericFunctions () +”\n”) ;

                       System.out.println(“String functions: “+dbmd.getStringFunctions ()+”\n” );

                       System.out.println (“System functions:” +dbmd.getSystemFunctions()+”\n”) ;

                       System.out.println(“Searc string Escape:” +dbmd.getSearchStringEscape ()+”\n”);

                       System.out.println (“getMaxRowSize: “+dbmd.getMaxRowSize()+”\n”);

                       System.out.println (“getMaxstatementLength:”+dbmd.getMaxStatementLength() +”\n”);

                       System.out.println(“get maximum tables in a select query:”+dbmd.getMaxTablesInSelect()+”\n”);

                       System.out.println(“get maximum length of table name:”+dbmd.getMaxTableNameLength()+”\n”);

                       System.out.println(“jdbcapi version is :”+dbmd.getJDBCMajorVersion()+”\n”);

                 }

}

ResultSetMetaData

It is used to gather more information about database table that is represented by JBDC ResultSet object. It is used to get no of columns, column name, column data types, etc., information from database table.

ResultSetMetaData object means it is the object of JBDC driver supplied Java class that implements java.sql.ResultSet.MetaData(interface). This object is very useful while generating reports based on database table data; like progress report, sales report, etc.


Method calling

ResultSet rs =st.executeQuery(“select * from emp”);

ResultSetMetaData rsmd=rs.getMetaData();


Here we have taken college table as follows:


//ResuleSetMetaDataTest

import java.sql.*;

import java.util.*;

public class ResultSetMetaDataTest

{

               public static void main(String args[]) throws SQLException,ClassNotFoundException

              {

                     //read inputs

                     Scanner sc = new Scanner(System.in);

                     System.out.println(“Enter table name”);

                     String tname=sc.next();

                     //create jdbc connection

                     Class.forName(“oracle.jdbc.driver.OracleDriver”) ;

                     Connection cn=DriverManager.getConnection(“jdbc:oracle:thin:@localhost:1521:oracl”,”scott”,”tiger”);

                     Statement st=cn.createStatement();

                     ResultSet rs=st.executeQuery (“select * from “+tname);

                     ResultSetMetaData rsmd=rs.getMetaData();

                     int colcnt=rsmd.getColumnCount();

                     //System.out.println(“Columns present in the table are:\n”) ;

                     for(int i=1;i<=colcnt;i++)

                        {

                            System.out.print (rsmd.getColumnLabel(i)+”\t\t” ) ;

                        }

                            System.out.println(“\n”);

                            //Systeml.out.println(“datatypes of the columns are:\n”);

                            for(int i=1;i<=colcnt;++i)

                               {

                                    System.out.print (rsmd.getColumnTypeName(i)+”\t”);

                               }

                                    System.out.println(“\n”);

                                    //System.out.println(“records of the table are:\n”);

                                    while(rs.next())

                                      {

                                           System.out.println(rs.getString(1)+”\t\t”+rs.getString(2)+”\t\t”+rs.getString(3));

                                            /*for (int i=1;  i<=colcnt; ++i)

                                                    {

                                                        System.out.println(rs. getString(i) +”\ t “) ;

                                                     }*/

                                      }

                                  rs.close() ;

                                  st.close() ;

                                  cn.close();

                }

}

How to Working With Resultset Interface

By Dinesh Thakur

ResultSet is an interface present in java.sql package and provided under JDBC core API. The java.sql. ResultSet interface is defined to describe an object called ResultSet object, implemented by third-party vendor as a part of JDBC driver.

The ResultSet object represent the data in a tabular form that is retrieved using SQL query. It implies that a ResultSet object represents a data in a table whose cursor is returned by executing an SQL query. We can obtain a ResultSet by using the executeQuery() or getResultSet() method of JDBC Statement object.

Only a single ResultSet object can be opened at a time, however we can obtain multiple ResultSet objects by using one statement. When we try to open a ResultSet using a statement that is already associated with an open ResultSet, the existing ResultSet is implicitly closed. A ResultSet is also closed when the JDBC statement used to generate it is closed.

                         Resultset Interface

Methods of ResultSet

The java.sql.ResultSet interface provides certain methods to work with the ResultSet object.

• public boolean absolute(int row)

This method is used to move the cursor to the given number of rows in a ResultSet object.

• public void afterLast()

This method is used to move the cursor just after the last row in ResultSet object.

• public void beforeFirst()

This method is used to move the cursor before the first row in ResultSet object.

• getXXX()

XXX=int, long, byte, character, String, double or any large object type. This method retrieves the column value of the specified types from the current row. The type can be any of the Java predefined data type such as int, long, byte etc.

• public ResultSetMetadata getMetaData()

This method retrieves the number, type and properties of the ResultSet object.

• public boolean first()

Move the cursor to the first row in a ResultSet object.

• public boolean last()

This methods move the cursor to the last

• public int getRow()

This method gives the current row number associated with the ResultSet object.

• public void beforeFirst()

This method moves the cursor before first row.

• public void previous()

This method moves cursor backward one row. It returns true if the cursor is newly positioned on a row and false if the cursor is positioned before the first row.

Using ResultSet

After obtaining a ResultSet object, you can use it to read the data encapsulated in it, that is the data stored in the ResultSet.


You can retrieve data from a ResultSet in two simple steps:

• Move the cursor position to the required row.

• Read the column data using the getxxx() methods.


Moving the Cursor Position

When you obtain a ResultSet, initially the cursor is positioned before the first row, that is beforeFirst, you use the next() method of ResultSet to move the cursor positioned to the next record in ResultSet.


Reading the Column Value

After moving the cursor to the respective row, you can use the getter method of ResultSet to retrieve the data from the row where the cursor is positioned. The methods of ResultSet are overloaded to support the navigation of column by using its index or name.

The ResultSet object supports two versions for each of the JDBC type. One of these two indexes takes column index of int type, where column index start with 1 and other takes column name of java .lang. String type. Column name passed into getter method are not case sensitive. If a select list contains same column more than the first instance of column returns.


By default Result Set is non scrollable. it means the cursor can be moved in forward direction only. if we want to move the cursor randomly ,that is ,in forward and in backward direction, then we need a scrollable result set


Example: Retrieving all the row from table (Using Non scrollable ResultSet)We have to retrieve all records from emp table.


Empno

Ename

Sal

7000

smith

7000

7005

raj

8000

7009

ravi

9000


import java.sql.*;

public class AllRow

{

                 public static void main (String arg[ ])throws Exception

                 {

                        //load the type-4 driver

                        Class.forName (“oracle.jdbc.driver.OracleDriver”) ;

                        //get connection

                        Connection cn=DriverManager.getConnection(“jdbc:oracle:thin:@localhost:1521:XE”,”system”,”manager”);

                        //create CallableStatement object

                        Statement st=cn.createStatement();

                        //execute sgl query

                        ResultSet rs=st.executeQuery(“Select * from emp”);

                        //print the result

                        while(rs.next())

                               {

                                    int empno =rs.getInt(1);

                                    String name=rs.getString(2);

                                    int sal = rs.getInt(3);

                                    System.out.println(“empno” +empno+”ename”+name+”sal”+sal);

                                }

                                 rs.close();

                                 st.close();

                                 cn.close();

                  }

}


Output


empno 7000 ename Smith sal    7000

empno 7005 ename Raj     sal    8000

empno 7009 ename Ravi   sal    9000


Example:2 Scrollable ResultSet


Empno

Ename

Sal

7000

smith

7000

7005

raj

8000

7009

ravi

9000


import java.sql.*;

public class ScrollableTest

{

                        public static void main (String args[]) throws Exception

                        {

                                //load the type-4 driver

                                Class.forName(“oracle.jdbc.driver.oracleDriver”);

                                //getconnection

                                Connection cn=DriverManager.getConnection(“jdbc:oracle:thin:@localhost:1521:XE”,”system”,”manager”);

                                //create Statement object

                                Statement st=cn.createStatement(1004,1007);

                                //execute sql query

                                ResultSet rs=st.executeQuery(“Select * from emp”);

                                rs.afterLast(); //Move the cursor after the last row

                                //print the result

                                while(rs.previous()) //Move in backward direction

                                       {

                                             System.out.println(rs.getInt(1)+”\t”+rs.getString(2)+”\t”+rs.getInt(3));

                                       }

                                             rs.close();

                                             st.close();

                                             cn.close();

                          }

}


Output:


7009 Ravi   9000

7005 Raj     8000

7000 Smith 7000

How to Working with CallableStatement

By Dinesh Thakur

CallableStatement of JDBC is derived from interface of PreparedStatement. In JDBC, CallableStatement is best statement because by using this statement we can execute SQL operation on database and we can also call stored procedure of database. The only difference between CallableStatement and PreparedStatement is that the latter is not useful to call a stored procedure but it is possible through the former.

CallableStatement in JDBC can be used for both executing the command on a database and also calling the stored procedure of database. So, we have two syntax to obtain CallableStatement.


Syntax-1

CallableStatement cs=cn.prepareCall(“sql command”);


Syntax-2

CallableStatement cs=con.prepareCall( {call procedurename(parameter) });


What is the difference between Procedure and Function in frontend programming?

• Procedure does not return any value.

Function returns only one value.

What is the difference between Procedure and Function in backend programming?

• Procedure can return zero or more value.

Function can return only one value.

Syntax for creating procedure in oracle database:

create or replace procedure Name(parameter)

is

declare variables;

begin

statement;

end;

• A procedure can contain any of three types of parameters

• IN parameter

• OUT parameter

• INOUT parameter

• By default the parameter is type IN.

IN: IN parameter is used to accept input values to a procedure.

OUT: Parameter is used to return output value from procedure.

INOUT: Parameter is used to take input value and also return output values.

• The following procedure is used for calculating experience of an employee.

Take Input as employee number and return output as employee name and is experienced.

The following is a JDBC program for calling the above procedure created in Oracle database server using Callable Statement of JDBC.

Step 1:Login to Oracle server

Step 2:SQL>ed demo

Step 3:Create procedure emp_experience

Syntax:

Create or replace procedure emp_experience(eno in number, empname out varchar2, experience out number)

is

doj date;

today date;

begin

Select sysdate into today from dual;

Select hiredate into doj from employee where empno=eno;

experience:=(today-doj)/365;

Select ename into empname from employee where empno=eno;

end;

Step 4: Save and exit

//compilation of procedure

Step 5:SQL>@demo

Step 6:Write Java code

import java.sql.*;

import java.util.*;

public class CallableTest1

{

       public static void main (String args [ ]) throws Exception

       {

               //load type-4 driver

               Class.forName(“oracle.Jdbc.driver.OracleDriver”);

               //get connecticin

               Connection cn=DriverManager.getConnection(“jdbc:oracle:thin:@localhost:1521:XE”,”system”,”manger”);

               //create Callable Statement object

               CallableStatement cs=cn.callableStatement(“insert into employee_info values(?,?,?) “);

               Scanner sc=new Scanner(System.in);

               System.out.println(“Enter the employee no”);

               int eid=sc.nextInt();

               //set id and name

               cs.setInt(1,eid);

               //registeter OUT parameter

               cs.registerOutParameter(2,Types.VARCHAR);

               cs.registerOutParameter(3, Types.INTEGER);

               //call the procedure

               cs.execute() ;

               //read empname

               String str=cs.getString(2);

               int k=cs.getInt(3);

               System.out.println(“empno”+eid) ;

               System.out.println(“emp narne”+str);

               System.out.println(“empexperience”+k+”year”) ;

               cs.close() ;

               cn.close() ;

      }

}

Output:

Enter employee number

7900

emp no 7900

emp name Dinesh

emp experience 31 years

In above example, while calling a procedure using CallableStatement:

• We register_out Parameter procedure call. The reason why OUTparameter is registered is that if you do not register then by default CallableStatement assumes all parameters as IN parameter.

• If the parameter is IN modeor IN type then Input values must be set before calling the procedure.

• If parameter is registered as OUT then CallableStatement object store the output values as returned by the OUT parameter.

• CallableStatement cannot understand Java Datatype or Database Datatype. So, we need to specify JDBC Type which acts as a mediator between java and database.

• Types.VARCHAR is mediator type between java String type and database varchar2.

• In JDBC all mediator data types are given in java.sql package.

                                                DATA TYPE

Java Type

JDBC Type

Database Type

Int

Types.INTEGER                     

Number

Double

Types.DOUBLE                      

Number

String

Types.VARCHAR                   

varchar2

Char

Types.CHAR                           

char(1)

InputStream  

Types.BLOB                            

Blob

In the following procedure empno is IN parameter and return Bonus is OUT parameter

SQL>ed demo2

Create or replace procedure emp_bonus(eno number,bonus out number)

is

temp number(9);

begin

select sal into temp from  emp where empno=eno;

if temp between  1 and 2000 then

bonus:=temp*0.15;

else if temp between 2001 and 5000 then

bonus:=temp*0.20;

else

bonus=temp*0.30;

end if;

end;

SQL>@demo2

procedure created

The following JDBC program is calling the above procedure using CallableStatement.


Example


import java.sql.*;

import java.util.*;

public class CallableTest2

{

              public static void main (String args [ ])throws Exception

              {

                      //load the type-4 driver

                      Class.forName(“oracle.jdbc.driver.OracleDriver”);

                      //get connection.

                      Connection cn=DriverManager.getConnection (“jdbc:orac1e:thin:@localhost:1521:XE”,”system”,”manager”);

                      //create callableStatement object

                      CallableStatement cs=cn.prepareCall (“{call emp_bonus(?,?) }”);

                      Scanner sc=new Scanner(System.in);

                      System.out.println(“Enter the employee no”);

                      int eno=sc.nextInt();

                      //set IN parameter

                      cs.setInt (1, eno);

                      //register out parameter

                      cs.registerOutParameter(2,Types.DOUBLE);

                      //call the procedure

                      cs.execute();

                      //read out parameter

                      double d=cs.getDouble (2);

                      System.out.println (“emp no”+eno);

                      System.out.println(“empbonus”+d);

                      cs.close();

                      cn.close();

               }

}


Output;

Enter employee no

7900

Emp no 7900

Emp bonus 1000.0.


Syntax to Create Function in Oracle Database Server

Create or replace function functionname (parameter)

Return returntype is

declare variables;

begin

statements;

end;


Note

• By default parameter of function is IN and IN is not allowed to specify IN parameter.

• For a function return type is mandatory.

• Within the body of function statement is mandatory.

The following function is created for finding the sum of salaries of employees working in a given department, by accepting depno as input.

sql>ed demo3

create or replace function sum_dept(dno number)

return is

temp number(q)

begin

select sum(sql) into temp from employee where depno=dno

end;

sql>@demo3

Function created


• The following JDBC program is calling the above function using CallableStatement.


Example


import java.sql.*;

import java.util.*;

public class CallableTest3

{

               public static void main(String args[ ]) throws Exception

              {

                   //load the type-4 driver

                   Class.forName(“oracle.jdbc.driver.OracleDriver”);

                   //get connection

                   Connection cn=DriverManager.getConnection (“jdbc:oracle:thin:@locdlhost:1521:XE”,”system”,”manager”);

                   //create CallableStatememt object

                   CallableStatement cs=cn.prepareCall (“{? =call sum_dept(?) }”);

                   // register OUT parameter

                   cs.registerOutParameter(1,Types.INTEGER);

                   Scanner sc=new Scanner (System.in) ;

                   System.out.println(“Enter deptno”);

                   int dno=sc.nextInt ();

                   //set IN parameter

                   cs.setInt(2,dno) ;

                   //call the procedure

                   cs.execute ( ) ;

                   //read OUT parameter

                   int k=cs.getInt (1) ;

                   System.out.println(“sal sum is ” +k) ;

                   cs.close() ;

                   cn.close() ;

               }

}


Output:

Enter depno

30

Sum of sal=2000

How to Working With Prepared Statement

By Dinesh Thakur

To overcome the above limitation, use precompiled SQL query with the help of PreparedStatement object. The JDBC PreparedStatement object deals with precompiled SQL query. The query that comes to database software from Java application without values only once becomes parsed query in database software only once and allows client application(Java application) to set the values for query for the multiple times, with same or different values to gather the results for multiple times. This is called precompiled SQL query. [Read more…] about How to Working With Prepared Statement

How to Work with Statement Interface?

By Dinesh Thakur

The Statement object executes a normal SQL statement to update or query the database. The java.sql.Statement interface is a part of JDBC API that describes a standard abstraction for statement object which is implemented as part of JDBC driver. [Read more…] about How to Work with Statement Interface?

What is Jdbc Statement?

By Dinesh Thakur

A JDBC statement object is used to execute an SQL statement. JDBC API supports three types of JDBC statement object to work with the SQL statements.

In JDBC we get three types of statements:

i  Statement Interface

ii PreparedStatement Interface

iii CallableStatement Interface

   There is a relationship between above three statements:

                  Jdbc Statement

The above three Statement Interfaces are given in  java.sql package. PreparedStatement Interface extends Statement. It means PreparedStatement interface has more features than that statement interface, Callablestatement (interface) extends Prepared Statement.

Statement

It executes normal SQL statements with no IN and OUT parameters.

PreparedStatement

It executes parameterized SQL statement that supports IN parameter.

CallableStatement

It executes parameterized SQL statement that invokes database procedure or function or supports IN and OUT parameter.

SAVE POINT in JDBC

By Dinesh Thakur

The save point is a logical position in a transaction up to which we can rollback the transaction. When the save point is placed in the middle of the transaction, the logics placed before the save point will be committed and the logics placed after the save point will be rolled back. There are two types of save points:

1. Named save point

2. Unnamed save point

The save point object is the object of a class given by JDBC driver implementing java.sql.Savepoint interface.

When the save point is placed in the transaction we cannot reference it from connection.commit (), but it can be referenced from connection.rollback (). That means we cannot commit up to save point position, but we can roll back up to save point position.


Source codes for save point testing program.

SavepointDemo.java

import java.sql.*;

public class SavepointDemo 

{

          public static void main (String args []) throws Exception

          {

                  Class.forName (“oracle.jdbc.driver.oracleDriver”);

                  Connection con = DriverManager.getConnection

                  (“jdbc:oracle:thin:@localhost:1521:orcl”, “scott”, “tiger”);

                  Statement st = con.createStatement ();

                  con.setAutoCommit (false);

                  st.executeUpdate (“insert into college values (‘olamipa’, ‘mumbai’, 1009)”);   

                  Savepoint svpt = con.setSavepoint (“mysp”);

                  st.executeUpdate (“update college set cname= ‘xavier’ where code=1001”);

                 st.executeUpdate (“insert into college values (‘KIIT’, ‘Bhubaneswar’, 1008)”);

                 con.rollback (svpt);

                 con.commit ();

           }

}

Savepoint svpt=con.setSavepoint (“mysp”): After execution of some database operation the save point is created at this position, and any name can be passed as string.

con.rollback (svpt): When we call rollback on save point instance, the transaction before the save point is saved but the transaction after the save point is not performed.

Running the Program


We can confirm from the database table.


JDBC Join

By Dinesh Thakur

Join is a keyword in SQL that is used to retrieve data from two or more table based on some relationship between two columns.

Type of Joins

EQUI join: It returns all the matched records from the table based on the condition.

Query: Select empno, ename, job, dname, loc from emp1,deptl where  emp1.deptno=deptl.deptno

Left outer join: It returns all the records from left-side table and only matched records from right-side based on the joining condition.

Query: Select empno, ename, job, dname, loc from emp1,deptl where emp1.deptno=dept1.deptno(+)

Right outer join: It returns all the records from right-side table and only matched records from left-side table based on the joining condition.

Query: Select empno, ename, job, dname, loc from emp1,deptl where  emp1.deptno(+)=dept1.deptno

Full join: It returns all the records from the two or more tables based on joining condition.

Query: Select empno, ename, job, dname, loc from emp1full outer join deptl on (emp1.deptno=dept1.deptno)


Example of showing EQUI join

Source code for the program:

join.java

import java.sql.*;

public class join

{

       public static void main (String arg [])

         {

                try

                 {

                      Class.forName (“oracle.jdbc.driver.oracleDriver”);

                      Connection con = DriverManager.getConnection (“jdbc:oracle:thin:@localhost:1521:orcl”, “scott”, “tiger”);

                      Statement st = con.createStatement ();

                      String query = “select empno, ename, job, dname, loc from emp1, dept1 where emp1.deptno=dept1.deptno”;

                      ResultSet rs = st.executeQuery (query);

                      System.out.println (“empno\t ename \t job dname \t \t loc”);

                      while (rs.next ())

                        {

                              int empno = rs.getInt (1);

                              String ename = rs.getString (2);

                              String job = rs.getString (3);

                              String dname = rs.getString (4);

                              String loc = rs.getString (5);

                              System.out.println (empno+ ” “+ename+ ” “+job+ ” “+dname+ ” “+ loc);

                        }

                        st.close ();

                        con.close ();

                 }

                catch (Exception ee)          

                 {

                      System.out.println(ee);

                 }

        }

}


Based on joining condition all records have been displayed here.


Example on Left outer join


Outer.java

import java.sql.*;

public class outer

{

        //code same as the above application

        ……………………………………..

        ……………………………………..

        only change this line of code

        String query = “select empno, ename, job, dname, loc from emp1, dept1 where

        emp1.deptno=dept1.deptno (+)”;

        ……………………………………..

}


 Right outer join


 Full join


JDBC Connection Pooling

By Dinesh Thakur

JDBC connection pool is divided into two parts:

1. JDBC Driver Managed/Stand Alone JDBC Connection Pool (Resides Outside The Server)

2. Web Server Managed JDBC Connection Pool

While developing small-scale applications like standalone desktop applications we can use driver-managed JDBC connection pool. While developing large-scale applications like web sites and enterprise application, we can use server managed JDBC connection pool. JDBC connection pool for Oracle means all JDBC connection pool represents connectivity with Oracle database software. Oracle thin driver/OCI driver gives one built-in JDBC connection pool for oracle. JDBC data source object represents JDBC connection pool so our application should always get JDBC connection object from connection pool through data source object.

                   JDBC Connection Pooling

JDBC data source object is the object of a Java class that implements javax.sql. DataSource (I). The JDBC connection object that is created by the programmer manually is called the Direct JDBC Connection Object. The JDBC connection object that is collected from JDBC connection pool is called Pooled JDBC Connection Object.

Example application on Oracle thin Driver-Managed JDBC Connection Pool


ConnectionPoolTest.java

import java.sql.*;

import javax.sql.*;//for pooledConnection (I)

import oracle.jdbc.pool.*;// (for oracle Connection pool DataSource (c)) 

public class ConnPoolTest

{

      public void main (String args []) throws Exception

        {

                /*create JDBC DataSource object representing empty driver managed

                connection pool of oracle*/

                OracleConnectionPoolDataSource ds = new OracleConnectionPoolDataSource

                ();

                //gives details to create JDBC connection objects in the Connection pool

                ds.setDriverType (“thin”);

               ds.setPortNumber (1521) ;

               ds.setServiceName (“Orcl”) ;

               ds.setUser (“Scott”) ;

               ds.setPassword (“tiger”);

               /*get access to JDBC connection pool for oracle (this connection pool will be

               created based on the details)*/

               PooledConnection con = pcon.getConnection ();

               //Write JDBC based on the above details

               Statement st = con.createStatement ();

               ResultSet rs = st.executeQuery (“select * from student”);

               while (rs.next())

                {

                      System.out.println (“rs.getInt (1) + ” ” + rs.getInt (2) + ” ” + rs.getInt (3)”);

                }

                rs.close ();

                st.close (); //releases Connection object back to JDBC connection pool

         }

}

JDBC RowSets

By Dinesh Thakur

Limitations of ResultSet object


Objects become serializable object only when its class implements java.io.5erializable

interface. We can send only Serializable objects over the network.

i. ResultSet object cannot be send over the network because it is not Serializable object.

ii. ResultSet object does not support beans style programming.


RowSet

RowSet object means it is the object of driver supplied Java class that implements javax.sql.RowSet interface. This RowSet interface is a sub interface of java.sql.ResultSet interface. We have three types of RowSets.

1. Cached RowSet

It is a disconnected RowSet. Behavior wise, it is like insensitive ResultSet object.

2. JDBC RowSet

It is connected RowSet. Behavior wise, it is like sensitive ResultSet object.

3. Web RowSet

It is a connected RowSet. It collects data from xml files.

All RowSet objects are Serializable objects and they support bean style programming (getter and setter method-based programming).

Oracle thin/OCI driver give support for RowSets by supplying the following three

classes in ojdbc14.jar (oracle 10g), orcrs12.jar(oracle 9i), ojdbc6.jaroracle 11g) files.

The classes are

i. oracle.jdbc.rowset.OracleCachedRowSet

ii. oracle.jdbc.rowset.OracleJDBCRowSet

iii. oracle.jdbc.rowset.OracleWebRowSet

Advantages with RowSets

i. Gives simplified programming (allows single object based setter and getter methods oriented programming).

ii. RowSets are serializable objects so they can be sent over the network.

Disadvantages with RowSets

i. Very few drivers support Rowsets.

ii. Allows only select operations.

iii. These are not industry standard.


Example on CachedRowSet


Source code for CachedRowSet:

CachedRowSetDemo.java

import java.sql.*;

import javax.sql.*;

public class CachedRowSetDemo

{

      public static void main (String args []) throws Exception

         {

                  //instance is created for OracleRowSet class

                  oracle.jdbc.rowset.OracleCachedRowSet crs = new oracle.jdbc.rowset.OracleCachedRowSet ();

                  //setter methods

                  crs.setUrl (“jdbc:oracle:thin:@Jocalhost:1521:orcl”);

                  crs.setUsername (“scott”);

                  crs.setPqssword (“tiger”);

                  crs.setCommand (“select* from college”);

                  crs.execute () ;

                  while (crs.next ())

                     {

                            System.out.println (crs.getString (1) +” “+crs.getString (2) + ” “+crs.getInt(3)); 


                    }

                    crs.close ();

         }

}

crs.setCommand (“select * from college”): Is used to set the command for select query.

crs.execute (): is used to execute all above settled commands.


Example on JdbcRowSet

Source code for the program:

JdbcRowSetDemo.java


import java.sql.*;

import javax.sql.*;

import oracle.jdbc.rowset.*;

public class JdbcRowSetDemo

{

        public static void main (String args [] )throws Exception

         {

               try

                {     

                     //instance created for OraCleJDBCRowSet and referenced by RowSet

                     RowSet jrs = new OracleJDBCRowSet ();

                     jrs.setUrl (“jdbc:oracle:thin@localhost:1521:orcl”);

                     jrs.setUsername (“scott”);

                     jrs.setpassword (“tiger”);

                     jrs.setCommand (“select * from college”);

                     jrs.execute ();

                     while (jrs.next ())

                       {

                               System.out.println (jrs.getString (1) +” “+jrs.getString (2) + ” “+jrs.getInt (3));

                       }

                       jrs.close ();

                }

                catch (Exception e){}

         }

} 


Batch Processing in JDBC

By Dinesh Thakur

Network round trips (query gone for execution to database and result comes to the screen, i.e., one network roundtrip) increases while sending multiple queries as individual queries to the database. It is recommended to combine them into a single unit/batch and send that batch to database only once for execution. This is called batch processing and this reduces network round trips between Java application and the database software. [Read more…] about Batch Processing in JDBC

Transaction Management in JDBC

By Dinesh Thakur

A transaction is a group of operations used to perform a particular task. In a transaction if one operation fails then all operations of the transaction gets cancelled. Finally, the transaction status fails.

If all operations in a transaction are successfully executed, then only the transaction status is successful. A transaction follows the principle of –All or Nothing. For example, booking a movie ticket online is a transaction.

Transactions are of two types:

1. Local transaction

2. Distributed transaction (Global Transaction)

                    Type of Transactions

Local Transaction

Local transaction means all operations are executed on a single database. In Java, local transaction can be done by using JDBC, hibernate, Enterprise JavaBeans (EJB), spring framework.

                    Local Transaction

Distributed Transaction

Distributed transaction means the operations are executed on more than one database.

In Java, distributed transaction can be done either using EJB technology or by using spring framework.

                     Distributed Transaction

Transaction property

1. Atomicity

Every transaction is an atomic operation. It means “follow all or nothing principle”. For example, in a transfer of money operation-in a bank, if an amount is withdrawn from account 1 and it is deposited to account 2. Here either both operations are done or both are cancelled. So it is an atomic operation.

2. Consistency

After the transaction is completed successfully or fails, the data left in the database, should be reliable. Reliable data is called consistent data.

3. Isolation

If two transaction are working on the same data then one transaction does not clash (collide) with the other. It means transaction is isolated.

4. Durability

The data generated after completion of transaction will be long-lasting data, until another transaction is done on that data. We call these data durable.

Transaction management method in JDBC

The following are the three methods given by Connection interface in JDBC to perform transaction management.

i.  setAutoCommit (false)

ii. commit ()

iii. rollback ()

From a Java program if any SQL operation is executed, it will be permanently executed on database by default. If operations are permanently executed in database then we cannot cancel them. So transaction management is not possible.

If we want to perform transaction management in JDBC program, we should execute operation on database as temporarily. Later, we can either commit or cancel the operation.

If we want to execute SQL operation temporarily from a Java program onto database, then first of all, we need to disable auto commit mode on JDBC program. To disable auto commit mode we need to call setAutocommit (-) method.

If execution occurs while executing database operation, then we need to cancel the transaction by calling rollback (-) method.

If all operations are successfully executed, then we need to commit the transaction by calling commit (-) method.

Need for try catch in transaction management

In JDBC program we need to put the operation of transaction within try block, because Java program knows whether an error has occurred in transaction or not by observing the control in the catch block.

If the control entereds the catch block, it means an error has occurred. So, we will rollback the transaction.

If the control does not enter the catch block, it means no exception has occurred. So we commit the transaction.

This account_balance is created by the following columns and data types on which

we are going to perform transaction management:


The source code for the transaction management:


BankingTest.java


import java.sql.*;

import java.util.Scanner;

public class BankingTest

{

      public static void main (String args []) throws Exception

       {

             //to take the input from keyboard

             Scanner s = new Scanner (System.in);

             System.out.println (“Enter the Source account number :” );

             int saccno = s.nextInt ();

             System.out.println (“Enter the Destination account number :”);  

             int daccno = s.nextInt ();

            System.out.println (“Enter the amount to transfer :”);

            int amnt = s.nextInt ();

            Class.forName (“oracle.jdbc.driver.OracleDriver :”);

            Connection cn = DriverManager.getConnection

            (“jdbc:oracle:thin:@localhost:1521:orcl”, “scott”, “tiger”);

            Statement st = cn.createStatement ();

            cn.setAutoCommit (false);

            ResultSet rs = st.executeQuery (“select avail_balance from account_balance where account_number=”+saccno);

            rs.next ();

            int abal = rs.getInt (1);

            //System.out.print (abal);

            if (abal>amnt)

            {

                 int up = st.executeUpdate (“update account_balance set avail_balance =avail_balance-“+amnt+ “where account_number=”+saccno);

                 int up1 = st.executeUpdate (“update account_balance set avail_balance = avail_balance-“+amnt+ “where account_number=”+daccno);

                 //System.out.print (up+” “+up1);

                 if (up==1 && up1==1)

                 {

                      cn.commit ();

                      System.out.println (“*******: “+amnt+” balance is successfully Transferred:*******”);

                 }

                 else

                  {

                      cn.rollback ();

                      System.out.println (“rollback”);

                 }

            }

            else

              {

                    System.out.println (“You does not have sufficient balance !!! please deposit in your account.”);

              }

      }

}

In the above program:

cn.setAutoCommit (false): Used to disable auto commit mode. Auto commit mode is disabled before any transaction happens, so the any data cannot be stored automatically.

cn.commit () It commits the transaction after the successful execution of the transaction.

cn.rollback ()  If some problem occurs in the transaction, it cancels the entire transaction.

Transaction is performed by running the program. Here, transaction is successful. You can check it from the database table.

This program also shows error message when the transaction has more than the available balance.


What is RMI Architecture?

By Dinesh Thakur

The RMI architecture, shown in Figure, describes how remote objects behave and how parameters are passed between remote methods. Remote method invocation allows the program to define separately the behaviour and the code that implements the behaviour and allows running them on separate JVMs. This principle facilitates the clients to focus on the definition of a service while the servers can focus on providing the service. [Read more…] about What is RMI Architecture?

What is RMI (Remote Method Invocation)?

By Dinesh Thakur

The Java RMI comes along with Java JDK l.l and higher versions. It is a true distributed computing application interface for Java. Java RMI is language-specific, and can provide more advanced features like serialization, security and so on. [Read more…] about What is RMI (Remote Method Invocation)?

MVC Design Pattern

By Dinesh Thakur

• The (Model View Controller) MVC design pattern separates a software component into three distinct pieces: a view, a model  and a controller.

• The model stores the content. It manages the state and conducts all transformations on that state. The MVC model has no specific knowledge of either its controllers or its views. The Link is maintain by system between model and views and notifies the views when the state change occurs. For example – For the button component model will hold the information about the state of button such as whether the button is pushed or not.

• The view displays the contents. It manages the visual display of the state represented by the model. Thus  model view can be represented graphically to the user. For example – For example: For the button component the color, the size of the button will be decided by the view.

                                    MVC Design Pattern


• The controller is for managing the user interaction with the model. It is basically for handling the user input. The controller takes care of mouse and keyboard events. For example – For the button component the reaction of events on the button press will be decided by the controller.

• The MVC architecture of swing specifies how these three objects(Model, View and Controller) interact.

• For the text field the model is nothing but the contents of the text field. The model must implement the method to change the contents and to discover the contents. For example text model had methods to add to remove the characters. One important thing to note is that the model is completely non visual.

• For a single model there can be more than one views. Each view can show different aspect of the content. For example: A particular web page can be viewed in its WYSIWYC(What-You-See-Is-What-You-Get)) form or in the raw tagged form. But there are some components like button for which it is not possible to have multiple views for the same model.

• The controller handles the user-input events such as mouse clicks and keyboard strokes. On receiving the events the controller decides whether to translate it into corresponding model or in views.

• If user presses the button then the controller calls the event handling methods in order to handle the button press. The controller tells the view to update itself and to display the desired result. For displaying the desired result the view reads the content from the model. Thus model-view and controller works together in order to accomplish the certain task.

Class Hierarchy for Applets

By Dinesh Thakur

The AWT allows us to use various graphical components. When we start writing any applet program we essentially import two packages namely – java.awt and java.applet.

The java.applet package contains a class Applet which uses various interfaces such as AppletContext, AppletStub and AudioCIip. The applet class is an extension of Panel class belonging to java.awt package.

To create an user friendly graphical interface we need to place various components on GUI window. There is a Component class from java.awt package which derives several classes for components. These classed include Check box, Choice, List, buttons and so on. The Component class in java.awt is an abstract class.

The class hierarchy for Applets is as shown in Fig.

                       Applet class hierarchy

What are the differences between AWT and Swing?

By Dinesh Thakur

Java graphics programming is possible using AWT i.e. Abstract Window Toolkit and swing components. Swing is a set of classes. These classes provide the components that are more powerful and flexible than AWT.

The difference between AWT and Swing is as given below –


AWT

Swing

The Abstract Window ToolKit is a heavy weight component because every graphical unit will invoke the native methods.

The Swing is a light weight component because it’s the responsibility of JVM to invoke the native methods

The look and feel of AWT depends upon platform.

As Swing is based on Model View Controller pattern, the look and feel of swing components in independent of hardware and the operating system.

AWT occupies more memory space.

Swing occupies less memory space.

AWT is less powerful than Swing.

Swing is extension to AWT and many drawbacks of AWT are removed in Swing.


JPopupMenu in Java Swing Example

By Dinesh Thakur

Using the JPopupMenu class, context-sensitive pop-up menus can be created, which are provided in most of today’s computer applications. These menus are used to provide options specific to the component for which the pop-up trigger event was generated. The pop-up trigger events occur when the right mouse button is either pressed or released. Program demonstrates how such a pop-up menu can be created.

import javax.swing.*;
import java.awt.event.*;
import java.awt.*;
public class PopupTest extends JFrame implements MouseListener
{
                 public JRadioButtonMenuItem items[];
                 String fonts[]={"Bold", "Italic", "Bold Italic"};
                 public String displaytext="This is a demonstrating popup menus,"+
                                                     "Please right click the mouse";
                 final JPopupMenu popupMenu;
                 public int index;
                 public PopupTest()
                 {
                         super("PopupMenu Example");
                         popupMenu=new JPopupMenu();
                         ItemHandler handler=new ItemHandler();
                         index=3;
                         ButtonGroup fontsGroup=new ButtonGroup();
                         items=new JRadioButtonMenuItem[3];
                         for(int i=0;i<items.length;i++)
                             {
                                  items[i] =new JRadioButtonMenuItem(fonts[i]);
                                  fontsGroup.add (items[i]);
                                  popupMenu.add(items[i]);
                                  items[i].addActionListener(handler);
                             }
                        getContentPane().setBackground(Color.white);
                        getContentPane().addMouseListener(this);
                        setSize(300,200);
                        show();
                }
                public void mousePressed(MouseEvent e)
                  {
                        checkForTriggerEvent(e);
                  }
                public void mouseReleased(MouseEvent e)
                 {
                        checkForTriggerEvent(e);
                 }
                 public void mouseMoved(MouseEvent e)
                 { }
                 public void mouseClicked(MouseEvent e)
                 { }
                 public void mouseEntered(MouseEvent e)
                 { }
                 public void mouseExited(MouseEvent e)
                 { }
                 private void checkForTriggerEvent(MouseEvent e)
                 {
                     if(popupMenu.isPopupTrigger(e))
                       {
                             popupMenu.show(e.getComponent(),e.getX() ,e.getY());
                       }
                 }
                 public void paint(Graphics g)
                 {
                       super.paint(g);
                       String fontname="Arial";
                       int type=Font.PLAIN;
                       int size=12;
                       Font font;
                       FontMetrics fm;
                       switch(index)
                               {
                                      case 0: type=type|Font.BOLD;
                                                 break;
                                      case 1: type=type|Font.ITALIC;
                                                 break;
                                      case 2: type=type|Font.BOLD|Font.ITALIC;
                                                 break;
                                      default:type=Font.PLAIN;
                                                 break;
                               }
                        font=new Font(fontname,type,size);
                        g.setFont(font);
                        fm=getFontMetrics(font);
                        int xloc=(getSize().width-fm.stringWidth (displaytext))/2;
                        int yloc=(getSize().height-fm.getHeight())/2;
                        g.drawString(displaytext,xloc,yloc);
                  }
                     public static void main(String args[])
                      {
                             PopupTest app=new PopupTest();
                             app.setDefaultCloseOperation(JFrame.DISPOSE_ON_CLOSE);
                      }
                     private class ItemHandler implements ActionListener
                     {
                                  public void actionPerformed(ActionEvent e)
                                  {
                                        for(int i=0;i<items.length;i++)
                                            {
                                                  if(e.getSource() ==items[i])
                                                    {
                                                            index=i;
                                                            repaint();
                                                            return;
                                                    }
                                            }
                                   }
                       }
}


Before any of the radio button menu items are selected the text is displayed in plain font. If the Bold Italic menu item is selected, then the text displayed will be as follows:

                      JPopupMenu in Java Swing Example

When the user clicks the right mouse button on the Popup Test window, a JPopupMenu of fonts is displayed. If the user clicks one of the menu items that represent a font (that is, JRadioButtonMenultem) then the action Performed method of the class ItemHandler changes the font of the text displayed to the appropriate font. The constructor for the class Pop-up test defines the JPopupMenu.

                        final JPopupMenu popupMenu = new JPopupMenu();

In Program, the class Popup Test extends the class JFrame and implements the interface MouseListener. In this class, there is an inner class which implements the Item Listener interface to listen to the menu button-clicks. The methods mousePressed and mouseReleased are overridden to check for the pop-up-trigger event. Each method calls the private method checkForTriggerEvent to determine if the popup-trigger event occurs. The method isPopup Trigger returns the value true if the pop-up-trigger event has occurred. In that case, the show() method of JPopupMenu is invoked to display the pop-up menu. The first argument of the show() method specifies the origin component, whose position helps us determine where the pop-up menu will appear on the screen. The last two arguments are the x and y coordinates from the origin-component’s upper-left comer at which the pop-up menu should appear.

When a menu item is selected from the pop-up menu, the method actionPerformed() of the private inner class ItemHandler determines which object of JRadioButtonMenultem was selected : by the user and accordingly displays the text appropriate on the window.

Other than the ones listed above, the JPopupMenu class contains methods to set the invoker, label and size of the pop-up menu.

                    Constructors and methods in the jpopupMenu class.


Constructors and Methods

Description

JPopupMenu()

Constructs a new JPopupMenu object.

JPopupMenu(String str)

Constructs a new JPopupMenu object with the title specified by the parameter.

JMenultem add(Action action)

Appends a menu item that initiates the specified action to the end of the pop-up menu.

JMenultem add(Menultem menuitem)

Appends the specified menu item to the end of the pop-up menu.

void addPopupMenuListener(Popup MenuListener listener)

Adds a listener of PopupMenu class to the pop-up menu.

void addSeparator()

Adds or appends a new separator to the end of this menu.

Component getComponent()

Returns the name of the component of JPopupMenu.

Component getComponentAtlndex(int index)

Returns the jpopupMenu Component at the specified index.

int getComponentlndex(Component c)

Returns the index of the specified component in the JPopupMenu.

Component getinvoker()

Returns the component that invokes this pop-up menu.

String getLabel()

Returns the po-pup menu’s title.

void insert(Component component, int index)

Inserts or adds the specified component at the specified index for this pop-up menu.

void pack()

Lays out the container such that it uses the minimum space to display its contents.

void remove(Component component)

Removes the specified component from the pop-up menu

void remove(int index)

Remove the component at the specified index from the pop-up menu.

void show(Component component, int x, int y)

Displays the pop-up menu on the window.

The Swing Packages

By Dinesh Thakur

Some of the packages of swing components that are used most are the following:

• Javax.swing

• javax.swing.event

• javax.swing.plaf.basic

• javax.swing.table

• javax.swing.border

• javax.swing.tree


The largest of the swing packages, javax.swing, contains most of the user-interface classes (these are J classes, the classes having the prefix J). JTableHeader and JTextComponent are the exceptional classes implemented in the packages javax.swing.table and javax.swing.text, respectively. javax.swing.text contains two sub-packages known as javax.swing.text.html and javax.swing.text.rtf used for HTMLcontent and for Rich Text Format content, respectively.

To define the look and feel of the swing component, the javax.swing.plaf.basic package is used. javax.swing.border contains an interface called Border which is implemented by all the border classes. These classes cannot be instantiated directly. They are instantiated using the factory method (BorderFactory) defined in the javax.swing package. The javax.swing.event package contains all the classes that are used for event handling. The javax.swing.tree package includes classes and interfaces that are specific to the JTree component.

There are totally 16 packages in the swings packages and javax.swing is one of them. A brief description of all the packages in swing is given below.

Packages

Description

javax.swing

Provides a set of “lightweight” (all-Java language) components to the maximum degree possible, work the same on all platforms.

javax.swing.border

Provides classes and interface for drawing specialized borders around a Swing component.

javax.swi ng.colorchooser

Contains classes and interfaces used by the JcolorChooser component.

javax.swing.event

Provides for events fired by Swing components

javax.swing.filechooser

Contains classes and interfaces used by the JfileChooser component.

javax.swing.plaf

Provides one interface and many abstract classes that Swing uses to provide its pluggable look-and-feel capabilities.

javax.swing.plaf.basic

Provides user interface objects built according to the Basic look and feel.

javax.swing.plaf.metal

Provides user interface objects built according to the Java look and feel (once condenamed Metal), which is the default look and feel.

javax.swi ng.plaf.mult

Provides user interface objects that combine two or more look and feels.

javax.swing.table

Provides classes and interfaces for dealing with javax.swing.jtable

javax.swing.text

Provides classes and interfaces that deal with editable and noneditable text components

javax.swing.text.html

Provides the class HTML Editor Kit and supporting classes for creating HTML text editors.

javax.swing.text.html.parser

Provides the default HTML parser, along with support classes.

javax.swing.text.rtf

Provides a class RTF Editor Kit for creating Rich- Text-Format text editors.

javax.swing.tree

Provides classes and interfaces for dealing with javax.swing.jtree

javax.swing.undo

Allows developers to provide support for undo/redo in applications such as text editors.


The Java2D API

By Dinesh Thakur

The Java2D API provides advanced two-dimensional graphics capabilities for programmers who require detailed and complex graphical manipulations. The API includes features for processing line art, text and images in packages java.awt, java.awt.image, java.awt.color, java.awt.font. java.awt.geom, java.awt.print and java.awt.image.renderable.

Drawing with the Java2D API is accomplished by using an instance of class Graphics2D (package java.awt). Class Graphics2D is a sub-class of class Graphics. In fact, the actual object used to draw in every

paint method is a Graphics2D object, which can be passed to the paint() method and accessed using the super-class Graphics reference, that is, g. To access the Graphics2D capabilities, the Graphics reference passed to paint to a Graphics2D reference must be downcast. To access the additional capabilities of Graphics2D while working with the Graphics class, the Graphics reference (g) must be type-cast to a Graphics2D reference by passing paint Component into Graphics2D. The syntax of casting Graphics2D to Graphics is the following:

                                     Graphics2D g2d = (Graphics2D ) g;

Drawing with Graphics Class

By Dinesh Thakur

The Graphics class provides different methods for drawing shapes such as lines, rectangles and ovals. Table shows the methods that are used to draw shapes. Each drawing method takes.

                                       Methods in the Graphics Class


Method

Description

public void drawLine( int x1, int y1, int x2, int y2 )

Draws a line between the point (xl, yl) and the point (x2, y2).

public void drawRect( int x, int y, int width, int height)

Draws a bordered rectangle of specified ‘width’ and ‘height’ starting at the point ‘x’ and ‘y’.

Public void fillRect(int x, int y, int width, int height)

Fills a rectangle of specified ‘width’ and ‘height’ starting from the position ‘x’ and ‘y’.

public void clearRect( int x, int y. int width, int height)

Draws a filled rectangle of specified ‘width’ and ‘height’ starting from the position ‘x’ and ‘y’ with the current background colour.

public void drawRoundRect( int x, int y,int width. int height, int arcWidth, int arcHeight )

Draws a rectangle with rounded comers with the specified ‘width’ and ‘height’ starting from the position ‘x’ and’y’. The shape of the rounded comers are specified by parameters ‘arcWidth’ and ‘arcHeight.

Pubic void fillRoundRect(int x, int y,int width, int height, int arcWidth. Int arcHeight )

Draws a rectangle with rounded comers with the specified ‘width’ and ‘height’ starting from the position ‘x’ and’y’. Rounded comers are specified with the ‘arcWidth’ and ‘arcHeight’.

Public void draw3DRect( int x, int y, int width, int height, boolean b )

Draws a three-dimensional rectangle with specified ‘width’ and ‘height’ starting from the position ‘x’ and ‘y’.

Public void fill3DRect( int x, int y, int width, int height, boolean b )

Draws a three-dimensional filled rectangle with specified ‘width’ and ‘height’ starting from the position ‘x’ and ‘y’.

public void drawOval( int X, int y, int width, int height)

Draws an oval with specified ‘width’ and ‘height’ starting with the location ‘x’ and ‘y’.

Public void fillOval(int x, int y, int width,int height)

Draws a filled oval with specified ‘width’ and ‘height’ starting with the location ‘x’ and ‘y’.


the width and height of the shape as parameters” These parameters should be non-negative” These methods do not return any value and instead draw the shapes with the current colour of the Graphics object.

What is Abstract Window Toolkit (AWT)?

By Dinesh Thakur

The Abstract Windowing Toolkit (AWT) is the first set of nontrivial, publicly available, basic objects with which to build Java programs, with the focus on graphical user interfaces, or GUls. The AWT was built by Sun’s JavaSoft unit and is provided free for anyone to use for any reason whatsoever, in binary form. There is some controversy as to whether the AWT in its present condition will survive, but it does have three things going for it:


• It is the first Java toolkit available,
• It has gained rapid acceptance, and
• JavaSoft is committed to it.

The Java Foundation Class (JFC) provides two frameworks for building GUI-based Applications Abstract Window Toolkit (AWT) and swings.

The AWT package can be used by importing java.awt.* as follows:

   import java.awt.*

The AWT has a set of Java classes that provide the standard set of user-interface elements (windows, menus, boxes, buttons, lists and so on). That is, AWT provides several facilities for drawing two-dimensional shapes, controlling colours and controlling fonts. Before using Java AWT classes, understanding the Java coordinate system is essential. By default, the top left comer of the component has coordinates (0,0). Here, the x-coordinate denotes the horizontal distance and the y-coordinate is the vertical distance from the upper left comer of the component, respectively. The applet’s width and height are 200 pixels each, in which the upper left comer is denoted by (0,0) and lower right comer is (200, 200).

Event Handlers An event is generated when an action occurs, such as a mouse click on a button or a carriage return (enter) in a text field. Events are handled by creating listener classes which implement listener interfaces. The standard listener interfaces are found in java.awt.event.

Layout Manager A layout manager is automatically associated with each container when it is created. Examples of this are BorderLayout and GridLayout.

The HTML APPLET Tag

By Dinesh Thakur

The APPLET tag of HTML is used to start an applet either from a web browser or an applet viewer. The HTML tag allows a Java applet to be embedded in an HTML document.

A number of optional attributes can be used to control an applet’s appearance, for example, the dimensions of the applet panel. Also, parameters can be independently defined which can be passed to the applet to control its behavior.

The complete syntax of the applet tag is given below:

<applet

code = “appletFile” -or- [object = “serializedApplet”]

width = “pixels”

height = “pixels” [codebase = “codebaseURL”]

[archive = “archiveList”]

[alt = “alternateText”]

[name = “appletlnstanceName”]

[align = “alignment”]

[vspace = “pixels”]

[hspace = “pixels”]

> 

[<param name = “appletAttribute1” value = “value”>]

[<param name = “appletAttribute2” value = “value”>]

….

….

[alternateHTML]

</applet>

Attributes in the applet tag.

The attributes code, width and height are mandatory and all other attributes are options, which are shown in brackets ([]). The attributes need not follow the order that was specified in the above syntax. The description of each attribute is given below:

codeThe name of the Java applet. Class file, which contains the compiled applet code. This name must be relative to the base URL of the Applet and cannot be an absolute URL. The extension in the file name is optional.

width This refers to the width of the applet panel specified in pixels in the browser window.

height This refers to the height of the applet panel specified in pixels in the browser window. The width and height attributes specify the applet’s, display area. This applet area does not include any windows or dialogue boxes that the applet shows.

Codebase This refers to the base URL of the applet. That is, the URL of the directory that contains the applet class file. If this attribute is not specified then the HTML document’s URL directory is taken as the CODEBASE.

archive There are one or more archive files containing Java classes and other resources that will be preloaded. The classes are loaded using an instance of the AppletClassLoader class with the given codebase. The archives in archivelist are separated by a comma (,).

alt This refers to text to be displayed if the browser understands the applet tag but cannot run Java applets.

name This refers to a name for the applet instance which makes it possible for applets to

communicate with each other on the same HTML page. The getApplet () method, which is defined in the AppletContext interface, can be used to get the applet instance using name.

align This refers to the alignment of the apple!. The possible attribute values are LEFT, RlGHT, TOP, BOTTOM, MIDDLE, BASELINE, TEXTTOP, ABSMIDDLE and ABSBOTTOM.

vspace This refers to the space, specified in number of pixels, used as a margin above and below the applet.

hspace This refers to the space, specified in number of pixels, used as a margin to the left and right of the applet.


param The param tag, specifies an applet parameter as a name-value pair. The name is the parameters name, value is. its value. The values of these parameters can be obtained using the getParameter () method.

alternateHTML This is ordinary HTML to be displayed in the absence of Java or if the browser does not understand the applet tag. This is different from the alt attribute which understands the· applet tag but cannot run, whereas the alternateHTML tag is provided when a browser does not support applets.

Passing parameters to applets

The applet tag helps to define the parameters that are to be passed to the applets. Programs illustrate the method of passing parameters to an applet. In this example the first parameter that is presented contains text whose location is specified by the other two parameters. Program is the HTML code for this.

Program HTML code for the applet program for passing parameters.

<! DOCTYPE HTML PUBLIC“-//W3C//DTD HTML4.0 Transitional//EN”>

<HTML>

<HEAD>

<TITLE>Example for Parameter passing to applet </TITLE>

</HEAD>                                                      

<BODY>

<H3>This is an example for passing parameters to Applet</H3> <p>

The parameters are<p>

text= Text Parameter <p>

x = 50 <p>

y = 50 <p>

<H5> THE TEXT PARAMETER WILL BE DISPLAYEDIN THE APPLETAT THE

X, Y LOCATION </H5>

<APPLETCODE = “ParamApplet.c1ass” WIDTH = 300 HEIGHT = 100>

<PARAMNAME = “text” VALUE = “Text Parameter”>

<PARAM NAME = “x” VALUE = “50”>

<PARAM NAME = “y” VALUE = “50”>

</APPLET>

</BODY>

</HTML>

After writing the HTML code let us write the applet program that will retrieve the parameters specified in the HTML tag by using the getParameter () method. This method has one argument, which specifies the name of the argument and returns the value of the argument in the form of a string. The Integer.parselnt () method is used to convert the parameters to the integer datatype from the string datatype.

Program passing parameters to an applet.


import java.applet*;

import java.awt.*;

import java.awt.event.*;

import java.net.*;

public class Para Applet extends Applet

{

    public void init (){}

    public void start (){}

    public void destroy (){}

    public void stop (){}

          public void paint (Graphics g)

          {

              String text=getParameter (“text”);

              g.drawString (text, 50, 50);

          }

}

Working with Applets

By Dinesh Thakur

Applets can be executed in two ways: from Browser or from Appletviewer. The JDK provides the Appletviewer utility.

Browsers allow many applets on a single page, whereas applet viewers show the applets in separate windows.

Program, named SampleApplet, demonstrates the life-cycle methods of applets:

Program: A demonstration of life-cycle methods of applets.

import java.applet*;

import java.awt.*;

import java.awt.event.*;

/*<APPLETcode = “SampleApplet” width=300 height=150> </APPLET>*/

public class SampleApplet extends Applet implements ActionListener

{

    Button b = new Button (“Click Me”);

    boolean flag = false;

    public void init ()

    {

         System.out.println (“init () is called”);

         add(b);

         b.addActionListener (this );

    }

     public void start ()

     {

         System.out.println (“start () is called”);

    }

     public void destroy ()

     {

         System.out.println(“destroy () is called”);

     }

     public void stop ()

     {

        System.out.println(“stop () is called”);

     }

     public void actionPerformed (ActionEvent ae)

    {

         flag = true;

         repaint ();

     }

     public void paint(Graphics g)

     {

          System.out.println (“paint () is called”);

          if (flag)

          g.drawString (”This is a simple Applet”,50,50);

     }

}

For executing the program using the AppletViewer or the web browser, first the program is to be compiled in the same way as the Java application program as shown below:

C:\>Javac SampleApplet.java

Running the applet using AppletViewer

AppletViewer is a program which provides a Java run-time environment for applets. It accepts a HTMLfile as the input and executes the <applet> reference, ignoring the HTML statements. Usually, AppletViewer is used to test Java applets.

To execute any applet program using AppletViewer the applet tag should be added in the

comment lines of the program. These comment lines will not be considered when the programs are compiled. The command AppletViewer <appletfile.java> is used to view the applet .To execute Program, we can invoke the same as follows:

c:\>appletviewer SampleApplet.java

The reader can thus execute Program. It is suggested as an exercise.

The drawstring () method draws the String ‘This is a sample applet’ on the applet panel, starting at the coordinate (50, 50). Note that the applet panel provides a graphical environment in which the drawing will paint rather than print. Usually, the panel is specified in terms of pixels in which the upper left comer is the origin (0, 0).

As mentioned earlier, applets interact with the user through AWT. In Program we have used one AWT component-button. Observe the SampleApplet class header:

public class SampleApplet extends Applet implements ActionListener

The ActionListener interface is implemented by a class to handle the events generated

by components such as buttons. The method actionPerformed () available in this interface is overridden so that some action is performed when the button is pressed. In Program, it can be observed that when the applet is first executed, the paint () method does not display anything on the applet window. This is because flag is set to false. When the button is pressed (observe the actionPerformed () method) the flag is set to true and repaint () method is called. This time since the flag is set to true, the repaint () method will display the string ‘This is a simple applet’.

In Program we use the System.out.println () method to print the sequence of the methods executed when the applet is running.

The output shown in the console is in the following:

init () is called;

start () is called;

paint () is called;

stop () is called;

start () is called;

paint () is called;

stop () is called;

destroy () is called;

When the applet program is first executed, three methods-init (), start (), paint () are executed. Later, if the applet window is minimized, the stop () method is executed. If the applet window is maximized again, the start () and the paint () methods will be executed simultaneously, When the applet window is closed, the stop () and the destroy () methods will be called simultaneously.

Running the applet using the web browser

The browsers that support applets include Netscape Navigator, Internet Explorer and Hot Java. The applet can be viewed from a web browser by writing the APPLET tag within the HTML code. To run the Program in the web browser, the following html code has to be written:

<html>

<head>

<title> A sample Applet</title >

</head>

<body>

<applet code=”SampleApplet” width=200 height=200>

</applet>

</body>

</html>

To run the applet, the browser, which could be the Internet Explorer for instance, has to be opened, the options File     Open have to be selected. Then, the applet code HTML file is opened by using the Browse button.

To show the difference between running the applet in the applet viewer and the web browser Program is modified a little to the form shown in Program:

Program An alternate way of running an applet.

import java.applet.*;

import java.awt. *;

public class SampleApplet extends Applet

{

     String msg = “”;

     public void init ()

     {

        msg = msg + “init ();”

     }

     public void start ()

     {

          msg = msg+ “start ();”

     }

     public void destroy ()

     {

          msg = msg+ “destroy ();”

     }

     public void stop ()

     {

        msg = msg+ “stop ();”

    }

    public void paint(Graphics g)

    {

         msg = msg+ “paint ();”

         g.drawString(msg,10,20);

    }

}

The button is removed and the life-cycle methods are displayed on the applet window instead of on the console. The difference between the output of the above applet when called using the AppletViewer and the web browser is in Figure.

The output of Program shows the applet with the sequence of the methods executed. When the applet program is first executed, the init (), start () and paint () methods are called.

When the web browser is minimized, the paint () method is called, and when it is maximized, paint () is called again. In the case of the applet viewer the stop (), start () and paint () methods are called when the applet is maximized. The same things happen when the applet viewer and the web browser are’ closed. That is, the stop () method and the destroy () method are called. When moving from the web page containing the applet to another web page and back, the start () method in the applet is called.

Java Applications Versus Java Applets

By Dinesh Thakur

Java programs consist of applications and applets. Java applications are stand-alone programs and typically executed using the Java interpreter. On the other hand, Java applets are executed in a web browser or in a special window known as the Appletviewer; however, the compilation stages of both are the same.

The structure of applets differs from that of application programs; for example applets do not have the main () method. Applets do not interact with the console operations (that is, I/O operations) like application programs do. Applets allow the user to interact through the AWT .

Applets differ from applications in the way they are executed. An application is started when its main () method is called. In the case of applets, an HTML file has to be created, which tells the browser what to load and how to run the applet. Java, however, allows a programmer to create software code that can function both as a Java application and as a Java applet using a single class file. Table illustrates the similarities and differences between Java applications and applets.


                   Table Similarities and differences between applications and applets.


Java applications

Java applets

These run on stand-alone systems.

These run in web pages

These run from the command line of a computer.

These are executed using a web browser.

Parameters to the application are given at the command prompt (for example, args [0], args [1] and so on )

Parameters to the applet are given in the HTML file.

In an application, the program starts at the main () method. The main () method runs throughout the application.    

In an applet, there is no main () method that is executed continuously throughout the life of an applet.

These have security restrictions.

These have security restrictions.

They support GUI features.

They support GUI features too. Java-compatible browsers provide capabilities for graphics, imaging, event handling and networking.   

These are compiled using the javac command.

These are compiled using the javac command also.

These are run by specifying the command prompt as follows: javaclassFileName  

These are run by specifying the URL in a web browser, which opens the HTML file, or run using the appletviewer by specifying at the command prompt: appletviewer htmlFileName

« Previous Page
Next Page »

Primary Sidebar

Java Tutorials

Java Tutorials

  • Java - Home
  • Java - IDE
  • Java - Features
  • Java - History
  • Java - this Keyword
  • Java - Tokens
  • Java - Jump Statements
  • Java - Control Statements
  • Java - Literals
  • Java - Data Types
  • Java - Type Casting
  • Java - Constant
  • Java - Differences
  • Java - Keyword
  • Java - Static Keyword
  • Java - Variable Scope
  • Java - Identifiers
  • Java - Nested For Loop
  • Java - Vector
  • Java - Type Conversion Vs Casting
  • Java - Access Protection
  • Java - Implicit Type Conversion
  • Java - Type Casting
  • Java - Call by Value Vs Reference
  • Java - Collections
  • Java - Garbage Collection
  • Java - Scanner Class
  • Java - this Keyword
  • Java - Final Keyword
  • Java - Access Modifiers
  • Java - Design Patterns in Java

OOPS Concepts

  • Java - OOPS Concepts
  • Java - Characteristics of OOP
  • Java - OOPS Benefits
  • Java - Procedural Vs OOP's
  • Java - Polymorphism
  • Java - Encapsulation
  • Java - Multithreading
  • Java - Serialization

Java Operator & Types

  • Java - Operator
  • Java - Logical Operators
  • Java - Conditional Operator
  • Java - Assignment Operator
  • Java - Shift Operators
  • Java - Bitwise Complement Operator

Java Constructor & Types

  • Java - Constructor
  • Java - Copy Constructor
  • Java - String Constructors
  • Java - Parameterized Constructor

Java Array

  • Java - Array
  • Java - Accessing Array Elements
  • Java - ArrayList
  • Java - Passing Arrays to Methods
  • Java - Wrapper Class
  • Java - Singleton Class
  • Java - Access Specifiers
  • Java - Substring

Java Inheritance & Interfaces

  • Java - Inheritance
  • Java - Multilevel Inheritance
  • Java - Single Inheritance
  • Java - Abstract Class
  • Java - Abstraction
  • Java - Interfaces
  • Java - Extending Interfaces
  • Java - Method Overriding
  • Java - Method Overloading
  • Java - Super Keyword
  • Java - Multiple Inheritance

Exception Handling Tutorials

  • Java - Exception Handling
  • Java - Exception-Handling Advantages
  • Java - Final, Finally and Finalize

Data Structures

  • Java - Data Structures
  • Java - Bubble Sort

Advance Java

  • Java - Applet Life Cycle
  • Java - Applet Explaination
  • Java - Thread Model
  • Java - RMI Architecture
  • Java - Applet
  • Java - Swing Features
  • Java - Choice and list Control
  • Java - JFrame with Multiple JPanels
  • Java - Java Adapter Classes
  • Java - AWT Vs Swing
  • Java - Checkbox
  • Java - Byte Stream Classes
  • Java - Character Stream Classes
  • Java - Change Color of Applet
  • Java - Passing Parameters
  • Java - Html Applet Tag
  • Java - JComboBox
  • Java - CardLayout
  • Java - Keyboard Events
  • Java - Applet Run From CLI
  • Java - Applet Update Method
  • Java - Applet Display Methods
  • Java - Event Handling
  • Java - Scrollbar
  • Java - JFrame ContentPane Layout
  • Java - Class Rectangle
  • Java - Event Handling Model

Java programs

  • Java - Armstrong Number
  • Java - Program Structure
  • Java - Java Programs Types
  • Java - Font Class
  • Java - repaint()
  • Java - Thread Priority
  • Java - 1D Array
  • Java - 3x3 Matrix
  • Java - drawline()
  • Java - Prime Number Program
  • Java - Copy Data
  • Java - Calculate Area of Rectangle
  • Java - Strong Number Program
  • Java - Swap Elements of an Array
  • Java - Parameterized Constructor
  • Java - ActionListener
  • Java - Print Number
  • Java - Find Average Program
  • Java - Simple and Compound Interest
  • Java - Area of Rectangle
  • Java - Default Constructor Program
  • Java - Single Inheritance Program
  • Java - Array of Objects
  • Java - Passing 2D Array
  • Java - Compute the Bill
  • Java - BufferedReader Example
  • Java - Sum of First N Number
  • Java - Check Number
  • Java - Sum of Two 3x3 Matrices
  • Java - Calculate Circumference
  • Java - Perfect Number Program
  • Java - Factorial Program
  • Java - Reverse a String

Other Links

  • Java - PDF Version

Footer

Basic Course

  • Computer Fundamental
  • Computer Networking
  • Operating System
  • Database System
  • Computer Graphics
  • Management System
  • Software Engineering
  • Digital Electronics
  • Electronic Commerce
  • Compiler Design
  • Troubleshooting

Programming

  • Java Programming
  • Structured Query (SQL)
  • C Programming
  • C++ Programming
  • Visual Basic
  • Data Structures
  • Struts 2
  • Java Servlet
  • C# Programming
  • Basic Terms
  • Interviews

World Wide Web

  • Internet
  • Java Script
  • HTML Language
  • Cascading Style Sheet
  • Java Server Pages
  • Wordpress
  • PHP
  • Python Tutorial
  • AngularJS
  • Troubleshooting

 About Us |  Contact Us |  FAQ

Dinesh Thakur is a Technology Columinist and founder of Computer Notes.

Copyright © 2025. All Rights Reserved.

APPLY FOR ONLINE JOB IN BIGGEST CRYPTO COMPANIES
APPLY NOW