• Skip to main content
  • Skip to primary sidebar
  • Skip to secondary sidebar
  • Skip to footer

Computer Notes

Library
    • Computer Fundamental
    • Computer Memory
    • DBMS Tutorial
    • Operating System
    • Computer Networking
    • C Programming
    • C++ Programming
    • Java Programming
    • C# Programming
    • SQL Tutorial
    • Management Tutorial
    • Computer Graphics
    • Compiler Design
    • Style Sheet
    • JavaScript Tutorial
    • Html Tutorial
    • Wordpress Tutorial
    • Python Tutorial
    • PHP Tutorial
    • JSP Tutorial
    • AngularJS Tutorial
    • Data Structures
    • E Commerce Tutorial
    • Visual Basic
    • Structs2 Tutorial
    • Digital Electronics
    • Internet Terms
    • Servlet Tutorial
    • Software Engineering
    • Interviews Questions
    • Basic Terms
    • Troubleshooting
Menu

Header Right

Home » Java » Java

Singleton Class in Java with Example

By Dinesh Thakur

What is a Singleton in Java?

Singleton Class in Java: A given class whose object (an instance of the class) is instantiated only once in JVM (Java Virtual Machine) and that only global instance of an object of the class used for every access. Such objects are mainly immutable. [Read more…] about Singleton Class in Java with Example
Scanner Class in Java With Example

By Dinesh Thakur

In Java 1.5, a new class known as Scanner class was introduced to simplify the task of getting input from the user. The Scanner class is in java.util package which allows the user to read the data dynamically from the keyboard. It can be used to read a File on the disk. The Java Scanner class extends Object class is present in java.lang package and implements Iterator and Closeable interfaces. [Read more…] about Scanner Class in Java With Example

Association, Composition and Aggregation in Java

By Dinesh Thakur

Association is nothing more than  a connection that exists between two classes.  We use the objects of these classes to set up the connection. Association can be  done in three ways one-to-one, one-to-many and many-to-many. Let’s have a look at an example showing how association is implemented in Java. [Read more…] about Association, Composition and Aggregation in Java

What is Abstraction in Java? Abstract Class or Interface

By Dinesh Thakur

Abstraction in Java: The words “data abstraction” and “information hiding” are generally used interchangeably. The two terms mean the same thing in this context. Abstraction is a simple representation of a complicated situation. It is a technique where we hide irrelevant details and represent only the essential aspects of a context so that one can focus on features one is interested; It helps to deal a complex system by concentrating on the essential features only. It is designed to make it easier to maintain, read and work on the code. In the object-oriented model, a class is an abstraction of existing entities in the domain of the software system. Ex: A car viewed as a car rather than its components. [Read more…] about What is Abstraction in Java? Abstract Class or Interface

What is Java Strings? | String Class and its Methods with Examples

By Dinesh Thakur

Strings often used in programming. Most of the programs use strings such as names, addresses, messages and many more. A string is a sequence of Unicode characters. Unlike most of the programming languages such as C/C++ where strings treated as an array of characters, Java treats a string as an object. Java provides the following classes for storing and processing strings. [Read more…] about What is Java Strings? | String Class and its Methods with Examples

What is an Immutable Class in Java? How to create it.

By Dinesh Thakur

Immutable class means unmodifiable or unchangeable, i.e., once the object has been created, they are immutable objects, there is no way to modify the text it represents. In Java, all primitive java.lang package wrapper classes (like String, Boolean, Byte, Short, Integer, Long, Float, Double, etc.) and String classes are immutable. [Read more…] about What is an Immutable Class in Java? How to create it.

Why does a byte can represent a character?

By Dinesh Thakur

A computer cannot store characters or integers. Computer can store information in the form of bits and bytes. The bit is a basic unit of information in computer. A bit can only have two values: yes or no, true or false, 1 or 0. [Read more…] about Why does a byte can represent a character?

How to Displaying Images in java

By Dinesh Thakur

There are four different overloaded drawImage methods in Graphics.

First, we’ll show you the least complicated call:

if (image != null) {
   g.drawImage (image,xloc,yloc, this) ;
}

This causes the image to be drawn lifesize (no scaling is applied), with the upper left corner of the image positioned at (xloc,yloc) in the current graphics context clipping rectangle. If any errors or events occur while the image is being rendered, they are ignored (potentially leaving the image in some strange display state). If the image contains transparent pixels, the destination pixels are left as they were before the drawImage call was made.

Next we’ll show you the image-loading call we used in the How to loading images in java

if (image != null) {
   g.drawImage (image,xloc,yloc, getBackground() ,this);
}

This call draws the image scaled normally (100%) with the upper left corner of the image positioned at (xloc,yloc). If the image has transparent pixels, those pixels in the destination graphics context are drawn in the color passed to drawImage. Our example passes the background color of the container we’re drawing in. This is different than the previous call, where the destination pixels were left alone.

Both of the methods we just discussed draw the image at a one-to-one ratio. Each pixel in the source image is drawn directly into the destination graphics context. While this works for the vast majority of cases, there are situations where the source image needs to be scaled (up or down) to fit into a particular region of the destination graphics context. Two variations of drawImage provide width and height parameters to be used in scaling the destination image. Regardless of the source image size, the destination image is rendered to the size specified in the width and height. This example leaves the transparent pixels as they were before the call to drawImage.

if (image != null) {
   g.drawImage(image,xloc,yloc,width,height,this) ;
}

The next example draws the transparent pixels in light gray. All pixels other than the transparent pixels are drawn in the source pixel color.

if (image != null) {
 g.drawImage{image,xloc,yloc, width,height,Color.lightGray,this);
}

If something interesting happens while an image is being drawn, the AWTimage-drawing code notifies this. imageUpdate. For most of your code, you can just pass this as the image observer. The default behavior implemented by Component is usually sufficient to get the image drawn. If your application is using incremental drawing, you may need to implement your own imageUpdate method. When the imageUpdate method is called, it receives a small block of status information:
• Image img-the image being referenced
• int infoflags-the logical OR of the following bits, each of which indicates that the related information is available
• WIDTH
• HEIGHT
• PROPERTIES
• SOMEBITS
• FRAMEBITS
• ALLBITS
• ERROR
• ABORT
• int x-the X location of the image
• int y-the Y location of the image
• int width-if (infoflags&WIDTH), then this is the width of the image
• int height-if (infoflags&HEIGHT), then this is the height of the image

How to loading images in java

By Dinesh Thakur

The Java AWT provides several classes to manage loading and displaying images. The most common image code you see on the Web is called an animator. There are numerous animation applets and classes available on the WWW. The Java Developer’s Kit provides a set of demo applications that draw images using static, single-buffered, and double-buffered animation. [Read more…] about How to loading images in java

What are the Uses of Class java.awt.Insets

By Dinesh Thakur

When you override the Container.insets () method, you are instructing the AWT to provide a margin around your container. The inset is used mostly by the Layout Manager to calculate sizing and positioning for contained objects. The Layout Manager will fit everything inside the insets you provide to it. The most common use of the inset space is to provide white space around a set of components to make them stand out as a group or just to provide more pleasing balance to a window.Remember that the insets indicate the distance from the border of the container to the contained objects. Effectively, you are setting the margins for your container. The space between the top, left, right, and bottom inset and the border of the container would be considered the margin.

For instance, Insets (20,10,10,1) would cause the Layout Manager to leave a 20 pixel top margin, 10 pixels on the left and right, and only 1 pixel at the bottom. We’ve started using a standard inset of 10 pixels for most of our containers, but you should follow your environment’s guidelines for code of your own.

The method can be implemented very simply:

public Insets insets() {
   return new Insets(10,10,10,10);
}

This produces a new Insets object every time insets is called. If you want to enhance performance, and the specific constant insets will always be appropriate, you can instantiate a private object in the constructor and always return that object. Also, the four values allow you to vary the inset width on each of the top, left, bottom, and right.

You will often combine the inset with a simple border. In the container paint () method, you can call drawRect () to draw a simple pixel wide border around the container. The border is at the outside of the container, and contained components will be inset from the line by the active inset amount.

 public void paint (Graphics g) {
    Dimension d = size();
    g.drawRect(0,0,d.width-1,d.height-1);
}

Of course, just as on paper, you can draw in the margins of your container. You can use things other than drawRect to give the special effect you desire. A custom container might draw a shadow or other 3D effect that consumes all the space between the container border and it’s inset. You are definitely not limited to lines, either. You can draw images, text, or any other graphic component in the margin of your container.

How to Generating and executing JAR files

By Dinesh Thakur

The JAR file (Java Archive) is a way to compress multiple files in Java, as well as a ZIP. Usually the classes and other configuration files are stored. As they grouped several classes in a single file, they are great for distributing libraries, such as database drivers, frameworks, systems modules, etc. [Read more…] about How to Generating and executing JAR files

How to Implementing linked lists in java

By Dinesh Thakur

In this section, we will see the implementation of a simplified version of linked list class provided by the Java library. This shows how the lists of operations manipulate the links when the list is modified. [Read more…] about How to Implementing linked lists in java

What is programming?

By Dinesh Thakur

You’ve probably used a computer for work or leisure. Many people use computers for everyday tasks such as check the bank balance or write a school report. Computers are good for these tasks. They can treat repetitive tasks, such as adding numbers or insert words on a page without getting bored or exhausted. Computers are also good for games because they can play sequences of sounds and images, involving the human user in the process. [Read more…] about What is programming?

How to calculate the GCD (Greatest Common Divisor) in Java

By Dinesh Thakur

Currently the definition of Greatest Common Divisor (GDC) can be formalized as well: [Read more…] about How to calculate the GCD (Greatest Common Divisor) in Java

PrintStream Class in Java

By Dinesh Thakur

When a program is executed, the input is read from the various sources and the output is sent to different destinations. Generally, keyboard and monitor screen are used as standard input and output device, respectively.


The data fed by the user is supplied to the program using input streams and the output of the program is supplied to the output device using output streams. This output is displayed to the user using Java PrintStream class. So far the two methods, print () and println (),that have been used for displaying the primitive data type, object, etc. on an output device are defined by the PrintStream class. This is a byte stream class which is derived from the Output Stream class. Unlike other output streams, the PrintStream class does not throw an IOException even if an exceptional event occurs.

PrintStream class can be connected to the underlying output stream such as

FileOutputStream, ByteArrayOutputStream, BufferedOutputStream, etc

Print Stream class defines following type of constructor.

PrintStream(OutputStream os)

This constructor creates a print stream and connects it to the output stream os.

In addition to print () and println () methods, the PrintStream class defines some Other methods which are listed in Table

                                        Table PrintStream Class Methods

Method

Description

PrintStream append (char c)

Appends the character c to the output stream

PrintStream append (CharSequence cs)

Appends the character sequence c to the output stream

boolean checkError ()

Checks the error state of the stream

protected void setError ()

Sets the error state to true


Character Stream Classes in Java

By Dinesh Thakur

One of the limitations of byte stream classes is that it can handle only 8-bit bytes and cannot work directly with Unicode characters. To overcome this limitation, character stream classes have been introduced in java.io package to match the byte stream classes. The character stream classes support 16-bit Unicode characters, performing operations on characters, character arrays, or strings, reading or writing buffer at a time. Character stream classes are divided into two stream classes namely, Reader class and Writer class.

Reader Classes

Reader classes are used to read 16-bit unicode characters from the input stream. The Reader class is the superclass for all character-oriented input stream classes. All the methods of this class throw an IOException. Being an abstract class, the Reader class cannot be instantiated hence its subclasses are used. Some of these are listed in Table

                                                                Table Reader Classes

Class

Description

BufferedReader

contains methods to read characters from the buffer

CharArrayReader

contains methods to read characters from a character array

FileReader

contains methods to read from a file

FilterReader

contains methods to read from underlying character-input stream

InputStreamReader

contains methods to convert bytes to characters

PipedReader

contains methods to read from the connected piped output stream

StringReader

contains methods to read from a string

The Reader class defines various methods to perform reading operations on data of an input stream. Some of these methods along with their description are listed in Table.

                                                                Table Reader Class Methods

Method

Description

int read()

returns the integral representation of the next available character of input. It returns -1 when end of file is encountered

int read (char buffer [])

attempts to read buffer. length characters into the buffer and returns the total number of characters successfully read. It returns -I when end of file is encountered

int read (char buffer [], int loc, int nChars)

attempts to read ‘nChars’ characters into the buffer starting at buffer [loc] and returns the total number of characters successfully read. It returns -1 when end of file is encountered

void mark(int nChars)

marks the current position in the input stream until ‘nChars’ characters are read

void reset ()

resets the input pointer to the previously set mark

long skip (long nChars)

skips ‘nChars’ characters of the input stream and returns the number of actually skipped characters

boolean ready ()

returns true if the next request of the input will not have to wait, else it returns false

void close ()

closes the input source. If an attempt is made to read even after closing the stream then it generates IOException

Using Buffered.Reader Class

The BufferedReader class creates a buffered character stream between the input device and the program. It defines the methods to read the data from the buffer in the form of characters.

The BufferedReader object can be created using one of the following two constructors.

BufferedReader(Reader inpStream) //first

BufferedReader(Reader inpStream, int nChars) //second

The first constructor creates a buffered character stream of default buffer size. The second constructor creates a buffered character stream that uses an input buffer of size nChars.

Besides the methods provided by the Reader class, the BufferedReader class contains some other methods which are discussed as follows.

• String readLine ():It reads a line of the input text.

• boolean ready () : It checks whether or not the stream is ready to be read.

A program to demonstrate the use of BufferedReader class

import java.io.*;
class BufferedReaderExample {
       publicstaticvoid main(String args[])throwsIOException{
             String s=“This program is skipping first character of each word in the string”;
             StringReader sr = newStringReader(s);
             System.out.println(“The input string is: “+s);
             /*Creating an instance of BufferedReader using StringReader*/
             BufferedReader br = newBufferedReader(sr);
             //Reading from the underlying StringReader
             System.out.print (“The output string is: “);
             br.skip(1);
             /*skipping the first character of the first word of the input string*/
             //reading the remaining string
             int i=0;
             while((i=br.read())!=–1){
                   System.out.print((char)i);
                   if((char)i==‘ ‘)
                       //checking for white spaces
                       {
                               br.skip(1);
                               /*skipping first character of each word*/
                        }
             }
     }
}

The output of the program is

The input string is: This program is skipping first character of each word in the string

The output string is: his rogram s kipping irst haracter f ach ord n he tring In this program, skip () method is used to skip the first character of each word of the input string.

Writer Classes

Writer classes are used to write 16-bit Unicode characters onto an outputstream. The Writer class is the superclass for all character-oriented output stream classes .All the methods of this class throw an IOException. Being an abstract class, the Writer class cannot be instantiated hence, its subclasses are used. Some of these are listed in Table.

                                                            Table Writer Classes

Class

Description

BufferedWriter

Contains methods to write characters to a buffer

FileWriter

Contains methods to write to a file

FilterWriter

Contains methods to write characters to underlying output stream

CharArrayWriter

Contains methods to write characters to a character array

OutputStreamWriter

Contains methods to convert from bytes to character

PipedWriter

Contains methods to write to the connected piped input stream

StringWriter

Contains methods to write to a string

The Writer class defines various methods to perform writing operations on output stream. These methods along with their description are listed in Table.

                                                      Table Writer Class Methods

Method

Description

void write ()

writes data to the output stream

void write (int i)

Writes a single character to the output stream

void write (char buffer [] )

writes an array of characters to the output stream

void write(char buffer [],int loc, int nChars)

writes ‘n’ characters from the buffer starting at buffer [loc] to the output stream

void close ()

closes the output stream. If an attempt is made to perform writing operation even after closing the stream then it generates IOException

void flush ()

flushes the output stream and writes the waiting buffered output characters

Using BufferedWriter Class

The BufferedWriter class, an output counterpart of the BufferedReader, is used to write characters onto the character-output stream.

The BufferedWriter object can be created using one of the following two constructors.

BufferedWriter(Writer outStream) //first

BufferedWriter(Writer outStream, int nChars) //second

The first constructor creates a buffered character stream of default buffer size. The second constructor creates a buffered character stream that uses an input buffer of size nChars. Besides the methods provided by the Writer class, the BufferedWriter class contains the newLine () method which writes a new line.

//A program to demonstrate the use of BufferedWriter class

The output of the program is

This is an example of BufferedWriter

import java.io.*;
class BufferedWriterExample {
        public static void main(String args[]) throws IOException {
               String s = “This is an example of BufferedWriter”;
               StringWriter sw = new StringWriter();
               //creating an instance of BufferedWriter class
               BufferedWriter bw = new BufferedWriter(sw);
               bw.write(s,0,5);
               bw.newLine();
               bw.write(s,5,s.length()–5);
               /*writes the substring starting from index 5*/
               bw.flush() ;
              //flushes the stream
               System.out.println(sw.getBuffer());
               sw.close();
               //closing the stream
               bw.close();
               //closing the stream
       }
}

In this example the BufferedWriter class is used to write data to character-output stream (instance of StringWriter class). The getBuffer () method of the StringWriter class returns a buffer of String type.

Byte Stream Classes in java

By Dinesh Thakur

Byte stream classes are used to perform reading and writing of 8-bit bytes. Streams being unidirectional in nature can transfer bytes in one direction only, that is, either reading data from the source into a program or writing data from a program to the destination. Therefore, Java further divides byte stream classes into two classes, namely, InputStream class and OutputStrearn class. The subclasses of InputStrearn class contain methods to support input and the subclasses of OutputStrearn class contain output related methods.

Input Stream Classes

Java’s input stream classes are used to read 8-bit bytes from the stream. The InputStrearn class is the superclass for all byte-oriented input stream classes. All the methods of this class throw an IOException. Being an abstract class, the InputStrearn class cannot be instantiated hence, its subclasses are used. Some of these are listed in Table

                                                          Table Input Stream Classes

Class

Description

BufferedInputStream

contains methods to read bytes from the buffer (memory area)

ByteArrayInputStream

contains methods to read bytes from a byte array

DataInputStream

contains methods to read Java primitive data types

FileInputStream

contains methods to read bytes from a file

FilterInputStream

contains methods to read bytes from other input streams which it uses as its basic source of data

ObjectInputStream

contains methods to read objects

PipedInputStream

contains methods to read from a piped output stream. A piped input stream must be connected to a piped output stream

SequenceInputStream

contains methods to concatenate multiple input streams and then read from the combined stream

The Input Stream class defines various methods to perform reading operations on data of an input stream. Some of these methods along with their description are listed in Table

                                            Table InputStream Class Methods

Method

Description

int read()

returns the integral representation of the next available byte of input. It returns -1 when end of file is encountered

int read (byte buffer [])

attempts to read buffer. length bytes into the buffer and returns the total number of bytes successfully read. It returns -1 when end of file is encountered

int read (byte buffer [], int loc, int nBytes)

attempts to read ‘nBytes’ bytes into the buffer starting at buffer [loc] and returns the total number of bytes successfully read. It returns -1 when end of file is encountered

int available ()

returns the number of bytes of the input available for reading

Void mark(int nBytes)

marks the current position in the input stream until ‘nBytes’ bytes are read

void reset ()

Resets the input pointer to the previously set mark

long skip (long nBytes)

skips ‘nBytes’ bytes of the input stream and returns the number of actually skippedbyte

void close ()

closes the input source. If an attempt is made to read even after closing the

stream then it generates IOException

Using ByteArrayinputStream Class

The ByteArrayinputStream class opens an input stream to read bytes from a byte array. It contains an internal buffer that holds bytes that are read from the stream. It should be noted that closing the stream does not have any consequences. That is, methods of this class can be invoked even after closing the stream without generating any IOException.

The ByteArrayinputstream object can be created using one of the following constructors.

ByteArrayinputStream(byte[] buffer) //first

ByteArrayinputStream(byte[] buffer, int loc, int nBytes)

//second

The first constructor creates a ByteArrayinputStream which uses a byte array buffer as its input source. The second constructor creates a ByteArrayinputStream which uses a subset of byte array buffer as its input source. The reading begins from the index specified by loc and continues until nBytes are read.

// A Program to demonstrate the use of ByteArrayInputStream class

import java.io.*;

class ByteArrayInputStreamExample

{

      public static void main(String args[]) throws IOException

      {

           byte b[]=”this is my first program”.getBytes();

           ByteArrayInputStream inp =new ByteArrayInputStream(b);

           int n=inp.available();

           System.out.println(“Number of available bytes: “+n);

           long s=inp.skip(11); //skipping 11 bytes

           System.out.println(“Number of skipped bytes: “+s);

           int i;

           System.out.print(“String after skipping s bytes: “);

           while((i=inp.read()) != -1)

                  {

                         System.out.print((char)i);

                   }

           inp.reset(); /*reset the pointer to the beginning of the stream*/

           System.out.println(); //new line

           int j;

           System.out.print(“String in uppercase: “);

           while((j=inp.read()) != -1)

                  {

                      System.out.print(Character.toUpperCase((char) j));

                  }

      }

}

The output of the program is

Number of available bytes: 24

Number of skipped bytes: 11

String after skipping s bytes: first program

String in uppercase: THIS IS MY FIRST PROGRAM

In this example, the getBytes () method is used to convert string into bytes. The use of available () and skip () methods is demonstrated here. Once the entire stream is read, reset () method is invoked to set the pointer at the start of the stream.

Output Stream classes

Java’s output stream classes are used to write 8-bit bytes to a stream. The OutputStream class is the superclass for all byte-oriented output stream classes. All the methods of this class throw an IOException. Being an abstract class, the OutputStream class cannot be instantiated hence, its subclasses are used. Some of these are listed in Table

                                                           Table Output Stream Classes

Class

Description

BufferedOutputStream

Contains methods to write bytes into the buffer

ByteArrayOutputStream

Contains methods to write bytes into a byte array

DataOutputStream

Contains methods to write Java primitive data types

FileOutputStream

Contains methods to write bytes to a file

FilterOutputStream

Contains methods to write to other output streams

ObjectOutputStream

Contains methods to write objects

PipedOutputStream

Contains methods to write to a piped output stream

PrintStream

Contains methods to print Java primitive data types

The OutputStream class defines methods to perform writing operations. These methods are discussed in Table

                                           TableOutputStream Class Methods

.Method

Description

void write (int i)

writes a single byte to the output stream

void write (byte buffer [] )

writes an array of bytes to the output stream

Void write(bytes buffer[],int loc, int nBytes)

writes ‘nBytes’ bytes to the output stream from the buffer b starting at buffer [loc]

void flush ()

Flushes the output stream and writes the waiting buffered output bytes

void close ()

closes the output stream. If an attempt is made to write even after closing the stream then it generates IOException

Using ByteArrayOutputStream Class

TheByteArrayOutputStreamclass,anoutputcounterpartoftheByteArrayinputStream, writes streams of bytes to the buffer. Similar to ByteArrayinputStream, closing this stream has no effect. That is, methods of this class can be invoked even after closing the stream without generating any IOException.

The ByteArrayOutputStream object can be created using one of the following constructors.

ByteArrayOutputStream () I /first

ByteArrayOutputStream(int nBytes) //second

The first constructor creates a buffer of 32 bytes. The second constructor creates a buffer of size equal to nBytes. The size of the buffer increases as bytes are written to it.

// A Program to demonstrate the use of ByteArrayOutputStream class

import java.io.*;

class ByteArrayOutputStreamExample

{

     public static void main(String args[]) throws IOException

     {

        ByteArrayOutputStream out=new ByteArrayOutputStream();

        byte b[]=”Today is a bright sunny day”.getBytes();

        out.write(b);

        System.out.println(out.toString() ); /*converting byte array to String*/

        out.close(); //closing the stream

     }

}

The output of the program is

Today is a bright sunny day

In this example, the getBytes () method is used to convert string into bytes. Once the entire stream is written, the to String ( ) method is invoked to convert the contents (bytes) of the buffer into a string.

Adding Sound To An Applet using AudioClip Class

By Dinesh Thakur

The AudioClip class is used to load and play sound files. To load a sound file the getAudioClip () Method of the AudioClip class is used. The general form of the getAudioClip () method is


AudioClip getAudioClip (URL pathname, String filename)

AudioClip getAudioClip (URL pathname)

where,

pathname is the address of the sound file. When the image file and the source file are in the same directory, getCodeBase () method is used as first parameter to the method.


filename is the name of the sound file

Some of the methods of AudioClip class along with their description are listed in Table

Method

Description

void play()

used to play the sound for once

void loop()

used to play the sound in loop

void stop ()

used to stop playing the sound

Example: An applet code to demonstrate the use of AudioClip class


import java.applet.*;

import java.awt.*;

public class SoundExample extends Applet

{

       private AudioClip mysound;

       public void init()

        {

                 mysound=getAudioClip(getCodeBase(), “chimes.wav”);

          }

      public void start()

       {

             mysound.loop();

         }

     public void stop()

       {

             mysound.stop();

       }

The HTML code for SoundExample is

<HTML>

        <HEAD>

        </HEAD>

<BODY>

        <CENTER>

                <APPLETCODE=”SoundExample.class” WIDTH=”200″ HEIGHT=”l30″>

                 </APPLET>

        </CENTER>

</BODY>

</HTML>


Draw and Filling Rectangles in Java Applet

By Dinesh Thakur

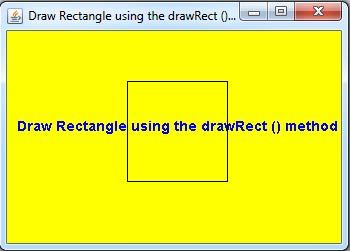
A rectangle can be drawn by using the drawRect () method. This method also takes the four parameters.

The general form of the drawRect () method is

void drawRect(int al, int bl, int w, int h)

where,

a1, b1 is the coordinate of the top left comer of the rectangle

w is the width of the rectangle

h is the height of the rectangle

For example, the statement g.drawRect (20 , 20 , 50 , 30 ) will draw a rectangle starting at (20, 20) with width of 50 pixels and height of 30 pixels as shown in Figure

             Figure A Rectangle with Width 50 pixels and Height 30 pixels

Example : Draw Rectangle using the drawRect () method.

import java.applet.Applet;

import java.awt.*;

import java.awt.event.*;

public class shapeRectangle extends Applet

{

      public static void main(String[] args)

   {

     Frame DrawingApplet = new Frame(“Draw Rectangle using the drawRect () method.”);

     DrawingApplet.setSize(350, 250);

     Applet shapeRectangle = new shapeRectangle();

     DrawingApplet.add(shapeRectangle);

     DrawingApplet.setVisible(true);

     DrawingApplet.addWindowListener(new WindowAdapter() {

     public void windowClosing(WindowEvent e) {System.exit(0); }

                                                                             });

  }

           public void paint(Graphics g)

            {

                     setBackground(Color.yellow);

                     g.setColor(Color.blue);  // Now we tell g to change the color

                     g.setFont(new Font(“Arial”,Font.BOLD,14)); // Now we tell g to change the font

                     g.drawString(“Draw Rectangle using the drawRect () method”, 10, 100);


            // draws a Rectangle

            g.setColor(Color.black);

            g.drawRect(120, 50, 100, 100);


       }

}

      Draw Rectangle using the drawRect () method

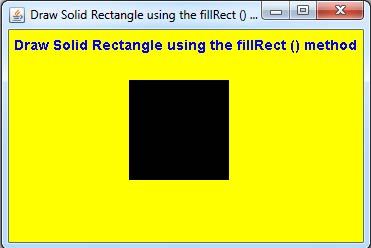
Note that the drawRect () method draws only the boundary of the rectangle. To draw a solid (filled) rectangle, fillRect () method is used. This method also takes four parameters similar to the drawRect () method.

To draw a solid rectangle having same parameters as above we use the statement g.fillRect (20 , 20 , 50, 30) which draws the rectangle as shown in Figure

              A Filled Rectangle with Width 50 pixels and Height 30 pixels

Exampel: Draw Solid Rectangle using the fillRect () method


import java.applet.Applet;

import java.awt.*;

import java.awt.event.*;

public class shapefillRectangle extends Applet

{

      public static void main(String[] args)

   {

     Frame DrawingApplet = new Frame(“Draw Solid Rectangle using the fillRect () method.”);

     DrawingApplet.setSize(370, 250);

     Applet shapefillRectangle = new shapefillRectangle();

     DrawingApplet.add(shapefillRectangle);

     DrawingApplet.setVisible(true);

     DrawingApplet.addWindowListener(new WindowAdapter() {

     public void windowClosing(WindowEvent e) {System.exit(0); }

                                                                             });

  }

           public void paint(Graphics g)

            {

                     setBackground(Color.yellow);

                     g.setColor(Color.blue);  // Now we tell g to change the color

                     g.setFont(new Font(“Arial”,Font.BOLD,14)); // Now we tell g to change the font

                     g.drawString(“Draw Solid Rectangle using the fillRect () method”, 5, 20);


            // draws a Rectangle

            g.setColor(Color.black);

            g.fillRect(120, 50, 100, 100);


       }

}

        Draw Solid Rectangle using the fillRect () method

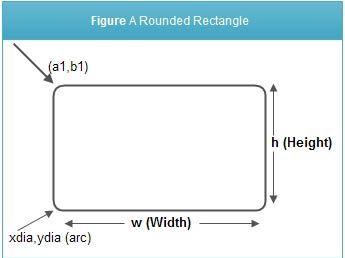
A rounded outlined rectangle can be drawn by using the drawRoundRect () method. This method takes the six parameters.

The general form of the drawRoundRect () method is:

void drawRoundRect (int al, int bl, int w, int h, int xdia, int ydia)   

           Figure A Rounded Rectangle  

where,

xdia is the diameter of the rounding arc (along X-axis)

ydia is the diameter of the rounding arc (along Y-axis)

Similarly, a rounded filled rectangle can be drawn using drawfillRoundRect () method. This method also takes six parameters similar to the drawRoundRect () method.


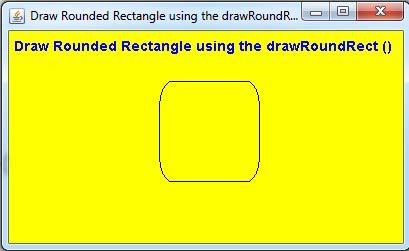
Example : Draw Rounded Rectangle using the drawRoundRect () method.

import java.applet.Applet;

import java.awt.*;

import java.awt.event.*;

public class shapeRoundRectangle extends Applet

{

      public static void main(String[] args)

   {

     Frame DrawingApplet = new Frame(“Draw Rounded Rectangle using the drawRoundRect () method.”);

     DrawingApplet.setSize(410, 250);

     Applet shapeRoundRectangle = new shapeRoundRectangle();

     DrawingApplet.add(shapeRoundRectangle);

     DrawingApplet.setVisible(true);

     DrawingApplet.addWindowListener(new WindowAdapter() {

     public void windowClosing(WindowEvent e) {System.exit(0); }

                                                                             });

  }

           public void paint(Graphics g)

            {

                     setBackground(Color.yellow);

                     g.setColor(Color.blue);  // Now we tell g to change the color

                     g.setFont(new Font(“Arial”,Font.BOLD,14)); // Now we tell g to change the font

                     g.drawString(“Draw Rounded Rectangle using the drawRoundRect ()”, 5, 20);


            // draws a Rectangle

            g.setColor(Color.black);

            g.drawRoundRect(150, 50, 100, 100, 25, 50);


       }

}

       Draw Rounded Rectangle using the drawRoundRect () method

Note: All the shapes are drawn relative to the Java coordinate system. The origin (0, 0) of the coordinate system is located at its upper-left corner such that the positive x values are to its right and the positive y values are to its bottom.

AppletContext and showDocument in java Example

By Dinesh Thakur

Java allows the applet to transfer the control to another URL by using the showDocument () Method defined in the AppletContext interface. For this, first of all, it is needed to obtain the Context of the currently executing applet by calling the getAppletContext () method defined by the Applet. Once the context of the applet is obtained with in an applet, another document can be brought into view by calling showDocument () method.

There are two showDocument () methods which are as follows:

showDocument(URL url)

showDocument(URL url,string lac)

where,

url is the URL from where the document is to be brought into view.

loc is the location within the browser window where the specified document is to be displayed.

Example An applet code to demonstrate the use of AppletContext and showDocument ().

import java.applet.Applet;

import java.applet.AppletContext;

import java.net.*;

/*

<applet code=”LoadHTMLFileSample” width=”700″ height=”500″></applet>

*/

public class LoadHTMLFileSample extends Applet

{

    public void start()

    {

          AppletContext context= getAppletContext();

          //get AppletContext

          URL codeBase = getCodeBase(); //get Applet code base

          try{

                 URL url = new URL(codeBase + “Test.html”);

                 context.showDocument(url,”_blank”);

                 repaint();

               }catch(MalformedURLException mfe) {

                         mfe.printStackTrace();

                         }

     }

}

Java Event Handling Model

By Dinesh Thakur

In Java, an event is an object which specifies the change of state in the source. It is generated whenever an action takes place like a mouse button is clicked or text is modified. Java’s AWT (Abstract Window Toolkit) is responsible for communicating these actions between the program and the user. Java packages such as java. util, java. awt, java. awt. event and javax. swing support event handling mechanism.

When an action takes place, an event is generated. The generated event and all the information about it such as time of its occurrence, type of event, etc. are sent to the appropriate event handling code provided within the program. This code determines how the allocated event will be handled so that an appropriate response can be sent to the user.

Event Handling Model

The working of an event-driven program is governed by its underlying event-handling model. Till now two models have been introduced in Java for receiving and processing events. The event handling mechanisms of these models differ a lot from each other.

Java 1.0 Event Model

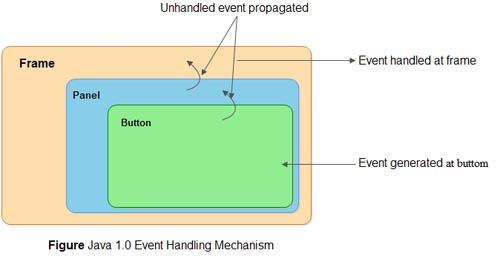
The Java 1.0 Event model for event processing was based on the concept of containment. In this approach, when a user-initiated event is generated it is first sent to the component in which the event has occurred. But in case the event is not handled at this component, it is automatically propagated to the container of that component. This process is continued until the event .is processed or it reaches the root of the containment hierarchy.

For example, as shown in the Figure, Button is contained in the Panel which itself is contained within the Frame. When the mouse is clicked on Button, an event is generated which is first sent to the Button. If it is not handled by it then this event is forwarded to the Panel and if it cannot handle the event, it is further sent to the Frame. Frame being the root of the given hierarchy processes this event. So the event is forwarded up the containment hierarchy until it is handled by a component.

              Figure Java 1.0 Event Handling Mechanism

The major drawback in this approach is that events could be handled by the component that generated it or by the container of that component. Another problem is that events are frequently sent to those components that cannot process them, thus wasting a lot of CPU cycles.

Delegation Event Model

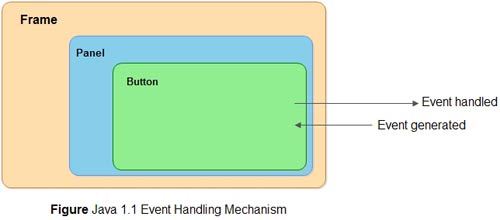
The advanced versions of Java ruled out the limitations of Java 1.0 event model. This model is referred to as the Delegation Event Model which defines a logical approach to handle events. It is based on the concept of source and listener. A source generates an event and sends it to one or more listeners. On receiving the event, listener processes the event and returns it. The notable feature of this model is that the source has a registered list of listeners which will receive the events as they occur. Only the listeners that have been registered actually receive the notification when a specific event is generated.

For example, as shown in Figure, when the mouse is clicked on Button, an event is generated. If the Button has a registered listener to handle the event, this event is sent to Button, processed and the output is returned to the user. However, if it has no registered listener the event will not be propagated upwards to Panel or Frame.

               Figure Java 1.1 Event Handling Mechanism

Now we discuss Event Source and Event Listener in detail.

• Event source: An event source is an object that generates a particular kind of event. An event is generated when the internal state of the event source is changed. A source may generate more than one type of event. Every source must register a list of listeners that are interested to receive the notifications regarding the type of event. Event source provides methods to add or remove listeners.

The general form of method to register (add) a listener is:

public void addTypeListener(TypeListener eventlistener)

Similarly, the general form of method to unregister (remove) a listener is:

public void removeTypeListener(TypeListener eventlistener)

where,

Type is the name of the event

eventlistener is a reference to the event listener

• Event listener: An event listener is an object which receives notification when an event occurs. As already mentioned, only registered listeners can receive notifications from sources about specific types of events. The role of event listener is to receive these notifications and process them.


Java Swing Timer class Example

By Dinesh Thakur

A timer is an object of Timer class which is the subclass of Object class present in java.lang package. A timer fires one or more action events after regular interval of time (in milliseconds) called delay.


The amount of delay is specified at the time of creation of timer. A timer is used in a program by creating a timer object and invoking start () method. When the timer is started, an event of ActionEvent type is fired and the code enclosed in actionPerformed () of the corresponding listener class is executed. The corresponding class must implement the ActionListener interface. The timer can also be made to fire an event only once by setting its method setRepeats () to false. The methods stop () and restart () can be called to stop or restart the timer, respectively.

The Timer can be created using the following constructor.

Timer(int delay, ActionListener listener)

where,

delay is the time, in milliseconds, between the action events

listener is the action listener

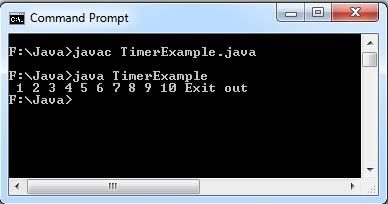
Consider Example. Here, a countdown of 10 seconds is printed. After 10 seconds, the program exits.

Example: A program to demonstrate the use of timer

import java.awt.*;

import java.awt.event.*;

import javax.swing.*;

class TimerExample implements ActionListener

{

   int second = 1;

   public static void main(String str[])

   {

     new TimerExample();

     while(true);

   }

    public TimerExample()

    {

       Timer second= new Timer(1000,this);

       second.start();

    }

    public void actionPerformed(ActionEvent e)

    {

       System.out.print(” “+second);

       second++;

       if (second == 11)

         {

                System.out.print(” “);

                System.out.print(“Exit out”);

                System.exit(0);

         }

    }

}

 The output of the program is as shown in Figure

         java swing timer class example

JWindow class in Java Swing Example

By Dinesh Thakur

The JWindow class is used to create a window which does not have any toolbar, border or window management buttons. This type of window is usually used to display messages like welcome messages, Copyright information, etc. The commonly used of constructor of JWindow class is as follows.

JWindow ()

Example: A program to demonstrate the use of JWindow class

import java.awt.*;

import javax.swing.*;

class Message

{

     public static void displayMessage(int timeDuration)

     {

        JWindow msg =new JWindow();

        JPanel panel= (JPanel)msg.getContentPane();

        int width = 350, height = 150;

        int x = 50, y = 50;

        msg.setBounds(x, y, width, height);

        JLabel welcome= new JLabel(“Welcome! to Java Programming”,JLabel. CENTER);

        welcome.setFont(new Font(“Times New Roman”, Font.BOLD, 20));

        panel.add(welcome, BorderLayout.CENTER);

        panel.setBorder(BorderFactory.createLineBorder(Color.green, 5));

        msg.setVisible(true);

        try

          {

             Thread.sleep(timeDuration);

          }

          catch(Exception e) {}

          msg.setVisible(false);

     }

      public static void main(String args[])

      {

          displayMessage(8000);

          System.exit(0);

      }

}

The output of the program is shown in Figure

                      JWindow class in Java Swing Example

GridBagLayout in Java Swing Example

By Dinesh Thakur

The grid bag layout manager is the most advanced and yet easy to use layout manager. A GridBagLayout arranges the component in a grid of rows and columns. It allows different sized components to span multiple rows or columns. Also, each row in the grid can have different number of columns. Grid bag layout specifies a grid of cells with the container determines the component’s size and then positions each component in one or more cell accordingly.

The grid bag layout manager can be created by using the following constructor.

GridBagLayout ()

Information such as, size and location of each component in a grid bag is determined by a set of constraints contained in an object of type GridBagConstraints. The variables in the class GridBagConstrain ts that represent these constraints are given below:

• gridx and gridy: gridx and gridy specify the x and y coordinates to position the component. gridx and grid y represent the number of cells at the left of the component and the number of cells at the top of the component, respectively. By default, the value of both gridx and gridy is relative. It places the component at position next to the component added last in a row or a column.

• gridwidth and gridheight: gridwidth and gridheight specify the number of columns and rows, respectively occupied by the components. The default value for both gridwidth and gridheight is 1. The value REMAINDER can be assigned to gridwidth and gridheight to indicate that the component should be the last one in a row or a column. Ifwe want the component to be the next to last one in a row or a column, the value RELATIVE is used.

• fill: fill specifies how the component should expand within its display area if the area is larger than the component. Any one of the following values can be assigned to fill.

NONE: To specify that the size of the component remains unchanged. It is the default value.

VERTICAL: To specify that the component can expand only vertically.

HORIZONTAL: To specify that the component can expand only horizontally.

BOTH: To specify that the component can expand vertically as well as horizontally.

• ipadx and ipady: ipadx and ipady specify extra width and height of the component, respectively. The default value is 0. Negative values can also be used to tighten the spacing between the components.

• insets: It specifies the amount of space to leave between the borders of the component and the edges of display area. The Insets class specifies the separate values of top, left, bottom, and right. The default value is (0,0,0,0).

• anchor : It specifies where the component should be placed within the display area if it is smaller than its display area. The location of the component is usually given as a compass direction. Any one of the following values can be assigned to anchor.

CENTER(default), NORTH, SOUTH, NORTHEAST, SOUTHWEST, EAST, WEST, SOUTHEAST,NORTHWEST

• weightx and weighty: weightx and weighty specify how the extra horizontal and vertical spaces be adjusted while resizing the container. The component will occupy extra space in the specific direction according to the weight assigned to it.

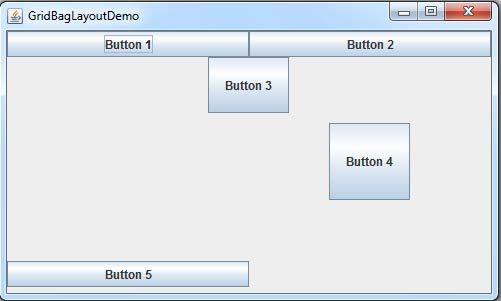
Consider Example. In this example, grid bag layout is set as the layout for the frame. Five buttons are created and their grid bag constraints are specified. Then the buttons are added to the frame.

Example: A Program to demonstrate the use of GridBaglayout

import java.awt.*;

import javax.swing.*;

class myGridBag extends JApplet

{

    final static boolean shouldWeightX = true;

    final static boolean RIGHT_TO_LEFT = false;

    public static void addComponentsToPane(Container pane)

     {

        if (RIGHT_TO_LEFT)

           {

               pane.setComponentOrientation(ComponentOrientation.RIGHT_TO_LEFT);

           }

               JButton button;

               pane.setLayout(new GridBagLayout());

               GridBagConstraints gb =new GridBagConstraints();

               button= new JButton(“Button 1”);

               if (shouldWeightX)

                  {

                     gb.weightx = 0.5;

                  }

               gb.fill = GridBagConstraints.HORIZONTAL;

               gb.gridx = 0;

               gb.gridy = 0;

               pane.add(button, gb);

               button= new JButton(“Button 2”);

               gb.fill = GridBagConstraints.HORIZONTAL;

               gb.weightx = 1;

               gb.gridx = 1;

               gb.gridwidth = 2;

               gb.gridy = 0;

               pane.add(button, gb);

               button= new JButton(“Button 3”);

               gb.fill = GridBagConstraints.VERTICAL;

               gb.ipady = 30;

               gb.weightx = 2;

               gb.gridwidth = 4;

               gb.gridx = 0;

               gb.gridy = 1;

               pane.add(button, gb);

               button= new JButton(“Button 4”);

               gb.fill = GridBagConstraints.VERTICAL;

               gb.ipady = 0; //reset to default

               gb.weighty = 1.0;

               gb.anchor = GridBagConstraints.PAGE_END;

               //bottom of space

               gb.insets =new Insets(10,0,0,0); //top padding

               gb.gridx = 1;

               gb.gridwidth = 2;

               gb.gridy = 2; //third row

               pane.add(button, gb);

               button= new JButton(“Button 5”);

               gb.fill = GridBagConstraints.HORIZONTAL;

               gb.weighty = 1.0;

               gb.anchor = GridBagConstraints.PAGE_END;

               gb.insets =new Insets(10,0,5,0);

               gb.gridx = 0;

               gb.gridwidth = 2;

               gb.gridy = 3; //fourth row

               pane.add(button, gb);

     }

              private static void displayGUI()

              {

                  JFrame frame= new JFrame(“GridBagLayoutDemo”);

                  frame.setDefaultCloseOperation(JFrame.EXIT_ON_CLOSE);

                  addComponentsToPane(frame.getContentPane());

                  frame.setSize(500, 300);

                  frame.setVisible(true);

              }

                public static void main(String[] args)

                {

                     javax.swing.SwingUtilities.invokeLater(new Runnable()

                     {

                        public void run()

                        {

                           displayGUI ();

                        }

                     }) ;

                }

}

The output of the program is shown in Figure

               GridBagLayout in Java Swing Example

JLayeredPane Java Swing Example

By Dinesh Thakur

A layered pane is a Swing container which is used to hold the various components using the concept of layers. The components present in the upper layer overlaps the components present in the lower layer. The layered pane is created using the JLayeredPane class. the only constructor of this class is JLayeredPane ().

Example: A program to demonstrate the use of JLayeredPane class.

import java.awt.*;

import javax.swing.*;

class LayerExample extends JApplet

{

    JFrame jf ;

    JLayeredPane LPane;

    JButton first, second, third;

    LayerExample ()

    {

         jf =new JFrame(“Layered Pane Example”);

         LPane =new JLayeredPane();

         jf.getContentPane() .add(LPane);

         first= new JButton(“First”);

         first.setBackground(Color.red);

         first.setBounds(50,30,100,100);

         second= new JButton(“Second”);

         second.setBackground(Color.yellow);

         second.setBounds(140,60,100,100);

         third= new JButton(“Third”);

         third.setBackground(Color.green);

         third.setBounds(230,90,100,100);

         LPane.add(first, new Integer(3));

         LPane.add(second, new Integer(2));

         LPane.add(third, new Integer(1));

         jf.setDefaultCloseOperation(jf.EXIT_ON_CLOSE);

         jf.setSize (400,300) ;

         jf.setVisible(true);

     }

         public static void main(String args[])

        {

            LayerExample le= new LayerExample();

        }

}

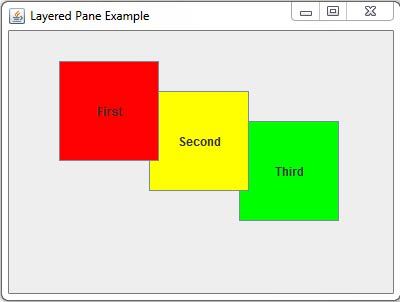
The output of the program is shown in Figure

              Layered Panes Java Swing Example

Swing JScrollBar Class Example

By Dinesh Thakur

Scroll bars are horizontally or vertically oriented bars which allow the user to select items between a specified minimum and maximum values. Each end of the scroll bar has an arrow which can be clicked to change the current value of the scroll bar. The slider box indicates the current value of the scroll bar which can be dragged by the user to a new position. Scrollbar is an object of ScrollBar class.

Some of the constructors defined by ScrollBar class are as follows.

JScrollBar() //first

JScrollBar(int orientation) //second

JScrollBar(int orientation, int initial_value, int visible units, int min, int max) //third

The first constructor creates a vertical scroll bar. The second constructor creates a scrollbar in which orientation specifies the orientation of the scroll bar which can take one of the following values JScrollBar.HORIZONTAL or JScrollBar.VERTICAL. The third constructor creates a scroll bar in which orientation specifies the orientation of the scroll bar, initial_value represents the initial value of the scrollbar, visible_units represents the number of visible items of a scroll bar at a time and min and max represents the minimum and maximum values for the scroll bar.

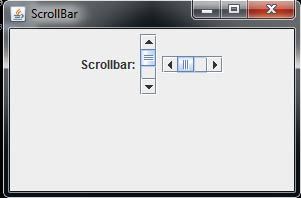
Consider the Example. Here, two scrollbars (one horizontal and one vertical) are added

Example An applet to demonstrate the use of Scrollbar class

import javax.swing.*;

public class ScrollBarExample extends JApplet

{

   ScrollBarExample()

   {

       JFrame jf;

       jf=new JFrame(“ScrollBar”);

       JPanel jp=new JPanel();

       JLabel j11=new JLabel(“Scrollbar:”);

       JScrollBar jsv=new JScrollBar();

       JScrollBar jsh=new JScrollBar(JScrollBar.HORIZONTAL);

       jp.add(j11);

       jp.add(jsv);

       jp.add (jsh);

       jf.add (jp);

       jf.setDefaultCloseOperation(jf.EXIT_ON_CLOSE);

       jf.setSize(300,200);

       jf.setVisible(true);

    }

       public static void main(String[] args)

        {

            ScrollBarExample japp= new ScrollBarExample();

        }

}

The output of the above code is Figure

                 Scrollbar Example

Swing Containers

By Dinesh Thakur

Swing component is an independent control, such as button, label, text field, etc. They need. a container to display themselves. Swing components are derived from JComponent class. JComponent provides the functionality common for all components. JComponent inherits the AWT class Container and Component. Thus, a Swing component and AWT component are compatible with each other.

There are two types of containers namely, top-level containers and lightweight containers

Top-Level Containers

A top-level container, as the name suggests, lies at the top of the containment hierarchy. The top-level containers are JFrame, JApplet, and JDialog. These containers do not inherit JComponent class but inherit the AWT classes’ Component and Container. These containers are heavyweight components. The most commonly used containers are JFrame and JApplet.

Each top-level container defines a set of panes. JRootPane is a special container which extends JComponent and manages the appearance of JApplet and JFrame objects. It contains a fixed set of panes, namely, glass pane, content pane, and layered pane.

• Glass pane: A glass pane is a top-level pane which covers all other panes. By default, it is a transparent instance of JPanel class. It is used to handle the mouse events affecting the entire container.

• Layered pane: A layered pane is an instance of JLayeredPane class. It holds a container called the content pane and an optional menu bar.

• Content pane: A content pane is a pane which is used to hold the components. All the visual components like buttons, labels are added to content pane. By default, it is an opaque instance of JPanel class and uses border layout. The content pane is accessed via getContentPane () method of JApplet and JFrame classes.

Lightweight Containers

Lightweight containers lie next to the top-level containers in the containment hierarchy. They inherit. JComponent. One of the examples of lightweight container is JPanel. As lightweight container can be contained within another container, they can be used to organize and manage groups of related components.

What are Features of java swing?

By Dinesh Thakur

Swing, a part of Java Federation Classes (JFC) is the next generation GUI toolkit that allows us to develop large scale enterprise applications in Java. It is a set of classes which provides many powerful and flexible components for creating graphical user interface. Earlier, the concept of Swing did not exist in Java and the user interfaces were built by using the Java’s original GUI system, AWT. Because of the limitations of the AWT, Swing was introduced in 1997 by the Sun Microsystems. It provides new and improved components that enhance the look and functionality of GUIs. [Read more…] about What are Features of java swing?

JDBC – ResultSetMetaData Interface

By Dinesh Thakur

The ResultSetMetaDa ta interface provides methods that allow you to get metadata for the resultset, that is, the number, types and properties of the columns in a ResultSet object. This information is used to collect the data with same semantics but stored in different databases in different formats.

To get this information of columns in the ResultSet object using methods of the ResultSetMetaData interface, it is required to invoke the getMetaData () method of the ResultSet object that returns a reference to an object of type ResultSetMetaData.

Some of the methods of ResultSetMetaData interface are as follows.

• Int getColumnCount() :This method returns the number of columns in the resultset.

• String getColumnName(int index) :This method returns the name of column specified by index value index in the resultset.

• int getColumnType(int index) :This method returns the type of column specified by index value index in the resultset.

program to demonstrate implementation of ResultSetMetaData and ResultSet interface.

import java.sql.*;

class ExampleResultSetMetaData

{

   public static void main(String args[])

   {

       Connection con;

       Statement stmt;

       ResultSet rs;

       try

         {

              Class.forName(“sun.jdbc.odbc.JdbcOdbcDriver”);

              con= DriverManager.getConnection(“jdbc:odbc:Emp”);

              stmt = con.createStatement();

              rs = stmt.executeQuery(“Select * from Employee WHERE Department=’Math'”);

              ResultSetMetaData rsmd = rs.getMetaData();

              int col= rsmd.getColumnCount();

              //returns number of columns

              int row = 1;

              while (rs.next())

                    {

                         System.out.println(“Row” +row+”: “);

                         for (int i = 1; i <= col; i++)

                             {

                                 System.out.print(” Column”+ i + “: “);

                                 System.out.println(rs.getString(i));

                             }

                                 System.out.println(” “);

                                 row++;

                   }

                         stmt.close();

                         con.close();

       }

                  catch(Exception e)

                     {

                         System.err.print(“ClassNotFoundException: “);

                         System.err.println(e.getMessage());

                     }

    }

}

JDBC – PreparedStatement Interface (Handling Database Queries Dynamically)

By Dinesh Thakur

PreparedStatement interface extends the Statement interface so it has access to all the methods of Statement interface. It is used to execute precompiled parameterized SQL statements.

This helps statements to execute much faster thus increases the efficiency of the program. It allows you to specify SQL query, in which unknown values are replaced by ‘? ‘. The user provides the unknown values later at the run-time. The setString () and set Int () methods can be used to specify the values for the parameters. To understand the concept of prepared statement, consider the following statements.

PreparedStatement ps = con.prepareStatement(“INSERT INTO Student VALUES(?, ? , ? ) “) ;

ps.setString(l, “A010”);  //assigns value to first attribute

ps.setint(2, 90);              //assigns value to second attribute

ps.setString(3, “A”);      //assigns value to third attribute

ps.executeUpdate();

The values can be assigned to the corresponding attributes through variable name also instead of using literal values representing index value. Like, set String () and set Int () methods, there are various methods for setting value of other data type. Some of these are setBoolean (), setFloat (), setByte (), setDate (),etc. The method void clearParameters () can be used to clear all the values held currently in the parameters.

« Previous Page
Next Page »

Primary Sidebar

Java Tutorials

Java Tutorials

  • Java - Home
  • Java - IDE
  • Java - Features
  • Java - History
  • Java - this Keyword
  • Java - Tokens
  • Java - Jump Statements
  • Java - Control Statements
  • Java - Literals
  • Java - Data Types
  • Java - Type Casting
  • Java - Constant
  • Java - Differences
  • Java - Keyword
  • Java - Static Keyword
  • Java - Variable Scope
  • Java - Identifiers
  • Java - Nested For Loop
  • Java - Vector
  • Java - Type Conversion Vs Casting
  • Java - Access Protection
  • Java - Implicit Type Conversion
  • Java - Type Casting
  • Java - Call by Value Vs Reference
  • Java - Collections
  • Java - Garbage Collection
  • Java - Scanner Class
  • Java - this Keyword
  • Java - Final Keyword
  • Java - Access Modifiers
  • Java - Design Patterns in Java

OOPS Concepts

  • Java - OOPS Concepts
  • Java - Characteristics of OOP
  • Java - OOPS Benefits
  • Java - Procedural Vs OOP's
  • Java - Polymorphism
  • Java - Encapsulation
  • Java - Multithreading
  • Java - Serialization

Java Operator & Types

  • Java - Operator
  • Java - Logical Operators
  • Java - Conditional Operator
  • Java - Assignment Operator
  • Java - Shift Operators
  • Java - Bitwise Complement Operator

Java Constructor & Types

  • Java - Constructor
  • Java - Copy Constructor
  • Java - String Constructors
  • Java - Parameterized Constructor

Java Array

  • Java - Array
  • Java - Accessing Array Elements
  • Java - ArrayList
  • Java - Passing Arrays to Methods
  • Java - Wrapper Class
  • Java - Singleton Class
  • Java - Access Specifiers
  • Java - Substring

Java Inheritance & Interfaces

  • Java - Inheritance
  • Java - Multilevel Inheritance
  • Java - Single Inheritance
  • Java - Abstract Class
  • Java - Abstraction
  • Java - Interfaces
  • Java - Extending Interfaces
  • Java - Method Overriding
  • Java - Method Overloading
  • Java - Super Keyword
  • Java - Multiple Inheritance

Exception Handling Tutorials

  • Java - Exception Handling
  • Java - Exception-Handling Advantages
  • Java - Final, Finally and Finalize

Data Structures

  • Java - Data Structures
  • Java - Bubble Sort

Advance Java

  • Java - Applet Life Cycle
  • Java - Applet Explaination
  • Java - Thread Model
  • Java - RMI Architecture
  • Java - Applet
  • Java - Swing Features
  • Java - Choice and list Control
  • Java - JFrame with Multiple JPanels
  • Java - Java Adapter Classes
  • Java - AWT Vs Swing
  • Java - Checkbox
  • Java - Byte Stream Classes
  • Java - Character Stream Classes
  • Java - Change Color of Applet
  • Java - Passing Parameters
  • Java - Html Applet Tag
  • Java - JComboBox
  • Java - CardLayout
  • Java - Keyboard Events
  • Java - Applet Run From CLI
  • Java - Applet Update Method
  • Java - Applet Display Methods
  • Java - Event Handling
  • Java - Scrollbar
  • Java - JFrame ContentPane Layout
  • Java - Class Rectangle
  • Java - Event Handling Model

Java programs

  • Java - Armstrong Number
  • Java - Program Structure
  • Java - Java Programs Types
  • Java - Font Class
  • Java - repaint()
  • Java - Thread Priority
  • Java - 1D Array
  • Java - 3x3 Matrix
  • Java - drawline()
  • Java - Prime Number Program
  • Java - Copy Data
  • Java - Calculate Area of Rectangle
  • Java - Strong Number Program
  • Java - Swap Elements of an Array
  • Java - Parameterized Constructor
  • Java - ActionListener
  • Java - Print Number
  • Java - Find Average Program
  • Java - Simple and Compound Interest
  • Java - Area of Rectangle
  • Java - Default Constructor Program
  • Java - Single Inheritance Program
  • Java - Array of Objects
  • Java - Passing 2D Array
  • Java - Compute the Bill
  • Java - BufferedReader Example
  • Java - Sum of First N Number
  • Java - Check Number
  • Java - Sum of Two 3x3 Matrices
  • Java - Calculate Circumference
  • Java - Perfect Number Program
  • Java - Factorial Program
  • Java - Reverse a String

Other Links

  • Java - PDF Version

Footer

Basic Course

  • Computer Fundamental
  • Computer Networking
  • Operating System
  • Database System
  • Computer Graphics
  • Management System
  • Software Engineering
  • Digital Electronics
  • Electronic Commerce
  • Compiler Design
  • Troubleshooting

Programming

  • Java Programming
  • Structured Query (SQL)
  • C Programming
  • C++ Programming
  • Visual Basic
  • Data Structures
  • Struts 2
  • Java Servlet
  • C# Programming
  • Basic Terms
  • Interviews

World Wide Web

  • Internet
  • Java Script
  • HTML Language
  • Cascading Style Sheet
  • Java Server Pages
  • Wordpress
  • PHP
  • Python Tutorial
  • AngularJS
  • Troubleshooting

 About Us |  Contact Us |  FAQ

Dinesh Thakur is a Technology Columinist and founder of Computer Notes.

Copyright © 2023. All Rights Reserved.