• Skip to main content
  • Skip to primary sidebar
  • Skip to secondary sidebar
  • Skip to footer

Computer Notes

Library
    • Computer Fundamental
    • Computer Memory
    • DBMS Tutorial
    • Operating System
    • Computer Networking
    • C Programming
    • C++ Programming
    • Java Programming
    • C# Programming
    • SQL Tutorial
    • Management Tutorial
    • Computer Graphics
    • Compiler Design
    • Style Sheet
    • JavaScript Tutorial
    • Html Tutorial
    • Wordpress Tutorial
    • Python Tutorial
    • PHP Tutorial
    • JSP Tutorial
    • AngularJS Tutorial
    • Data Structures
    • E Commerce Tutorial
    • Visual Basic
    • Structs2 Tutorial
    • Digital Electronics
    • Internet Terms
    • Servlet Tutorial
    • Software Engineering
    • Interviews Questions
    • Basic Terms
    • Troubleshooting
Menu

Header Right

Home » Wordpress » WordPress

WordPress

What is Concept and Definition of blogging?

By Dinesh Thakur

      Concept of blogging


Blog is a word resulting from the simplification of the term weblog. We can define blog as an online diary. The person who runs the blog is called blogger. Blogs are websites which are regularly published various contents, such as text, images, music or video, both can be dedicated to a specific subject as being quite generally. A blog is a place where you can share things you find interesting and useful not only to you as others. They can be held by one or more persons and usually have room for comments from your readers. Blogger is the name given to those who publish a blog and the blogsphere is the set of blogs.

The BLOG has been used both by companies and by professionals as a way to rapidly disseminate their ideas in a simple and fast way. Basically, a blog is a set of long or short messages which are known as Post. These messages are sorted in descending order of posting date. Blog enabled millions of people to have a voice and connect with others around the world.

Starting your own blog doesn’t have expensive. In fact, more and more people are starting blogs every day. It seems that just about every business has a blog these days. One of the features of blogs is that in general they have a very similar appearance, i.e., the user is limited with respect to visual change. Another feature of blogs is the update frequency. Some are updated daily, others weekly, monthly, and in some cases, up to several times per day.

The popularization of this tool was such that even the companies began to use it as a communication tool. Most companies, even those who do not work directly on the Internet already has blogs to communicate with employees and customers.

Common and famous people, small, medium or large companies, all share the blogosphere, the blog world. In this space, some bloggers stand out and become famous, simply externalize his ideas to those who want to know them.

Many bloggers decide to use a blog to organize their thoughts, while some become influential with thousands of followers and loyal readers, because what they have to say to people is important and want to hear it and maybe even follow it.

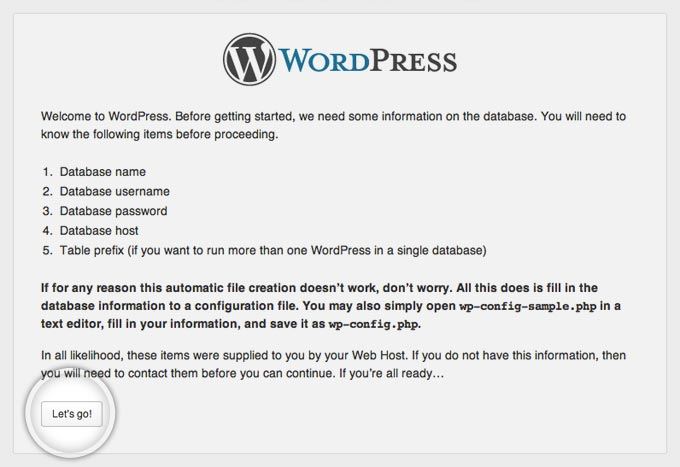
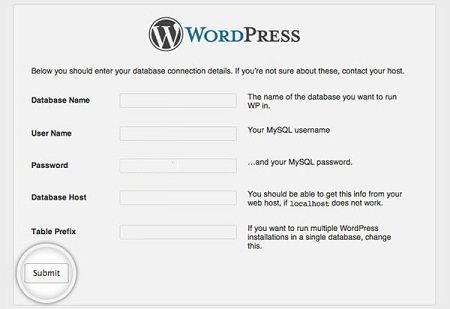
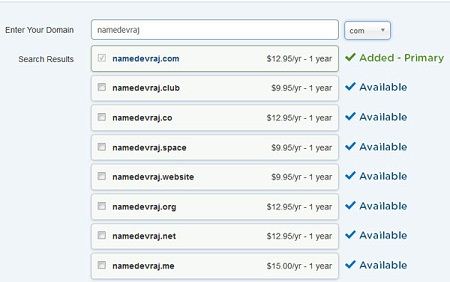
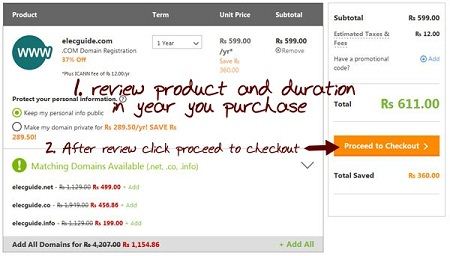
WordPress is the easiest way to create a blog. Creating a blog on WordPress is Simply and easy. To build a blog, you need to buy domain name and webhosting. Once you setup your hosting account, you can install WordPress and begin creating your blog.

How to submit your blog sitemap to Google webmaster tool

By Dinesh Thakur

After Creating a website/blog, Google might need some help to find you. A blog sitemap (Sitemap is an xml file, which contains blog URLs,) is exactly as it sounds … a map of your blog/website. you can see Wiki article for more detail about Sitemap. To be able to submit your website sitemap to GWT (Google webmaster tools) means submitting your site to Google.

here’s how you can submit a sitemap to Google, Bing and many more so it will find all the pages and posts.

1. Open a separate window and go to your WordPress dashboard.
2. Under the plugin, type it into the search box XML Sitemap & Google News feeds.

      Search and install XML Sitemap
3. After Installing wordpress plugin . Without going into all the ins and outs of plugins, as soon as you turn it on, it creates a sitemap for you.
4. Go to the plugin settings page and you’ll see the URL (http://www.yourdomain.com/sitemap.xml) of the file was created.
5. Know time to send the URL to Google.
6. Go to Google webmaster tools. You may need to register for an account first.
7. First you will need to verify you are the owner of your blog. Click the red button that says Add Site.

     Search Console Sitemaps
8. Type in your URL and click Continue.

       Search Console of Sitemaps
9. It will ask you to download a file. Click on the blue HTML verification file and save it somewhere on your hard drive.
10. Now go to your cPanel sign on your host (open a new window and keep the Google webmaster tools window open). For example, if you have Hostgator or Bluehost, go to the homepage and login.
11. When you arrive at the log, go to the File Manager.
12. It will ask you what directory you want to go to. Click on the document root for your URL.
13. When you see the folder, go to the button that says upload. Upload file saved to your computer.
14. Now go back to the webmaster tool and click in step 8.
15. It should open a new web page. That’s what you want!
16. Go to webmaster tools screen once again and press the verification. Now you are the manager of your blog and can submit a sitemap.

     
17.  Congratulations, you just submit a sitemap to Google so it can crawl ALL your pages!

How to Update WordPress Theme

By Dinesh Thakur

Just like Update Plugin, WordPress theme is also need of update. This update can be due to a more limited repair or update previous version. Here is the tutorial.


1. Log in to your WordPress dashboard, then select the Appearance »Themes. No notification will be like in the image below if you need update theme.

        Update Theme in wordpress

2. To update the theme, you can simply click the theme that will be updated and then select the update now.

        update the theme

3. Wait a few seconds, if a theme has been successfully updated notification will appear as shown below.

         theme has been successfully updated notification


Essential tutorials before Use the Image Media


• How To Register Your Website Domain Name With GoDaddy

• How To Install WordPress On Hostgator CPanel

• How To Install WordPress Theme

• How to Install WordPress Plugin


How to Update and Delete Plugin in wordpress

By Dinesh Thakur

Update and Delete Plugin in wordpress is very simple and straightforward process. In this tutorial, we will show you how to update and remove wordpress plugins. Following is the steps to delete WordPress plugin.

1. To determine whether a plug-in requires the latest version update, the way is very simple. You can see it on the dashboard left hand side menu WordPress plugin. If the listed numbers in there, for example as shown, then there is a plugin that requires an update. This figure adjust the amount of plugins that need to be updated. You can see an example below.

       plugin that requires an update

2. If you find any such notification for updates of plugins in WordPress, immediately go to your WordPress admin panel and then select Plugins » Installed Plugins. After that, click Update Now on the plugin you want to update. 

       Update Now on the plugin

3. Wait until the update process is complete. Then notification will appear as shown below.

       update process is complete

4. Deleting any plugins are very simple and easy process. Make sure you’re still on Plugins Installed page, then search plugin that you want to delete and select Delete.


5. Select Yes, Delete Reviews These plugin files and deleted successfully.


How to Use the Image Media in wordpress

By Dinesh Thakur

Image Media is a media library in which there are entire content in the form of pictures, video and other media files that you’ve uploaded previously, be it when making a post or pages.
In addition you can also upload content via the media. Here are the steps.

1. Sign on your WordPress dashboard, then select Media » Library you will find all the content you’ve uploaded. Each button will open a new window that will allow you to insert media.


         Image Media library
2. To add images or other new content, you simply select Add New »Select Files and select the image you want to upload. Later this image is ready for you put on a post or page without the need to upload it again.

Inserting an image you must have an prior image to add in your post. It may find on your computer or on an server. To insert a picture in your post, you’ll first point of the cursor mouse to where you want to integrate. Then you click the button to the right of Send. A new window opens.

         Add image file
3. You can also change the captions by clicking on one of the images. After that, it will appear as shown below, where you can change the Title, Description, and more here.

        Add and change image caption
4. In addition, you can edit the image by selecting Edit Image in the picture above. There are several options available to edit images, such as Rotate, Flip, adjust the image size, crop images and others.


Essential tutorials before Use the Image Media

• How To Register Your Website Domain Name With GoDaddy

• How To Install WordPress On Hostgator CPanel

• How To Install WordPress Theme

• How to Install WordPress Plugin

How to create a New Post in WordPress

By Dinesh Thakur

Post is the activity of writing or creating an article that will be published and seen by everyone who accesses the page of your WordPress website.

Here are the steps to make a post on WordPress.

1. To write your first post,Sign in your Dashboard, click Post » Add New link in the navigation menu to the left-hand side of the WordPress Dashboard or select the icon (+) at the top and select Post. On this page you have a series of information that we will detail as and when writing your post.

      Select post link

2. You’ll find Add New Post page like this, where there is a column to write the title of your post and also an area for writing posts.

The post title is very important because it affects the content and determine the visitor’s interest. This is the title that will retain reader’s attention. It is necessary, so give it special attention. You will enter it directly in the space reserved for that purpose under the indication Add a new post.

      Add New Post page


Text area for writing post, This is what we call a WYSIWYG (What You See Is What You Get). What you will see in the editor is what will be displayed globally on your blog post. You find here the concept and ergonomics of a conventional word processor.

3. Then there is Post formatting section or post editor to enhance your writing, which is usually located in the Office application in general.

      Post formatting section

4. To add content such as images, video or any other media, WordPress has a media library that allows you to transfer any type of media file from your computer to the server of your blog, but also to manage them directly from the administration interface of WordPress. you can use the option Add Media. Then choose Select Files and select the content you wish to upload. Wait until the upload is complete.

       Add Media option

5. After that you can adjust the size, title, and so the images. After everything is appropriate, select Insert into Post and the image has been successfully uploaded and entered in the post.

6. In addition, you can also categorize posts that you make into a particular category, can create a new category or follow the existing categories. This option can be found in the Categories section, the right of the post area. Creating a new category is very easy. You can select the option Add New Category, write the category you want, and click on a check mark in the category.

       Categories section

7. There is also a selection of tags that you can add in accordance with the posts you write. To add it was quite easy. You just need to write down the tag, and select Add.

       Tag Section

8. Then to change the permalink or URL post will publish, please select an option under the column heading or title, then select edit and customize to your liking.

          change the permalink

9. At the right top on this screen you’ll see the Publish box. Here, your can save your draft post. If you click the Preview button, you can get a preview of your post.

10. Once this is done, you can publish a post or article by clicking the Publish button.

          publish a post or article


Essential tutorials before you create a New Post in WordPress

• How To Install WordPress Theme

• How To Register Your Website Domain Name With GoDaddy

• How to Install WordPress Plugin

• How to Buy a Domain and Hosting

How to Install WordPress manually via FTP

By Dinesh Thakur

Besides being able to install WordPress via cPanel, other alternative you can also install WordPress via FTP. However, manual installation has a few added steps, and you will need an FTP client software for that.

Here is our beginner’s tutorial on How to Install WordPress manually via FTP.


Also Read: How to Buy a Domain and Hosting


      Install WordPress manually via FTP

Step 1. First thing you need to do is Download Software or FileZilla Application from Filezilla project website: https://filezilla-project.org/download.php After that, install the software as usual.

       Download Filezilla software
Step 2.When finished installing FileZilla, go back to cPanel and select FTP Accounts as shown below.

      Cpanel FTP Accounts
Step 3. Create a new FTP account by filling out the form that has been provided as an example image below, then select “Create FTP Account“.

      Create a new FTP account by filling out the form
Step 4. When finished, a new FTP account that has been created. Select “Configure FTP Client” and select “FTP Configuration File” icon FileZilla.

      Select
Step 5. There will be a file that is downloaded in .xml format, then reopen the application FileZilla, then select File » Import .

      import FTP Configuration File
Step 6. Find the file in .xml format had already downloaded on cPanel, then “Open”.

      import XML file
Step 7. Once successful, the next step select the server icon in the left corner of FileZilla. Then, select the FTP account that has been imported earlier and then enter the FTP password that has been created in cPanel.

       select the server icon in the left corner of FileZilla. Then, select the FTP account
Step 8. Once successful, the information will appear as shown below.

       File-zilla configure success
Step 9. Please download WordPress in https://wordpress.org/download/ address.

       Download WordPress
Step 10. When finished downloading, go back FileZilla and select the file which you downloaded WordPress earlier. Right click and select “Upload” and wait until the process is complete. WordPress files will appear in the column Remote site, as shown below.

       Copy-Wordpress
Step 11. Return to cPanel, create a database for WordPress that will be installed. Select “MySQL® Database Wizard”.

       Select Mysql database wizard
Step 11.1. Write the name of the database that you want, and then click “Next Step”.

        Mysql database wizard
Step 11.2. Enter the username and password of database that you want, then select the “Create User” like the screen below.

        Create Database user
Step 11.3. The next step is check all of the options or simply the option “ALL PRIVILEGES” and select “Next Step”.

       Database Privileges
Step 11.4. Then the database was created successfully.
Step 12. The next step is returned to the Home cPanel, then select File Manager » Go.

          select File Manager
Step 13. After that you’ll go to the File Manager page and find the WordPress files that are uploaded through FTP. Then select the WordPress files, select Extract, type / public_html, then Extract File (s).

            go to the File Manager page and find the WordPress files that are uploaded through FTP
Step 14. After the Extract process is successful, you will get a folder named Anonymous on File Manager or pulic_html. All you have to do next is to open the WordPress folder, choose Select All » Move and change the name of the directory was / public_html / wordpress to / public_html.

          Install wordpress file in host
Step 15. After all files are moved to the directory / public_html, the next step is to connect WordPress and databases that have been made earlier. Do so, open a browser and type the Domainname.com/wp-admin/ it will appear as shown below. Select the language you want and then click “Continue”.

       Wordpress Language Installation
Step 16. Further more you will find a page like this, select “Let’s go!”.

      
Step 17. Fill in the database name, username, and password according to the database that has been created previously. To Database Table Prefix Host and let the default, then click “Submit”.

       
Step 18. If successful message appears as in the image below. Then select “Run the install”.

       Run Insall
Step 19. The next step is to fill WordPress information such as Title, Username and Password to login to the dashboard and email to need when you forget the password, then select “Install WordPress”.

      Run Install WordPress
Step 20. After the installation process is complete, the page will appear as shown below. You can log in with the username and password that was created earlier.

     login form

Essential tutorials after Install WordPress manually via FTP

• How To Register Your Website Domain Name With GoDaddy

• How To Install WordPress On Hostgator CPanel

• How To Install WordPress Theme

• How to Install WordPress Plugin

How to Buy a Domain and Hosting

By Dinesh Thakur

       Buy a Domain and Hosting

In this tutorial, you’ll learn how to buy hosting and domain, it would be better if each of us first understand what is meant by Domain and Hosting.

What is Hosting?

Hosting is an online data storage space on the internet that allows data to be accessed online and viewed by all people from all over the world.

There are different variants of the data storage space that you can choose: 500MB, 1GB, even a much larger space. Hostgator or inmotionhosting provide an unlimited hosting service where you can freely upload your website content either in the form of images, video or other file types without fear of running out of space.

What is Domain?

Domain is your website address in the form (.com / .net / .org) and others, has the function to identify the IP address of your hosting server.

As illustrated above, when you already have the online data storage space, of course, all you need is the address that anyone can visit your business premises with ease. If you already have an online data storage space, but do not have an address, then how people can visit your business premises?

Likewise with the domain, an address that is required so that your website can easily be remembered and visited by people from all over the world.

Okay, let’s move to a tutorial on how to buy hosting and domain in Hostgator.

1. Open Hostgator website at (http://www.hostgator.com/)

     Hostgator website

2. Choose the web Hosting menu above, and then select a Web Hosting Plans to Meet Every Need.

3. For example, we choose the Baby Plan with a minimum 6 month contract.

      Web Hosting Plans

4. Click “Sign Up Now” and you’ll find the option to buy the domain. Please enter a domain name that you want, and then press enter.

       buy the domain

6. If the domain name you want is available, it will display a description as shown below, and then select a time period of registration, available at different prices. For example, we chose the one-year registration.


5. After that you will scroll the page like the picture below, Choose a Hosting Plan contract: 1 month, 6 months, 1 year, or even five years; of course with different rebates.

       Hosting Plan contract

7. After that, you will scroll down, and fill Your Billing Info. Make sure everything is correct, and nothing is opting from Add Additional Services Section and then select “agreement check box”.

       Billing Info detail

8. You will then be taken to option “Checkout” on this page where you will be directed to create a new account in Hostgator. Please select “Continue”, but if you already have an account, simply login on the page by entering your email and password. Fill in your data in detail below, and select the desired payment method, then select “Checkout Process”.


9. Then you will find a thank you page. Select continue, and then you will enter the member area Hostgator and found bills to be paid, along with how to make the payment as shown below.

10. After confirmation of the payment, you will receive an email or a notification to the member area Hostgator data related to login into cPanel or you’re hosting.

11. After that, try logging in cPanel to cPanel URL contained in the email as shown above. You can also type DomainName.com/cpanel browser to bring up the page as shown below. Please enter your username and password contained in the email.

Essential tutorials after Buy a Domain and Hosting


• How To Register Your Website Domain Name With GoDaddy

• How To Install WordPress On Hostgator CPanel

• How To Install WordPress Theme

• How to Install WordPress Plugin

How To Create SEO Friendly Images in WordPress

By Dinesh Thakur

How To Create SEO Friendly Images

If you are analyze traffic sources you may have noticed that a percentage of organic visits come from images. on-page SEO for images on your blogs can generate huge amounts of traffic from search engines. The image alt tag is responsible for transcribing the content for search engines. Therefore, it is important to learn how to optimize your images for search engines.

How to add Alt tag to WordPress images:

•  Add Alt Text to Images

WordPress allows you to manually adding an image alt text and image title to your blog post. while you upload an image, you get an option to add alt text and image title.

      SEO friendly images Setting

Conversely, if you are using HTML, you can add the alt text and image title in the image code, this would be an example with the same photo as the above in html:

<a href=”http://ecomputernotes.com/fundamental/computer.jpg”><img style=”border: 0px solid ; width: 602px; height: 410px;” alt = “Computer” title=”computer” >

If you want to add an alt text and image title to your existing site old images, then it’s not idle situation. we have a SEO friendly images free WordPress plugin which automatically updates ALT and TITLE attributes of all images.

      SEO friendly images

Also read: How to Install WordPress Plugin

• Use Relative File Name

Apart from adding image alt tag is responsible for transcribing the content for search engines, To Create SEO Friendly Image, filename is the first location to use main keyword related to your topic. it is the another way to achieve the goal.

Essential tutorials:

• How to Buy a Domain and Hosting

• How To Register Your Website Domain Name With GoDaddy

• How To Install WordPress On Hostgator CPanel

• How To Install WordPress Theme

• How to Install WordPress Plugin

Things Require To Do After Installing WordPress

By Dinesh Thakur

       Settings After Installing WordPress

Install WordPress is one of the first steps to create a Website. I’ll share with you a list of essential WordPress settings for beginner that you need to follow after installing WordPress on your hosting. They are very basic but necessary adjustments and you must perform properly to substantially improve your blog.

Some tasks are extremely important because of them depends on the security of your website, while others are simply gives small improvements.

There will be some sample data that do not want to display on website, remove plugins that are installed with the basic installation, change the username, permalinks, improve security and other issues that are important to present.

Delete default Posts and page:

To delete one or more your default Pages/Posts, Log in to your WordPress Administration Panel (dashboard) and go to Posts » All posts , click the Trash link at the top of the screen. This will move the Page/Post to the Trash.

      Delete Default WordPress post

Set up WordPress Permalink:

To improve positioning in Google Search Engine, you must change the permalinks. In most cases the default settings make them look like this:

http://ecomputernotes.com/?p=123

To modify it, all you have to do is enter the section Settings » Permalinks. Then select the “entry name” option. Thus the URL have the keywords in your title, will be much more accessible and better search engine ranking.

       WordPress permalink setup

Set your time Zone:

It is very important to set up the timezone to your local time, this will make sure your Scheduling post, message publication, and many calendar features will go according to your time zone.
To changing your timezone, Go to your WordPress dashboard area and then Click on the Settings » General Settings » Timezone screen. Select a city in the same timezone as you.

        General WordPress settings

Disable users registration

Spam registration can become a major problem. So if you have no need of adding new subscribers, then disable WordPress user-registrations from your dashboard. Just click Settings » General Settings and then do the following:

       disable user registration in WordPress

WordPress discussion/comment settings:

Comments are important for your website, If comments are enabled, your visitors opinion on your popular content.  The way your discussion/comment are shown depend on your discussion/comment settings shown in the screenshot.

       WordPress comment settings

WordPress Ping Service:

By default, WordPress has only one ping service, To extend your blog reach to major search engines you can Updated WordPress Ping List with many more services. You can add more ping list at Settings » Writing.

       updating WordPress ping list

Essential tutorials:

• How To Register Your Website Domain Name With GoDaddy

• How To Install WordPress On Hostgator CPanel

• How To Install WordPress Theme

• How to Install WordPress Plugin

• How to Buy a Domain and Hosting


How to Install WordPress Plugin

By Dinesh Thakur

     Different Ways To Install WordPress Plugin


WordPress is a flexible and powerful platform, one of the great advantages of WordPress is the large number of plugins available free on its website, and they expand their features and functionality to your application. Virtually anything you need to do with WordPress that does not bring it as standard can do it by simply by installing a plugin. Generally, Installing WordPress plugins from the WordPress Dashboard is one such thing that every Blogger who works with WordPress should know. Install WordPress plugins can be done in three different ways on your blog:

     • Search and Install Plugin from WordPress

     • Install WordPress plugin from 3rd party sites:

     • Install WordPress Plugin through FTP method

Search and install WordPress Plugins:

Installing a WordPress plugins are so simple that anyone could do it in just a couple of minutes. If you know the name of the plugin, then you can directly Login to WP admin area and go to Plugins » Add new Screen allows for the installation of new Plugins. There we find a screen like this; we will install the plugin to Insert Post Ads. So, in this case, I looked Insert Post Ads, and I got the following results:

      Install new WordPress plugin

If you are looking for new plug-in. Once you have located the plugin you need, either through the menu or through a search, just click on the Install Now button and then click to activate the plugin that accompanies the description of the plugin and you’re done, WordPress will do its magic.

      Install WordPress plugin

Install plugin in WordPress downloaded from third-party sites:

As you have seen, install a WordPress plugin has no secret and it’s very easy. But there are even more ways to do it.

For example, if you download a premium plugin that is not in the WordPress repository. You can see in the below picture there is an Upload plugin button. Do not worry, I’ll highlight here:

       Upload Plugin Button

Well, you just browse to the plugin archive and select it that you have saved on your computer. But beware; you have to upload compressed ZIP: no RAR or any other compression. Then click Install Now button and the plugin will be installed.

     Upload New plugin

Install WordPress Plugin through FTP method

In addition to installing the plugin directly through the WordPress dashboard, there are other ways that can be done if often find errors when installing directly via dashboard. The way is to use FTP, which does not vary much with how to install WordPress via FTP.

Just Locate and download WP plugins you want to install WordPress in https://wordpress.org/plugins/ address in Zip file format to your computer, unzip and put it to your site’s server, either with the WordPress dashboard manager which provides our hosting either through its own FTP client (FileZilla) and put the plugin file into your: / public_html / wp-content / plugins / directory. Once you have finished transfer the file in uncompressed format, And after that? You just have to go to the WP administration and you’ll find it listed with the other plugins you have, ready to be activating it from the Plugins menu.

The Plugin removal is also straight-forward process. Simply remove the plugin directory you already install and it will be automatically deactivated.


Essential tutorials before you Install WordPress Plugin

• How To Register Your Website Domain Name With GoDaddy

• How To Install WordPress On Hostgator CPanel

• How To Install WordPress Theme

• How to Buy a Domain and Hosting


How To Install WordPress Theme

By Dinesh Thakur

Installing a WordPress theme is a simple and quick task. In this article we will provide you with detailed instructions on How to Install Theme in your WordPress site. Similar to WordPress plugin installation, the WordPress themes are the face of your website on the Internet, what your visitors see and wrap your posts with a distinctive look.

There are two ways to upload WordPress themes via dashboard or FTP software. If you are new to WordPress, First start by reading below article.


• How To Install WordPress On Hostgator CPanel

• How To Register Your Website Domain Name With GoDaddy

• How to Buy a Domain and Hosting

Here are some helpful official resources for WordPress where you can download WordPress themes.

  • WordPress official themes directory (Free Themes)

How to Install WordPress theme:

Wordpress theme installation

So let’s assume, you can download WordPress theme. Usually, most of the Themes come in the .Zip format, which can be installed directly from the WordPress dashboard. Here is a guide plan for getting started to Install Theme in your WordPress site.

The following Instructions & procedure explain How to Install WordPress Theme.

   Log into your site admin page by entering: http:///websitename.com/wp-admin , Next, once there, click to Appearance » Themes » Add New link at the top of the page.

        Install New WordPress theme   

Once you’re there, simply Click on Upload theme tab, and then click browse button to select the archive of your theme from your local computer, which you downloaded in above step and click Install Now button.

        Upload WordPress Theme

        Browse Theme

In few seconds, WordPress will now install your theme on your web server; you will then see the link to activate under the message for successful theme installation. Click on the activate link, and you’ve successfully installed and activated your WordPress theme. That’s it! You can go to the front end of site and see the newly activated theme.

         Activate WordPress theme

How to Install WordPress theme using FTP:

Just like Installing WordPress Plugin, you can also install the theme via FTP. Here is the tutorial.

If you have obtained the .zip file of the theme, then you have to set up a FTP client like FileZilla (it is great free software) or your web hosting control panel should offer FTP access from the website panel.

In FTP method, you’ve uploaded a WordPress themes folder to your wp-content/themes folder of your WordPress directory.

As I mentioned above, if you have obtained the .zip compression file of the WordPress theme. So, you have to unzip the theme folder with free version of WinRAR. If you don’t have any such software, then you can download it from the official site of WinRAR and install it. After installation of WinRAR, right-click on .zip WordPress themes folder and select unzip:

Now login to your FTP manager via FTP client like FileZilla, as discussed above and locate to wp-content/Themes WordPress folder and upload the unzipped folder directly to your server.


That’s it, and now your WordPress theme is uploaded on your web server. Now it’s time to activate it.

How to activate WordPress theme:

Once you have to upload the WordPress theme, and then go to admin area and click on Appearance » Themes, and you will see a list of all installed themes. You can activate the theme by Bring your mouse on top of that theme and click on the activate button.


How To Install WordPress on Hostgator cPanel

By Dinesh Thakur

If you are interested to install your own WordPress blog?

Do you know 25% Websites in the world are installed on the most widely used self-hosted blogging WordPress platform?

To get started with WordPress is quite easy and simple, and if you want to install WordPress on your own hosting account with us, we have a simple install for you.

Besides being able to install WordPress with FTP, you can also use the Cpanel to install WordPress in a way that is similar to Install WordPress on Hostgator cPanel.

Easiest and quickest way to Install and manage on shared hosting for WordPress is using “QuickInstall script installer” which automatically downloads and installs WordPress within few clicks, and you don’t need to Installing manually to create your blog. Here are the quick step-by-step guidelines for newbie to get started to install WordPress on Hostgator hosting cPanel within 5 minutes. Hostgator offers unlimited hosting and bandwidth package for your WordPress, and I suggest you to pick Baby Plan which cost only $6.96/month. Click Hostgator on their official page for more information. 


      Install WordPress on Hostgator


Step-by-Step guidelines for newbie to install WordPress on Hostgator:


In most circumstances, installing WordPress is one of the easiest & simple process that takes five minutes to complete your WordPress site will be up.

Step 1. Before you installing WordPress, you will need a domain name and web hosting, website name is also known as domain name. You can purchase it from godaddy.com or some other domain provided by company. After a successful purchase hosting and domain in Hostgator, the next step is how to install WordPress via cPanel. Here’s the tutorial.


Sign-Up Link for Hostgator.com


Step 2. At first, go to Hostgator website and click on ‘Get Started Now!‘ button. After Purchasing web hosting from Hostgator, it provides cPanel (Control Panel) account ID and password to log into their hosting customers. At First, Login to cPanel by typing your domain name followed by a slash (/) and then type cPanel like this: Domainname.com/cpanel. After that, you’ll find the login page. Please enter your username and password contained in the email as the previous tutorial.

Step 3. After you’ve logged in to cPanel, you will find cPanel dashboard pages, each of which have different functions and features.On the dashboard, or page, please Scroll down and you can found Services/Software section and click on QuickInstall button.


              quickinstall for wordpress

Step 4. After landed on QuickInstall page, you click “WordPress” link as shown below under blog software category on left side. Once you click on it, you will get a quick latest WordPress version to install, size and other info.

   QuickInstall WordPress

Step 5. You will bring a screen as shown above where you need to enter your domain name, enter your admin email address, Site title, your first and last name. Make sure to add a valid email address. It will appear as shown below. Information:
1. Choose Protocol: Protocol you want to use, available http: //, http: // www., Https: // and https: // www. For the selection of the most widely used please select the default http: //.
2. Choose Domain: Select the domain you want to use to install WordPress. If you have more than one domain in 1 hosting, it would appear more domain options.
3. In Directory: If you want to install WordPress in another directory, please fill out as you see fit. For example if you fill the directory with the name “blog” then WordPress will be installed and accessed on namadomainAnda.com/blog, if only want to install without a directory or on your primary domain only, please clear the option.
4. Table Prefix: Table which will be used in the Database (Let it default).
5. Site Name: The name of your site.
6. Site Description: The description of your site.
7. Enable Multisite (WPMU): Option to turn on your WordPress multisite, this option is rarely switched on, so do not be unchecked.
8. Admin Username: username to login on WordPress dashboard.
9. Admin Password: password to login to the WordPress dashboard.
10. Admin Email: Your email that will be used for the installation of WordPress, and is used to reset the password if you forget.
11. Select Language: The choice of language in which you want to use WordPress.
12. Limit Login Attempts: Plug-ins to be installed automatically on WordPress that serves to limit the number of login attempts if you enter a username or password.
13. Select Themes: If you want to install WordPress along with the Theme please select the theme you want, if not just ignore these options.
14. Email instalation details to: Please enter your email if you want to receive detailed information about the installation of WordPress you do
15. Now simply fill-up the form properly to get started with your install. Check the following instructions.

Step 6. Then Click Install Now button, it will take few minutes to complete the setup and your WordPress blog will be installed on Hostgator server.

Once the installation process is finished you can access default login page of your WordPress dashboard by going to “http://domain.com/wp-admin.php” (Replace DomainName.com with your actual domain name). You can enter admin and your password to log on the WP dashboard and start blogging.

Since you have understood the installation of WordPress. It’s time for now to configure your WordPress blog.

Essential tutorials after you have installed WordPress


• How To Install WordPress Theme

• How To Register Your Website Domain Name With GoDaddy

• How to Install WordPress Plugin

• How to Buy a Domain and Hosting


How To Register Your Website Domain Name with godaddy

By Dinesh Thakur

Internet is so powerful; because it gives the ability to everyone can share their skills and knowledge. One of the best ways to make you known is to set up a personal website. At first you need to a domain name.

Here’s How To Register Your Website Domain Name.

A domain name you choose is an essential for your website. You can register an available domain name for a period, with options for renewal. It costs approximately $7/year for one domain name.

Registering a domain name is a fast, simple, and affordable process. Just stay away from any offer of free domains. You get the domain free, it’s valid only for the first year and then they’ll charge heavily for the renewal for the next year because they know you’re locked in and it’s a hassle to transfer it to a different registrar.

Here are the Buying domains steps with GoDaddy

GoDaddy is world’s most popular domain name registrars, which I will use in my example.

Step 1. At first go to godaddy.com and search for the domain name you want to use. Double-check that the name you want to register is available. Be creative, as your domain name you want to use will be the central focus of your online website.

     Register Your Website Domain Name with godaddy

Step 2. If the domain name of your choice is not available, simply try again. It depends on how committed you are to that particular Domain name or name your website you want. Make sure the name your website you want is actually available, otherwise you cannot buy and register the domain name of your choice.

Select the domain types you want. In my case, I want the “.com“.

If you want the .com or another, so it’s important to quickly add the “.com” or another domain name at this stage, as GoDaddy does not give the option to add this domain extension later on.

In my case, it is available. Then Continue to Cart.

       Domain Availability

Step 3. On the following screen, GoDaddy will offer you want Private domain Registration. This will hides and protect your personal contact details from public searches. You can enable this if you want, but it costs is $6.99/year. I don’t think it’s necessary for newbie. Scroll down and ignore all of these add-ons services and click the orange Continue to Cart button at the bottom.

        Protect my information on godaddy

Step 4. On the following screen, you will be asked to review product you purchase.

Step 5. After selecting the domain you wish to register with, the last option to make is for how long you might want to reserve the name. The default is for 2 years, but it’s up to you, how long you want.


Step 5. At the Next Stage, Register to create an account, or login if you are an existing user.


Step 7. On the Next Screen, Proceed to the checkout and pay.

You should receive a confirmation email telling you your customer number and password.

Now your domain is registered, after that you need to update your site’s nameservers that you received in your confirmation email from Hostgator.

Essential tutorials after you have Register Your Website Domain Name


• How To Install WordPress Theme

• How To Install WordPress On Hostgator CPanel

• How to Install WordPress Plugin

• How to Buy a Domain and Hosting


Primary Sidebar

Wordpress Tutorials

Wordpress Tutorials

  • Wordpress - Blogging
  • Wordpress - Post
  • Wordpress - Install
  • Wordpress - SEO Images
  • Wordpress - Install Manually
  • Wordpress - Sitemap
  • Wordpress - Hosting
  • Wordpress - Update Theme
  • Wordpress - Plugin
  • Wordpress - Register
  • Wordpress - Things Require To Do
  • Wordpress - Delete Plugin
  • Wordpress - Theme Installation
  • Wordpress - Image Media Use

Other Links

  • Wordpress - PDF Version

Footer

Basic Course

  • Computer Fundamental
  • Computer Networking
  • Operating System
  • Database System
  • Computer Graphics
  • Management System
  • Software Engineering
  • Digital Electronics
  • Electronic Commerce
  • Compiler Design
  • Troubleshooting

Programming

  • Java Programming
  • Structured Query (SQL)
  • C Programming
  • C++ Programming
  • Visual Basic
  • Data Structures
  • Struts 2
  • Java Servlet
  • C# Programming
  • Basic Terms
  • Interviews

World Wide Web

  • Internet
  • Java Script
  • HTML Language
  • Cascading Style Sheet
  • Java Server Pages
  • Wordpress
  • PHP
  • Python Tutorial
  • AngularJS
  • Troubleshooting

 About Us |  Contact Us |  FAQ

Dinesh Thakur is a Technology Columinist and founder of Computer Notes.

Copyright © 2025. All Rights Reserved.

APPLY FOR ONLINE JOB IN BIGGEST CRYPTO COMPANIES
APPLY NOW