Besides being able to install WordPress via cPanel, other alternative you can also install WordPress via FTP. However, manual installation has a few added steps, and you will need an FTP client software for that.
Here is our beginner’s tutorial on How to Install WordPress manually via FTP.
Also Read: How to Buy a Domain and Hosting

Step 1. First thing you need to do is Download Software or FileZilla Application from Filezilla project website: https://filezilla-project.org/download.php After that, install the software as usual.

Step 2.When finished installing FileZilla, go back to cPanel and select FTP Accounts as shown below.

Step 3. Create a new FTP account by filling out the form that has been provided as an example image below, then select “Create FTP Account“.

Step 4. When finished, a new FTP account that has been created. Select “Configure FTP Client” and select “FTP Configuration File” icon FileZilla.

Step 5. There will be a file that is downloaded in .xml format, then reopen the application FileZilla, then select File » Import .

Step 6. Find the file in .xml format had already downloaded on cPanel, then “Open”.

Step 7. Once successful, the next step select the server icon in the left corner of FileZilla. Then, select the FTP account that has been imported earlier and then enter the FTP password that has been created in cPanel.

Step 8. Once successful, the information will appear as shown below.

Step 9. Please download WordPress in https://wordpress.org/download/ address.

Step 10. When finished downloading, go back FileZilla and select the file which you downloaded WordPress earlier. Right click and select “Upload” and wait until the process is complete. WordPress files will appear in the column Remote site, as shown below.

Step 11. Return to cPanel, create a database for WordPress that will be installed. Select “MySQL® Database Wizard”.

Step 11.1. Write the name of the database that you want, and then click “Next Step”.

Step 11.2. Enter the username and password of database that you want, then select the “Create User” like the screen below.

Step 11.3. The next step is check all of the options or simply the option “ALL PRIVILEGES” and select “Next Step”.

Step 11.4. Then the database was created successfully.
Step 12. The next step is returned to the Home cPanel, then select File Manager » Go.

Step 13. After that you’ll go to the File Manager page and find the WordPress files that are uploaded through FTP. Then select the WordPress files, select Extract, type / public_html, then Extract File (s).

Step 14. After the Extract process is successful, you will get a folder named Anonymous on File Manager or pulic_html. All you have to do next is to open the WordPress folder, choose Select All » Move and change the name of the directory was / public_html / wordpress to / public_html.

Step 15. After all files are moved to the directory / public_html, the next step is to connect WordPress and databases that have been made earlier. Do so, open a browser and type the Domainname.com/wp-admin/ it will appear as shown below. Select the language you want and then click “Continue”.

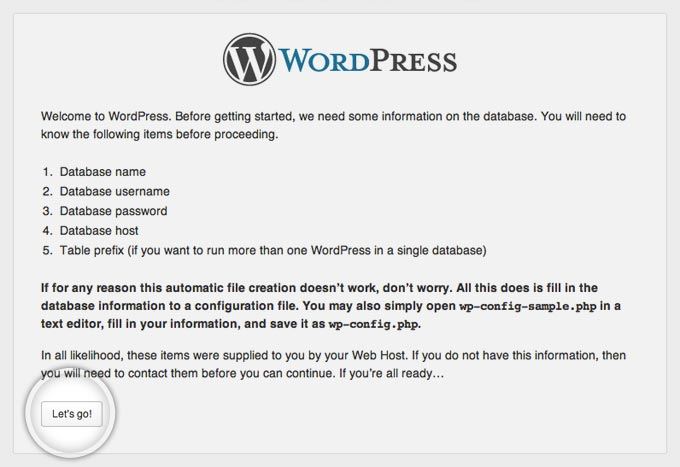
Step 16. Further more you will find a page like this, select “Let’s go!”.
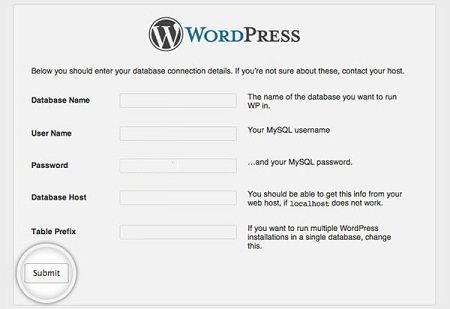
Step 17. Fill in the database name, username, and password according to the database that has been created previously. To Database Table Prefix Host and let the default, then click “Submit”.
Step 18. If successful message appears as in the image below. Then select “Run the install”.

Step 19. The next step is to fill WordPress information such as Title, Username and Password to login to the dashboard and email to need when you forget the password, then select “Install WordPress”.

Step 20. After the installation process is complete, the page will appear as shown below. You can log in with the username and password that was created earlier.

Essential tutorials after Install WordPress manually via FTP
• How To Register Your Website Domain Name With GoDaddy
• How To Install WordPress On Hostgator CPanel
• How To Install WordPress Theme
• How to Install WordPress Plugin
 Dinesh Thakur holds an B.C.A, MCDBA, MCSD certifications. Dinesh authors the hugely popular