• Skip to main content
  • Skip to primary sidebar
  • Skip to secondary sidebar
  • Skip to footer

Computer Notes

Library
    • Computer Fundamental
    • Computer Memory
    • DBMS Tutorial
    • Operating System
    • Computer Networking
    • C Programming
    • C++ Programming
    • Java Programming
    • C# Programming
    • SQL Tutorial
    • Management Tutorial
    • Computer Graphics
    • Compiler Design
    • Style Sheet
    • JavaScript Tutorial
    • Html Tutorial
    • Wordpress Tutorial
    • Python Tutorial
    • PHP Tutorial
    • JSP Tutorial
    • AngularJS Tutorial
    • Data Structures
    • E Commerce Tutorial
    • Visual Basic
    • Structs2 Tutorial
    • Digital Electronics
    • Internet Terms
    • Servlet Tutorial
    • Software Engineering
    • Interviews Questions
    • Basic Terms
    • Troubleshooting
Menu

Header Right

Home » Fundamental » Terms » How To Install An SSD
Next →
← Prev

How To Install An SSD

By Dinesh Thakur

Moving from a hard drive to an SSD is a fairly straightforward procedure that you can perform in less than an hour. Here, we’ll cover the steps you’ll need to take in order to install an SSD in a desktop PC.

We’ll be covering the following topics in this tutorial:

  • Physical Installation
  • Attach
  • Software Installation
  • Final Steps

Physical Installation

Start by turning your PC off and removing the left side panel. Then, locate the hard drive cage and look for a way to secure the SSD into the system. Most new desktop cases feature plastic slide-out trays that can hold either a 2.5-inch (traditional SSD size) or 3.5-inch (traditional hard drive size) drive, but if your PC is more than a year old, it’s unlikely it was built to natively hold the 2.5-inch SSD form factor.

Sata-HardDisk
Fortunately, there are a couple of ways you can mount an SSD into an open 3.5-inch hard drive bay. You can invest in a 3.5-inch to 2.5-inch adapter bracket that provides holes to securely mount your SSD, or, because SSDs have no moving parts, you can secure the drive in place with a few strips of hook-and-loop fastener tape, both on the 3.5-inch bay and the bottom of the SSD itself.

Attach

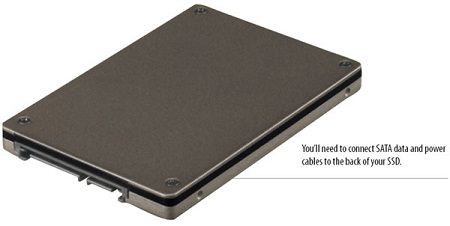
Once you’ve placed the SSD inside your case, you’ll need to connect a SATA (Serial Advanced Technology Attachment) data cable and a SATA power cable to the SSD. Your power supply should have a few unused L-shaped SATA power cables that you can run to the power connector on the back of the SSD.

Sata Cable
When connecting the SATA data cable, you’ll want to attach it to the fastest SATA port on your motherboard. Most new PCs provide you with both 6Gbps (also known as SATA 3) and 3Gbps (also known as SATA 2) SATA ports. SSDs work faster when connected via a 6Gbps SATA port, because they are capable of operating at the faster SATA speeds. Examine the manual for your desktop or motherboard to learn about the location and speed of available SATA ports. If your desktop does offer a 6Gbps SATA port, you’ll also want to ensure that you run a 6Gbps SATA cable (often the cable features a SATA 3 label) from the motherboard to the hard drive. Similar to the SATA power cable, you’ll run the data cable to the data port on the motherboard.

Software Installation

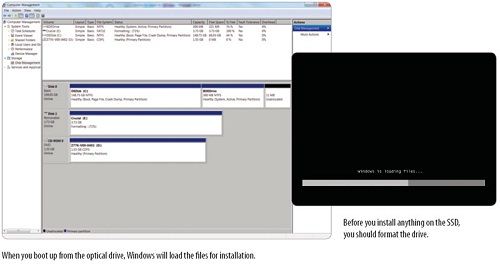
With the SSD mounted and connected, you can go ahead and install a fresh copy of Windows onto the drive. Before you install the operating system, however, you may need to format the drive. To do so in Windows, click the Start button, right-click Computer, and select Manage. Click Disk Management, right-click your SSD, and choose Format. The process will take a few minutes.

Installing-cable
Now, you can set up the PC to boot from your computer’s optical drive so that you can install Windows onto the SSD. Note that you’ll need a Windows installation disc to perform the installation. To change the PC’s boot order, you must enter the BIOS (Basic Input/Output System) by starting the PC and pressing a specific key—typically the DELETE key—at boot-up. Once inside the BIOS, you can use the arrow keys to find the boot options that allow you to set the optical drive as the first boot device. Save your changes and restart your computer.

Final Steps

As your PC reboots, you should see a prompt that reads “Press any key to boot from CD or DVD.” Press a key and Windows loads its installation utility—assuming that you’ve inserted the Windows installation disc into the optical drive. Follow the on-screen instructions and select the options for installing Windows on your SSD.

You’ll also like:

  1. How To Install An HDD or SSD
  2. How to install AngularJS
  3. How to Install Python on Windows
  4. How to Install WordPress Plugin
  5. How to Install WordPress manually via FTP
Next →
← Prev
Like/Subscribe us for latest updates     

About Dinesh Thakur
Dinesh ThakurDinesh Thakur holds an B.C.A, MCDBA, MCSD certifications. Dinesh authors the hugely popular Computer Notes blog. Where he writes how-to guides around Computer fundamental , computer software, Computer programming, and web apps.

Dinesh Thakur is a Freelance Writer who helps different clients from all over the globe. Dinesh has written over 500+ blogs, 30+ eBooks, and 10000+ Posts for all types of clients.


For any type of query or something that you think is missing, please feel free to Contact us.


Primary Sidebar

Terms

Parts of Computer

    • Computer - Processor
    • Computer - Scanner
    • Computer - SMPS
    • Computer - SCSI
    • Computer - EGA
    • Computer - CD-ROM
    • Computer - CD-R
    • Computer - Laser Disc
    • Computer - Optical Disc

Computer Ports

    • Computer - Port
    • Computer - Printer Port
    • Computer - Parallel Port
    • Computer - Serial Port
    • Computer - Display Port
    • Computer - HDMI

Computer Storage Terms

    • Storage - Disk Sector
    • Storage - FAT
    • Storage - Bootstrap
    • Storage - Seek Time
    • Storage - USB 3.0
    • Storage - Address
    • Storage - Format
    • Storage - Cluster
    • Storage - Defragmentation
    • Storage - Install SSD

Internet Terms

    • Internet - Cookies
    • Internet - UseNet
    • Internet - Search Engines
    • Internet - Bandwidth
    • Internet - 3G Technology
    • Internet - SkyDrive
    • Internet - Plug-Ins
    • Internet - Error Code 404
    • Internet - Crawlers
    • Internet - Wifi
    • Internet - Web hosting

Hardware Terms

    • Hardware - Video Card
    • Hardware - Clock Speed
    • Hardware - Architecture
    • Hardware - Tablet

Hardware Terms

    • OS - Desktop
    • OS - Desktop Publishing
    • OS - Application Program
    • OS - Device Dependent
    • OS - Command.com
    • OS - Bug
    • OS - PCL
    • OS - Ansi.Sys
    • OS - Desktop Level
    • OS - Android

Computer Language terms

    • Language - Assembly
    • Language - ANSI
    • Language - Embedded System
    • Language - AI
    • Language - Beta Version
    • Language - JQuery
    • Language - .Net

Google Terms

    • Google - Gravity
    • Google - Goglogo
    • Google - Barrel Roll
    • Google - Fonts
    • Google - Heart Graph
    • Google - Voice
    • Google - Movie Show Times

Some Other Terms

  • Terms - Antistatic Device
  • Terms - ATM
  • Terms - AirDrop
  • Terms - Abort
  • Terms - Bleed
  • Terms - Daisy Chain
  • Terms - Thunderbolt
  • Terms - Virus

Other Links

  • Computer Terms - PDF Version

Footer

Basic Course

  • Computer Fundamental
  • Computer Networking
  • Operating System
  • Database System
  • Computer Graphics
  • Management System
  • Software Engineering
  • Digital Electronics
  • Electronic Commerce
  • Compiler Design
  • Troubleshooting

Programming

  • Java Programming
  • Structured Query (SQL)
  • C Programming
  • C++ Programming
  • Visual Basic
  • Data Structures
  • Struts 2
  • Java Servlet
  • C# Programming
  • Basic Terms
  • Interviews

World Wide Web

  • Internet
  • Java Script
  • HTML Language
  • Cascading Style Sheet
  • Java Server Pages
  • Wordpress
  • PHP
  • Python Tutorial
  • AngularJS
  • Troubleshooting

 About Us |  Contact Us |  FAQ

Dinesh Thakur is a Technology Columinist and founder of Computer Notes.

Copyright © 2025. All Rights Reserved.

APPLY FOR ONLINE JOB IN BIGGEST CRYPTO COMPANIES
APPLY NOW