JTabbedPane Example in Java
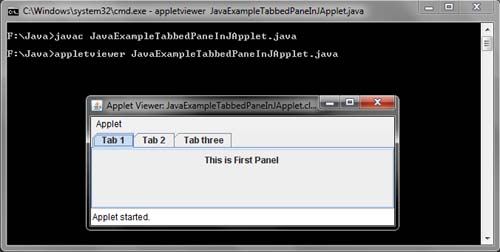
JTabbedPane : Set multiple tabbed sheets, which may contain other components. The user can select the sheet you want to see by tabs.
With the JTabbedPane class, we can have several components (usually objects JPanel) sharing the same space. The user can choose which component see selecting the tab of the desired component.
Create and configure a JtabbedPane
Method | Purpose |
JTabbedPane ()
| Creates a tabbed pane. the argument option should appear indicating where the tabs. |
addTab (String, Icon, Component, String)
| Add a new tab to the tabbed pane. The first argument specifies the text of the tab. |
Insert, Delete, Find and Select
Method | Purpose |
insertTab (String, Icon, Component, String, int) | Insert a tab at the specified index, where the first tab is at index 0. the arguments are the same as for addTab. |
remove (Component) | Removes the tab at index or specified component. |
removeAll () | Removes all tabs. |
indexOfComponent int (Component) | Returns the index of the tab that has the component, title, or icon. |
setSelectedIndex void (int) setSelectedComponent (Component) | Select the tab that has the index or specified component. |
int getSelectedIndex() Component getSelectedComponent() | Returns the indexor component |
Change the Appearance
Method | Purpose |
void setComponentAt(int, Component) Component getComponentA(int) | Set or get which component is associated with index tab Specified. The first tab is at index 0. |
void setTitleAt(int, String) String getTitleAt(int) | Set or getthe title of thetabspecified index. |
void setIconAt(int, Icon) Icon getIconAt(int) void setDisabledIconAt(int, Icon) Icon getDisabledIconAt(int) | Set or get icons displayed tab at the specified index. |
void setBackgroundAt(int, Color) Color getBackgroundAt(int) void setForegroundAt(int, Color) Color getForegroundAt(int) | Set or get the background color or Used by foreground tab index Specified. By default, a tab uses the colors of the tabbed pane. |
void setEnabledAt(int, boolean) boolean isEnabledAt(int) | Set or get the activated state of the tab at the specified index. |
import java.awt.*;
import javax.swing.*;
public class JavaExampleTabbedPaneInJApplet extends JApplet
  {
     public void init()
      {
        Container Cntnr = getContentPane();
        JTabbedPane TbdPn = new JTabbedPane();
        JPanel PnlOne = new JPanel();
        JPanel PnlTwo = new JPanel();
        JPanel PnlThree = new JPanel();
        PnlOne.add(new JLabel("This is First Panel"));
        PnlTwo.add(new JLabel("This is Second Panel"));
        PnlThree.add(new JLabel("This is Third Panel"));
        TbdPn.addTab("Tab 1",new ImageIcon("tab.jpg"),PnlOne,"This is First Tab");
        TbdPn.addTab("Tab 2", new ImageIcon("tab.jpg"),PnlTwo,"This is Second Tab");
        TbdPn.addTab("Tab three",new ImageIcon("tab.jpg"),PnlThree,"This is Third Tab");
        Cntnr.setLayout(new BorderLayout());
        Cntnr.add(TbdPn);
    }
}
/*<APPLET CODE=JavaExampleTabbedPaneInJApplet.class WIDTH=410 HEIGHT=210></APPLET>*/
Menus and Submenus in Java Example
Stack Operation in Java Using Array Example
JSplitPane Java Example
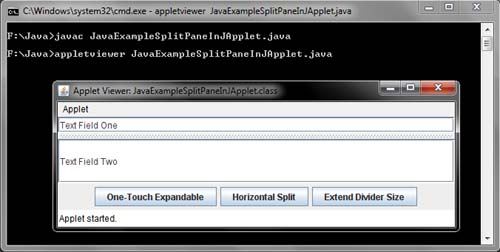
A split pane is a lightweight container that allows you to arrange two components (only two) side by side horizontally or vertically in a single pane. The display areas of both the components can also be adjusted at the runtime by the user. A split pane is an object of JSplitPane class.
Some of the constructors defined by JSplitPane class are as follows.
JSplitPane ()
JSpliPane(int orientation, boolean continuousLayout)
JSplitPane(int orientation, Component TopOrLeft,BottomOrRight)
JSplitPane(int orientation, boolean continuousLayout, Component TopOrLeft, Component BottomOrRight)
where,
orientation specifies how components will be arranged – can have one of the two values:
HORIZONTAL_SPLIT and VERTICAL_SPLIT
continuousLayout can have one of the two values: true,if the components are resizable
when divider is moved, otherwise false (default value)
TopOrLeft specifies the object to be placed at top or left
BottomOrRight specifies the object to be placed at bottom or right
import java.awt.*;
import javax.swing.*;
import java.awt.event.*;
public class JavaExampleSplitPaneInJApplet extends JApplet implements ActionListener
{
    JButton BtnTch,BtnSpltHoriz,BtnDvdrSz;
    JTextField TxtOne = new JTextField("Text Field One");
    JTextField TxtTwo = new JTextField("Text Field Two");
    JSplitPane SpltPn = new JSplitPane(JSplitPane.VERTICAL_SPLIT,TxtOne,TxtTwo);
    public void init()
      {
        Container Cntnr = getContentPane();
        JPanel Pnl = new JPanel();
        BtnTch = new JButton("One-Touch Expandable");
        BtnTch.addActionListener(this);
        Pnl.add(BtnTch);
        BtnSpltHoriz = new JButton("Horizontal Split");
        BtnSpltHoriz.addActionListener(this);
        Pnl.add(BtnSpltHoriz);
        BtnDvdrSz = new JButton("Extend Divider Size");
        BtnDvdrSz.addActionListener(this);
        Pnl.add(BtnDvdrSz);
        Cntnr.add(SpltPn, BorderLayout.CENTER);
        Cntnr.add(Pnl, BorderLayout.SOUTH);
      }
        public void actionPerformed(ActionEvent e1)
         {
            if(e1.getSource() == BtnTch)
              {
                 SpltPn.setOneTouchExpandable(true);
              }
                 if(e1.getSource() ==BtnSpltHoriz)
                {
                      SpltPn.setOrientation(SpltPn.HORIZONTAL_SPLIT);
                    }
                      if(e1.getSource() == BtnDvdrSz)
                     {
                           SpltPn.setDividerSize(SpltPn.getDividerSize() + 10);
                         }
         }
 }
/*<APPLET CODE=JavaExampleSplitPaneInJApplet.class WIDTH=610 HEIGHT=210></APPLET>*/
Sound in Java Swing Example
Sleep Method in Thread in Java Example
JSeparator Event in Java Example
JSeparator Java Example
Java Example Property()
JProgressBar Update in Java Example
JProgressBar Event in Java Example
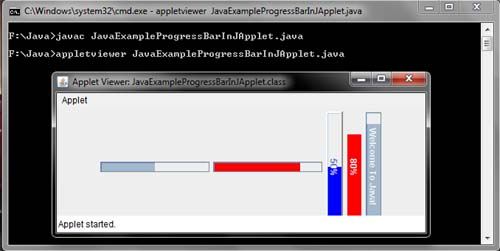
Progress bar is a user friendly control which is used to indicate the current status of some time consuming tasks such as software installation etc. It indicates the progress of a task by showing the percentage of completion using a color bar. The progress bar can be of two types namely, horizontal progress bar and vertical progress bar. In horizontal progress bar, the progress is indicated by filling the bar from left to right and in vertical progress bar, the progress is indicated by filling the bar from top to bottom. ·
A progress bar is an object of class JProgressBar which is a subclass of JComponent.
JProgressBar also implements the interface SwingConstants.
Some of the constructors defined by the JProgressBar class are as follows.
JProgressBar()
JProgressBar(int orientation)
JProgressBar(int min, int max)
JProgressBar(int orientation, int min, int max)
where,
orientation defines the orientation of the progress bar as VERTICAL or HORIZONTAL
min and max define the minimum and maximum value for the progress bar, respectively. The default values are 0 and 100
JProgressBar Example in Java Swing
JProgressBar: Displays the percentage of the total has a task to perform been completed. JProgressBar lack equivalents in the AWT. JprogressBar classes support horizontal and vertical orientations. The class is used JProgressBar typically to show the progress of a task, such as loading an image.
The progress bar is usually set when lengthy operations are underway. It is updated periodically to update the status ofthe lengthy operation. It displays the progress of lengthy operation in terms of percentage of completion.
Constructors and methods of the class jProgressBar.
Constructors and Methods | Description |
JProgressBar() | Constructs a horizontal progress bar without displaying progress string. |
JProgressBar(int orientation) | Constructs a progress bar with the specified orientation, which can be either JProgressBar.HORIZONTAL or JProgress Bar.VERTICAL. |
jProgressBar(int min, int max) | Constructs a horizontal progress bar with specified minimum and maximum values. |
JProgressBar(int orientation,int min, int max) | Constructs a progress bar with specified orientation, minimum and maximum values. |
jProgressBar(BoundedRangeModel model) | Constructs a horizontal progress bar with specified model. |
void addChangeListener(Change Listener I) | Adds a change listener to the progress bar |
int getMaximum() | Returns the maximum value of the progress bar stored in progress bar’s BoundedRangeModel. |
int getMinimum() | Returns the minimum value of the progress bar stored in progress bar’s BoundedRangeModel. |
BoundedRangeModel getModel() | Returns the progress bar’s data model. |
int getOrientation() | Returns the present orientation of progress bar, that is, JProgressBar.VERTICAL or JProgessBar.HORIZONTAL |
int getPercentComplete() | Returns the percentage complete for the progress bar. |
String getString() | Returns the current value of the progress string. |
int getValue() | Returns the current value of the progress bar’s data model. |
import java.awt.*;
import javax.swing.*;
public class JavaExampleProgressBarInJApplet extends JApplet
   {
     JProgressBar PrgsBar1,PrgsBar2,PrgsBar3,PrgsBar4,PrgsBar5,PrgsBar6;
     public void init()
      {
        Container Cntnr = getContentPane();
        Cntnr.setLayout(new FlowLayout());
        PrgsBar1 = new JProgressBar();
        PrgsBar1.setValue(50);
        Cntnr.add(PrgsBar1);
        PrgsBar2 = new JProgressBar();
        PrgsBar2.setMinimum(100);
        PrgsBar2.setMaximum(200);
        PrgsBar2.setValue(180);
        PrgsBar2.setForeground(Color.red);
        Cntnr.add(PrgsBar2);
        PrgsBar3 = new JProgressBar();
        PrgsBar3.setOrientation(JProgressBar.VERTICAL);
        PrgsBar3.setForeground(Color.blue);
        PrgsBar3.setValue(50);
        PrgsBar3.setStringPainted(true);
        PrgsBar3.setBorder(BorderFactory.createRaisedBevelBorder());
        Cntnr.add(PrgsBar3);
        PrgsBar4 = new JProgressBar();
        PrgsBar4.setOrientation(JProgressBar.VERTICAL);
        PrgsBar4.setForeground(Color.red);
        PrgsBar4.setValue(80);
        PrgsBar4.setStringPainted(true);
        PrgsBar4.setBorderPainted(false);
        Cntnr.add(PrgsBar4);
        PrgsBar5 = new JProgressBar();
        PrgsBar5.setOrientation(JProgressBar.VERTICAL);
        PrgsBar5.setStringPainted(true);
        PrgsBar5.setString("Welcome To Java!");
        PrgsBar5.setValue(90);
        Cntnr.add(PrgsBar5);
    }
 }
/*<APPLET CODE=JavaExampleProgressBarInJApplet.class WIDTH=500 HEIGHT=200></APPLET>*/
Java Swing Plaf Componenetui
JPasswordField Java Example
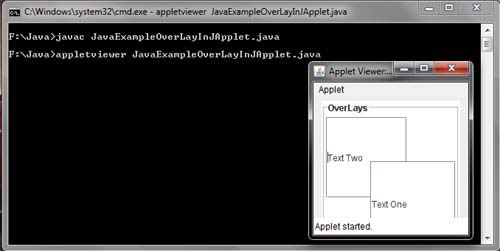
OverLay in Java Example
Overlay is a process of laying one component over another one. You can use Graphics2d to over layout one textfield component to another textfield.
import java.awt.*;
import javax.swing.*;
public class JavaExampleOverLayInJApplet extends JApplet
{
    public void init()
    {
        Container Cntnr = getContentPane();
        JPanel Pnl = new JPanel();
        Pnl.setLayout(new OverlayLayout(Pnl));
        Pnl.setBackground(Color.white);
        Pnl.setBorder(BorderFactory.createTitledBorder(BorderFactory.createEtchedBorder(),"OverLays"));
        JTextField Txt1 = new JTextField("Text One");
        JTextField Txt2 = new JTextField("Text Two");
        Txt1.setMinimumSize(new Dimension(35,35));
        Txt2.setMinimumSize(new Dimension(35,35));
        Txt1.setPreferredSize(new Dimension(110,110));
        Txt2.setPreferredSize(new Dimension(110,110));
        Txt1.setMaximumSize(new Dimension(125,125));
        Txt2.setMaximumSize(new Dimension(125,125));
        Txt1.setAlignmentX(0.3f);
        Txt1.setAlignmentY(0.3f);
        Txt2.setAlignmentX(0.9f);
        Txt2.setAlignmentY(0.9f);
        Pnl.add(Txt1);
        Pnl.add(Txt2);
        Cntnr.setLayout(new FlowLayout());
        Cntnr.add(Pnl);
    }
}
/*<APPLET  CODE =JavaExampleOverLayInJApplet.class WIDTH = 210  HEIGHT = 210 ></APPLET>*/
showInternalMessageDialog Example in Java
Java – List – Select Multiple items Example
List displays a list of items. It allows the user to make multiple selections from the given list of items. The list component is added in a scroll pane, so that the long list of items is scrollable. A list is an object of JList class.
Some of the constructors defined by JList class are as follows.
JList ()
JList(Object[] listdata)
where,
listdata represents the array of Object type that displays the elements
[Read more…] about Java – List – Select Multiple items Example
JMenuItem Example in Java
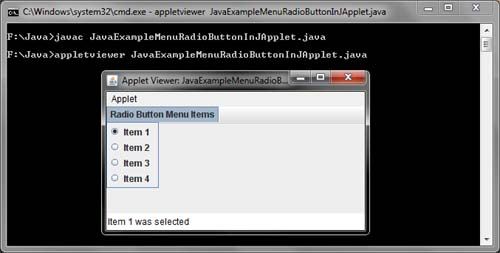
Menu Radio Button Java Example
There are several kinds of buttons in computer applications, buttons that you click on with the mouse pointer or that you activate with a key stroke. Buttons provide a way to tell the computer what to do. The buttons with the little round dots are called radio buttons, and they always come in groups of two or more. A set of radio buttons is a visual clue that you only have a choice of one of those options. Choosing another button automatically turns off the button that was currently selected, just like pressing a button on your car radio switches you from one station to the next.
Like other buttons, radio buttons are mostly found in a graphical user interface like the Macintosh or Windows or Presentation Manager, but they’re popping up in text-mode programs, too. Compare radio buttons with checkbox buttons, where you can choose as many of the checkboxes as you like.
import java.awt.*;
 import javax.swing.*;
 import java.awt.event.*;
 public class JavaExampleMenuRadioButtonInJApplet extends JApplet implements ItemListener
      {
         ImageIcon Icn = new ImageIcon("item.jpg");
         JRadioButtonMenuItem
         RdoBtnMnuItem1 = new JRadioButtonMenuItem("Item 1", Icn),
         RdoBtnMnuItem2 = new JRadioButtonMenuItem("Item 2", Icn),
         RdoBtnMnuItem3 = new JRadioButtonMenuItem("Item 3", Icn),
         RdoBtnMnuItem4 = new JRadioButtonMenuItem("Item 4", Icn);
         public void init()
          {
              Container Cntnr = getContentPane();
              JMenuBar MnuBar = new JMenuBar();
              JMenu Mnu = new JMenu("Radio Button Menu Items");
              Mnu.add(RdoBtnMnuItem1);
              Mnu.add(RdoBtnMnuItem2);
              Mnu.add(RdoBtnMnuItem3);
              Mnu.add(RdoBtnMnuItem4);
              ButtonGroup BtnGrp = new ButtonGroup();
              BtnGrp.add(RdoBtnMnuItem1);
              BtnGrp.add(RdoBtnMnuItem2);
              BtnGrp.add(RdoBtnMnuItem3);
              BtnGrp.add(RdoBtnMnuItem4);
              RdoBtnMnuItem1.addItemListener(this);
              RdoBtnMnuItem2.addItemListener(this);
              RdoBtnMnuItem3.addItemListener(this);
              RdoBtnMnuItem4.addItemListener(this);
              MnuBar.add(Mnu);
              setJMenuBar(MnuBar);
          }
              public void itemStateChanged(ItemEvent e1)
               {
                  JMenuItem MnuItem= (JMenuItem) e1.getSource();
                  String ItmTxt = MnuItem.getText();
                  if(e1.getStateChange() == ItemEvent.SELECTED)
                  ItmTxt += " was selected";
                  else
                  ItmTxt += " was deselected";
              showStatus(ItmTxt);
               }
   }
 /*<APPLET CODE = JavaExampleMenuRadioButtonInJApplet.class WIDTH = 350 HEIGHT = 280 ></APPLET>*/
Java – Add Icon to Menu Item Example
Disable Menuitem in Java Swing Example
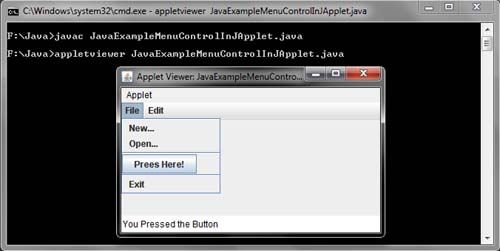
Menu Control in Java Swing Example
We understand all upper menu structure of a graphical application that allows us to display a list of operations that in turn can contain other lists of operations. The basic structure consists of a menu JMenuBar (the top bar) from which dangle (JMenu) menus that we add elements (JMenuItem) that can be JCheckBoxMenuItem, and even JRadioButtonMenuItem JMenu. Consider now the methods of each of these classes:
JMenuBar:
public JMenuBar (): creates a new JMenuBar;
public JMenu add (JMenu m): add a JMenu to the MenuBar;
GetMenu public JMenu (int index): Returns the index associated with the corresponding menu.
JMenuItem (JCheckBoxMenuItem superclass, and JradioButtonItem JMenu):
public JMenuItem () creates an empty menu item;
public JMenuItem (String text) creates a string associated;
public JMenuItem (Icon icon) is created with an associated image that will be displayed in the menu;
public void setEnabled (boolean b) indicate whether we want or not can be selected.
JMenu:
public JMenu (String s) Creates a new JMenu that displays the specified string;
public JMenu add (JMenuItem menuItem): adds the JMenu JMenuItem;
public JMenu add (String s) Creates a new menu item with the specified text and puts it at the end of this JMenu;
public void addSeparator () adds a separating horizontal line;
public JMenuItem getItem (int pos): Returns the JMenuItem containing the indicated position
import java.awt.*;
 import javax.swing.*;
 import java.awt.event.*;
 public class JavaExampleMenuControlInJApplet extends JApplet implements ActionListener
 {
     public void init()
      {
         JMenuBar MnuBar = new JMenuBar();
         JMenu MnuOne = new JMenu("File");
         JMenuItem MnuItmOne = new JMenuItem("New..."),
         MnuItmTwo = new JMenuItem("Open..."),
         MnuItmThree = new JMenuItem("Exit");
         JButton BtnPrss = new JButton("Prees Here!");
         BtnPrss.setActionCommand("You Pressed the Button");
         BtnPrss.addActionListener(this);
         MnuOne.add(MnuItmOne);
         MnuOne.add(MnuItmTwo);
         MnuOne.addSeparator();
         MnuOne.add(BtnPrss);
         MnuOne.addSeparator();
         MnuOne.add(MnuItmThree);
         JMenu MnuTwo = new JMenu("Edit");
         JMenuItem MnuItmFour = new JMenuItem("Cut"),
         MnuItmFive = new JMenuItem("Copy"),
         MnuItmSix = new JMenuItem("Paste");
         MnuTwo.add(MnuItmFour);
         MnuTwo.add(MnuItmFive);
         MnuTwo.add(MnuItmSix);
         MnuBar.add(MnuOne);
         MnuBar.add(MnuTwo);
         setJMenuBar(MnuBar);
      }
         public void actionPerformed(ActionEvent e1)
          {
             JButton Btn = (JButton)e1.getSource();
             showStatus(Btn.getActionCommand());
         }
  }
 /*<APPLET CODE=JavaExampleMenuControlInJApplet.class  WIDTH = 350  HEIGHT = 280 ></APPLET>*/
MenuAccelerator in Java example
Java MediaTracker Example
The java.awt.MediaTracker class is a useful class.It can monitor the progress of any number of images, so you can expect to all images are loaded or to be loaded only specific. Furthermore, can check for errors. The constructor is: public MediaTracker (Component comp) This constructor creates a new MediaTracker for pictures to be displayed in the variable comp, but really this parameter is not particularly important.
To upload images, a MediaTracker object provides the method following :
public void addImage ( Image image , int id)
This method adds the thumbnail image to the image list to load the object MediaTracker receiving the message . The id variable is used as the number of image identification when using other methods concerning this class.
import java.awt.*;
 import java.applet.*;
 public class JavaExampleMediaTrackerInJavaApplet extends Applet
 {
     Image Img;
     public void init()
      {
         MediaTracker Trckr = new MediaTracker(this);
         Img = getImage(getDocumentBase(),"Koala.jpg");
         Trckr.addImage(Img,0);
         try
            {
               Trckr.waitForAll();
            }
             catch (InterruptedException e1) { }
      }
             public void paint(Graphics gr)
              {
                gr.drawImage(Img, 10, 10, this);
              }
 }
 /*<APPLET CODE=JavaExampleMediaTrackerInJavaApplet.class WIDTH=600 HEIGHT=150> </APPLET>*/
![]()
ListMultiple in Java Swing Example
ListIterator Java Example
Java – Add an image to a JList item
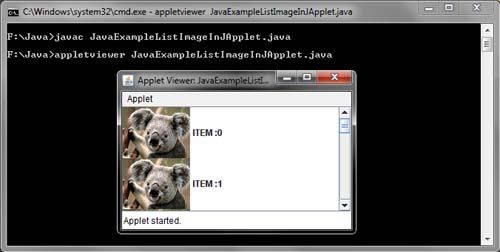
JList: The JList is a list on which we can view and select more than one item simultaneously. In case there are more items than can be simultaneously displayed due to the size of the list, a vertical scroll bar appears. Relevant methods:
public JList () Creates an empty JList;
public JList (Object [] listaItems) created with the items contained in the array of objects;
public JList (Vector listaItems) created with the Vector elements;
getSelectedIndex public int (): returns the index of the first selected item (-1 if none);
public int [] getSelectedIndices (): returns an array of indices that are selected;
getSelectedValue public Object () gives the reference to the object;
public Object [] getSelectedValues (): returns an array of Object
selected.
import java.awt.*;
import javax.swing.*;
import java.awt.event.*;
public class JavaExampleListImageInJApplet extends JApplet
{
    public void init()
    {
        Container Cntnr = getContentPane();
        newModel NwModl = new newModel();
        newRenderer NwRndrer = new newRenderer();
        JList Lst = new JList(NwModl);
        Lst.setCellRenderer(NwRndrer);
        Lst.setVisibleRowCount(5);
        Cntnr.add(new JScrollPane(Lst));
    }
}
      class newModel extends DefaultListModel
       {
           public newModel()
           {
               for(int loop_indx = 0; loop_indx <= 10; loop_indx++)
                    {
                       addElement(new Object[] {"ITEM :" + loop_indx,new ImageIcon("Koala.jpg")});
                    }
           }
       }
             class newRenderer extends JLabel implements ListCellRenderer
               {
                  public newRenderer()
                    {
                       setOpaque(true);
                    }
                       public Component getListCellRendererComponent(JList JLst, Object ob1, int indx, boolean isSelected,boolean Focus)
                         {
                             newModel Mdl = (newModel)JLst.getModel();
                             setText((String)((Object[])ob1)[0]);
                             setIcon((Icon)((Object[])ob1)[1]);
                             if(!isSelected)
                          {
                                 setBackground(JLst.getBackground());
                                setForeground(JLst.getForeground());
                              }
                                else
                            {
                                        setBackground(JLst.getSelectionBackground());
                                        setForeground(JLst.getSelectionForeground());
                                    }
                                        return this;
                          }
                }
/*<APPLET CODE=JavaExampleListImageInJApplet.class WIDTH=310 HEIGHT=310 ></APPLET>*/
