The tabular format of MS Excel is made up of rows and columns.
- Column runs vertically, while Row runs horizontally.
- The row number, which runs vertically down the left side of the sheet, identifies each row.
- The column header, which runs horizontally across the top of the sheet, identifies each column.
In MS Excel 2010, row numbers range from 1 to 104857, for a total of 1048576 rows, and column numbers range from A to XFD, for a total of 16384 columns.
Navigation with Rows and Columns
Let’s look at how to get to the last row or column.
- Pressing Control + Down Navigation arrow will take you to the last row.
- Control + Right Navigation arrow will take you to the last column.
 Cell Introduction
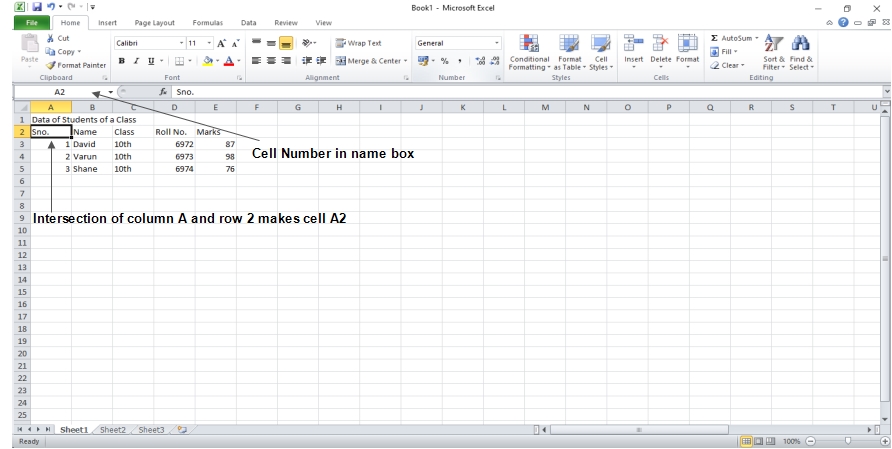
The intersection between rows and columns is called a cell.
The column header and row number are used to identify each cell.
For example: A1, A2
 Columns add a row to a worksheet
To add a single row, select the entire row or a cell in the row above which you want to add a new row. For example, click a cell in row 5 to add a new row above row 5.
To add multiple lines, select the lines above which you want to add lines. Select the same number of rows as the number of rows you want to add—for example, select three lines to add three lines.
To add non-contiguous rows, hold down the CTRL key while you select non-contiguous rows.
Select a cell, range, row, or column
On the Home tab, in the Cells group, click the arrow under Insert, and then click Insert Sheet Rows.
Note: You can also right-click the selected rows and click Add.
Note: When you insert rows in your worksheet, all references affected by the insertion, whether relative or absolute cell references will be adjusted accordingly.
The same behavior applies to deleting rows unless the deleted row is directly associated with a formula. If you want the references to be set automatically, it is better to use range references where they fit with your formula rather than specifying individual cells.
Adding columns to the worksheet
To add a single column, select the column just to where you want to add a new column or a cell in that column. For example, if you want to add a new column to the left of column B, click a cell in column B.
To add multiple columns, select the columns just to the right of where you want to add columns. Select the same number of columns as the number of columns you want to add. For example, select three columns to add three new columns.
To add non-contiguous columns, hold down the CTRL key while selecting non-contiguous columns.
Select a cell, range, row, or column
On the Home tab, in the Cells group, click the arrow next to Insert, and then click Add Page Columns.
Note: Also, right-click on the selected cells and Add
Note: To immediately repeat the column insert action, click where you want to add a column and press CTRL + Y.
If the cells you moved or copied contain formatting, you can use the Insert Options icon to adjust the formatting of the inserted columns.
Cell Sizing
The width of a cell depends on the column, and its height depends on the row. A cell alone cannot be sized. All cells in that row or column are sized. We can do the sizing in the following ways:
- Drag between row/column headers.
- Double click between the column headers. (The column will be sized according to the longest data contained in the cells in the cells).
- Format-Row-Height, Format-Column-Width.
- To make the height and width of multiple rows the same, drag is applied between headings after the column or rows are selected.
Show or Hide Columns and Rows
You can hide a row or column using the Hide command; however, rows and columns are also hidden when row height or column width is set to 0 (zero). You can have them reappear using the Show command.
You can redisplay specific rows and columns or re-view all hidden rows and columns at the same time. Reworking the first row or column of the worksheet is a bit tricky but can be done.
Hiding one or more rows or columns
Select the rows or columns you want to hide.
Click Format in the Cells group on the Home tab. Do one of the following:
Under Visibility, point to Hide and Show and click Hide Rows or Hide Columns. Under Cell Size, click Row Height or Column Width and type 0 in the Row Height or Column Width box.
Note: You can also right-click a row or column (or a selected range of rows or columns) and click Hide.
Displaying One or More Rows or Columns
To view hidden rows, select the rows above or below the rows you want to view.
To view the hidden columns, select the adjacent columns on either side of the columns you want to view.
To display the first hidden row or column in a worksheet, select it by typing A1 in the Name Box item next to the formula bar.
Note: You can also select it using the Go To dialog box. Under Editing on the Home tab, click Find and Select, and then click Go. Type A1 in the reference box, and then click OK.
- Click Format in the Cells group on the Home tab.
- Under Visibility, point to Hide and Show and click Show Rows or Show Columns.
- Under Cell Size, click the Row Height or Column Width option and type the value you want in the Row Height or Column Width box.
Note: You can also right-click the visible row and column selection next to hidden rows and columns and click Show.
Displaying All Hidden Rows and Columns Simultaneously
Selecting all cells on the worksheet for doing one of the following:
Click the Select All button or press CTRL + A. Click Format in the Cells group on the Home tab. Do one of the following:
- Under Visibility, point to Hide and Show and click Show Rows or Show Columns.
- Under Cell Size, click the Row Height or Column Width option and type the value you want in the Row Height or Column Width box.
 Dinesh Thakur holds an B.C.A, MCDBA, MCSD certifications. Dinesh authors the hugely popular