Three worksheets are provided by default in the Microsoft Excel workbook, but you can add or delete new worksheets (and other types of sheets such as a chart sheet, macro sheet, or dialog sheet) as needed. You can also change the number of worksheets shown by default in new workbooks.
If you have access to a worksheet template that you created yourself or provided in Office Online, you can base that template on the new worksheet.
The worksheet name (or title) is displayed in the sheet tab at the bottom of the screen. By default, its name is Sheet1, Sheet2, etc. you can give these worksheets more appropriate names.
Note: Sheet tabs are displayed by default, but if you don’t see them, verify that the Show sheet tabs check box in the advanced category in the Excel Options dialog box (File, Excel Options) is selected.
If you need to work with more than three sheets in a workbook, you will have to add more. The number of sheets can vary from 1 to 255.
We’ll be covering the following topics in this tutorial:
Adding a New Worksheet
To add a new worksheet, do one of the following:
To add a new worksheet to the end of existing worksheets, click the Add Worksheet tab at the bottom of the screen.
To add a new worksheet in front of an existing worksheet, select that worksheet, click Insert in the Cells group on the Home tab, and then click Add Sheet.
Note: You can right-click the existing worksheet tab and click Add. On the General tab, click Worksheet, and then click OK.
Note: To change the order of worksheets in a workbook, click the tab of the worksheet you want to move and drag it to the location you want.
Below are the steps that illustrate how to build a new worksheet if you want to start a new worksheet while working on a worksheet, or you have closed a worksheet that has already been opened and want to start a new worksheet.
To add a sheet, we will follow the following steps:
Step 1: Right-click the name of the sheet and select the Insert option.
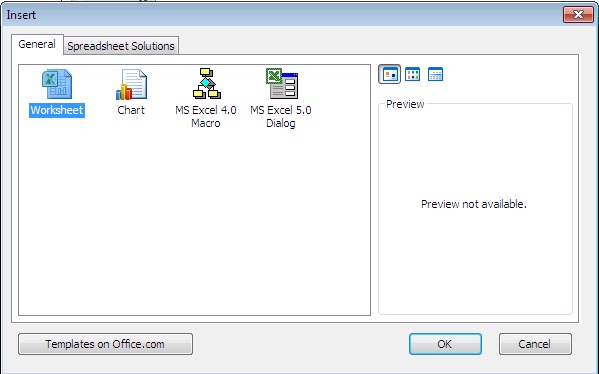
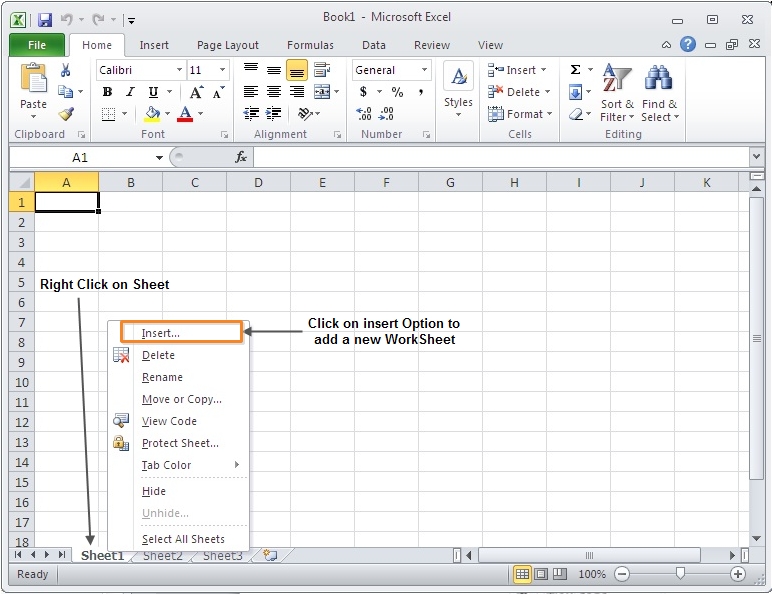 Step 2: The Insert dialog will now appear, with the Worksheet option selected from the general tab. Please click the OK tab.
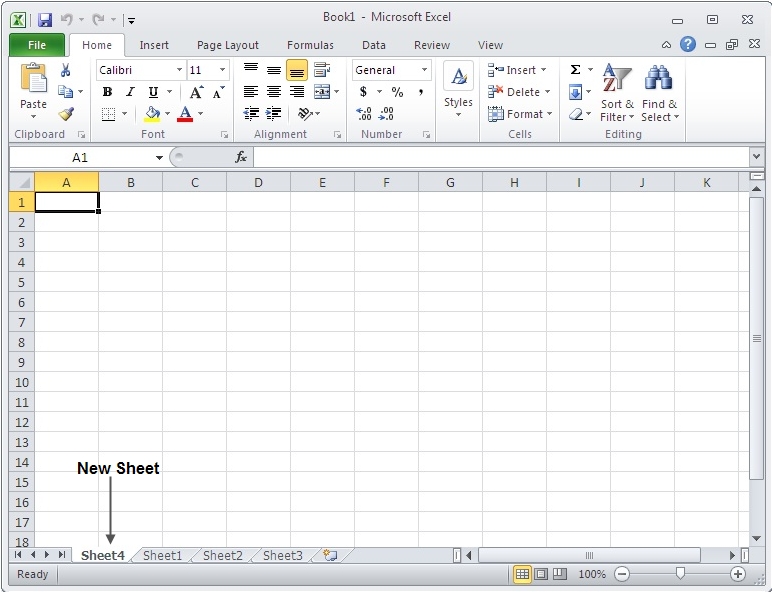
 You should now have your blank sheet ready to begin typing your document, as shown below.
Adding Multiple Worksheets at the Same Time
Hold down the SHIFT key and select the existing sheet tabs of the number of worksheets you want to add to the open workbook.
For example, if you want to add three new worksheets, select the three sheet tabs of existing worksheets.
On the Home tab, in the Cells group, click Insert, and then click Insert Sheet.
Note: You can also right-click the selected sheet tabs and click Add. On the General tab, click Worksheet, and then click OK.
To change the order of worksheets in a workbook, click the tab of the worksheet you want to move and drag it to the location you want.
Copy and Move Worksheets
The entire Worksheet (or sheet) in a workbook can be easily moved or copied to another location. However, calculations or graphs based on data in the worksheet may not be consistent when the worksheet is moved. Similarly, if a moved or copied worksheet is inserted between sheets referenced by a 3D formula reference, the data in the worksheet may unexpectedly be included in the calculation.
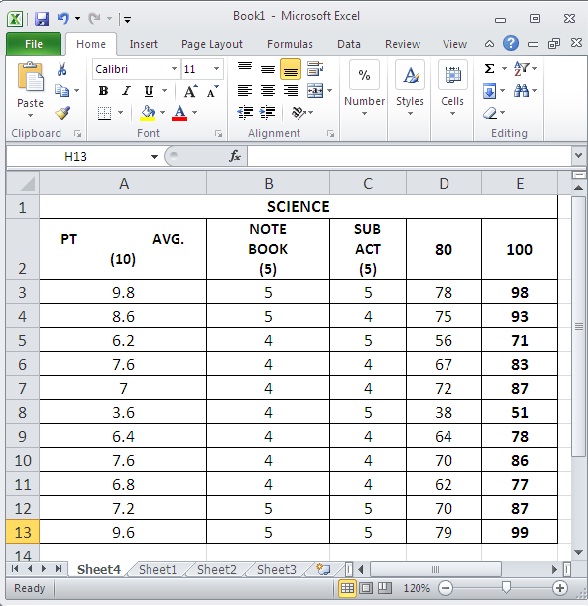
Before we go any further, let’s make some sample text. Please create a new excel sheet and fill it with whatever information you want. In the screenshot, we’ve included some sample data.
 To copy an entire worksheet, follow these steps.
Step 1: Right-click the Sheet Name and choose Move or Copy from the drop-down menu.
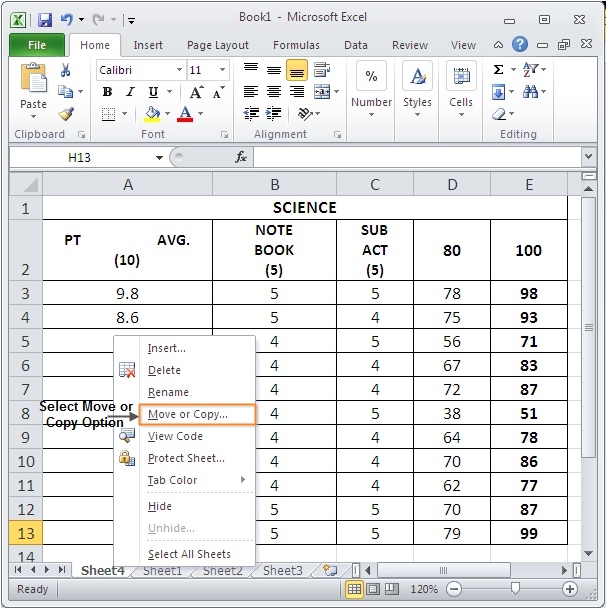 Step 2: The Move or Copy dialog will now appear, with the Worksheet option selected from the general tab.
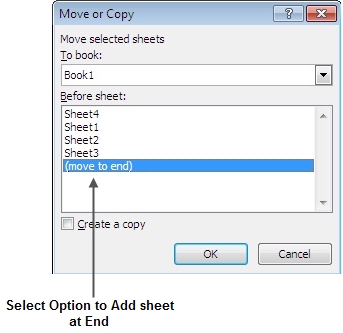 Select the Build a Copy Checkbox to make a copy of the current sheet, and set the before sheet option to (move to end) to create a new sheet at the end.
To continue, press the OK button.
As shown, you should now have your copied sheet.
By double-clicking on the sheet, you can rename it. The sheet name becomes editable when you double-click it.
Note: When you create a copy of the worksheet, that sheet is duplicated within the workbook and the sheet name states that it is a duplicate; for example, the first copy you make for Sheet1 is named Sheet1(2).
Move or Copy Worksheets to a Different Workbook
To move or copy worksheets to another workbook, make sure the workbook is open from Microsoft Office Excel.
Note: You cannot move or copy worksheets between workbooks that are open in separate instances of Excel. If a workbook was opened in a separate Excel instance (for example, you may have opened the workbook from a Windows SharePoint Services site), make sure that you open that workbook from the same Excel instance instead of browsing it from the Open dialog box (via the Open command on the File tab).
- Select those sheets in the workbook that contains the sheets you want to move or copy.
- Click Format in the Cells group on the Home tab, and then click Move Page or Copy under Organize Pages.
Note: You can also right-click a selected sheet tab and click Move or Copy.
- In the Booklist in the Move or Copy dialog box, do one of the following:
Click the workbook you want to move or copy the selected sheets. Click the new book to move or copy the selected sheets to a new workbook.
- In the next page list, do one of the following:
Click the page you want to add the moved or copied pages immediately before it. Click Move to End to insert the moved or copied sheets after the last sheet in the workbook and before the Insert Worksheet tab.
- Instead of copying the pages rather than moving them, select the Create a copy checkbox in the Move or Copy dialog box.
Note: When you create a copy of the worksheet, the worksheet is duplicated in the destination workbook. When you move the worksheet, the worksheet is removed from the original workbook and appears only in the destination workbook.
Move or Copy Data to another Worksheet or Workbook
Moving or copying the worksheet itself is an efficient way to transfer data to another location. You can still move or copy all or part of the data from one worksheet to another worksheet. This method can export data to a sheet in a workbook that is open in a separate instance of Excel.
- In a worksheet, select the data you want to move or copy.
Note: If the selection contains hidden rows or columns, Excel also copies the data in those hidden rows and columns. You must temporarily re-display the rows or columns that you do not want to include and then separately select each data range you want to move or copy. For information on this, see. Hide or show rows and columns.
- On the Home tab, in the Clipboard group, do one of the following: Click Cut (CTRL + X) to move the selected data. To copy the selected data, click the Copy (CTRL + C) button.
- Do one of the following:
Click the worksheet where you want to paste the data. Switch to a workbook that is open in another instance of Excel, and then click the worksheet where you want to paste the data.
- Select the upper-left cell of the paste area.
Note: The data in the paste area is overwritten. If the paste area contains hidden rows or columns, you may need to review the paste area to see all copied cells.
- On the Home tab, in the Clipboard group, do one of the Clicks the Paste (CTRL + V) buttons.
Note: To keep the column width previously specified for the data, click the arrow below the Paste button, click Paste Special, and then click Column widths under Paste.
To apply different paste options, click the arrow below the Paste button, and then click the option you want.
Note: See how the copied data will appear on your worksheet by hovering the pointer over the different paste options.
Hiding Worksheet in Excel 2010
As well as individual rows and columns of a table, you can collapse (hide) and expand (show explicitly) entire worksheets in a book. The point is that a particular worksheet can, if desired, be hidden from the user (but not deleted – the worksheet data is not lost), and then, if necessary, displayed explicitly.
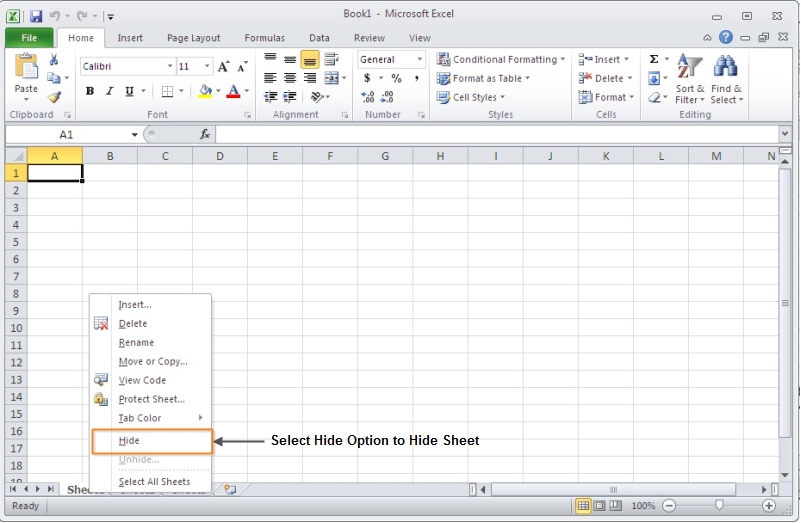
Step 1: The easiest way is to right-click on the worksheet tab and select the Hide command from the context menu list.
 The sheet is going to be hidden.
Another Method to Hide
- Select the sheets to hide. To select more than one, remember that you must click on the lower tabs while pressing the key Ctrl. Not all sheets can be selected, there must be at least one left in the workbook.
- Select menu Format.
- Choose option Hide and show.
- Another submenu will appear.
- Select option Hide sheet.
Show Hidden Sheets
The reverse procedure for displaying a hidden worksheet is also done in several ways. You can right-click on the sheet name of the displayed worksheets and select the Show command from the context menu.
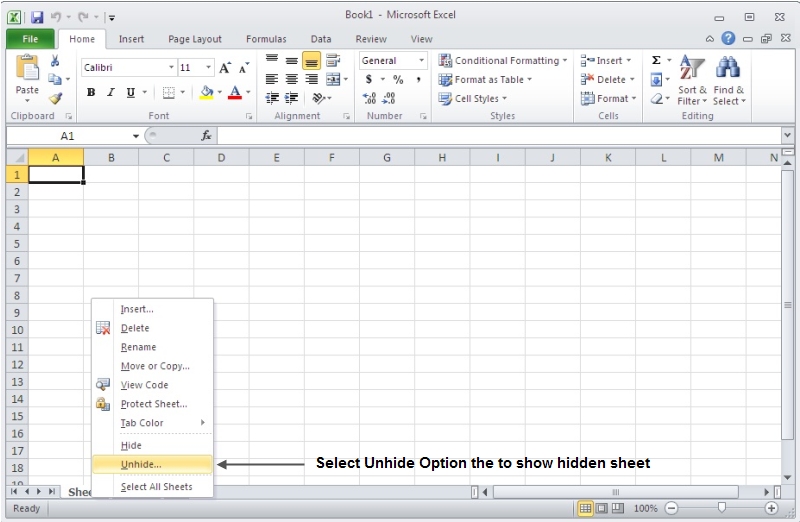
Step 1: Right-click on any Sheet Name and choose Unhide… from the drop-down menu.
 Step 2: In the Unhide dialog, choose Sheet Name to Unhide to reveal the sheet.
To continue, press the OK button.
You will now have access to your hidden sheet.
Delete a worksheet in Excel 2010
Step 1: Pick the Delete option from the right-click menu for the Sheet Name.
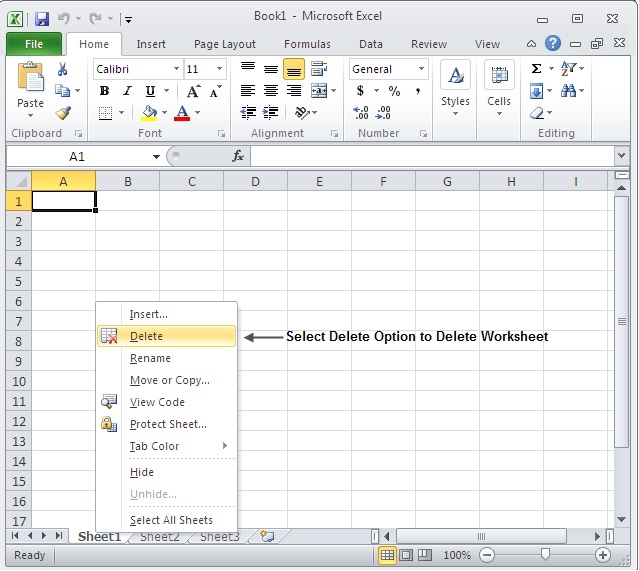 If the sheet is empty, it will be deleted; otherwise, you will receive confirmation message.
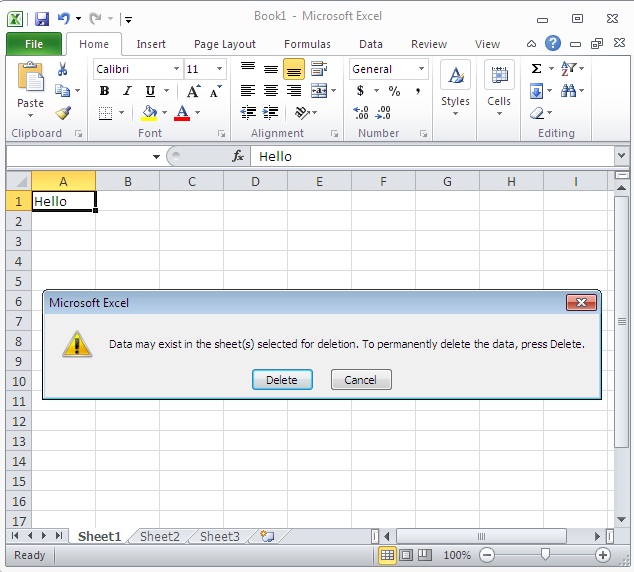 Press the Delete Button.
Now your worksheet will get deleted.
 Dinesh Thakur holds an B.C.A, MCDBA, MCSD certifications. Dinesh authors the hugely popular