Setting up and securing a wireless router in your office is something anyone can do. Here, we’ll take you step-by-step through the physical installation and setup of a wireless router.
1) Start by disconnecting the device that is currently connected to your cable or DSL modem. If you don’t already have a network, this is likely a PC. If you’re upgrading a network, this is likely the old router.
2) Power off your cable or DSL modem.

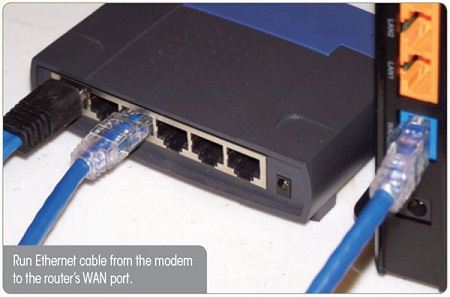
3) Run an Ethernet cable from the cable or DSL modem to the router’s WAN (wide-area network) port. Note that it’s best to locate a wireless router in the middle of a home or office, if possible, so that the signal will reach all of your devices. To move the router, you may need to move the cable or DSL modem, or locate a stretch of Ethernet cable that’s long enough to reach the spot where you want to place the wireless router.
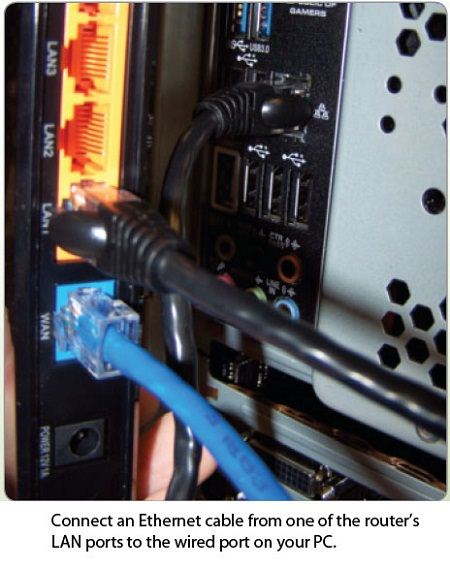
 4) Connect one end of an Ethernet cable to the LAN port on the router and connect the other end to a PC with a wired Ethernet connection, because you’ll need a wired connection to access and configure the wireless router.
 5) Attach the power adapter to the router, and plug the power adapter into a wall outlet. In some cases, you may also need to switch the router on. Also, you can now power on your cable or DSL modem. Wait a minute or two until both the router and modem have booted up.
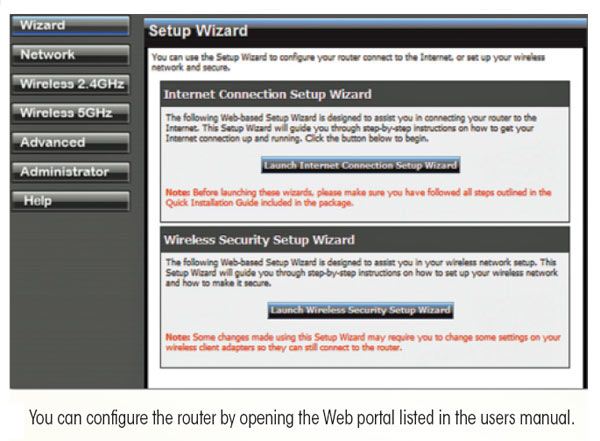
6) Turn on the computer that’s connected to the router and open your Web browser. Reference the router’s users manual to find the address you need to enter to make changes to the router’s configuration. Typically, the Web address will be something similar to http://192.168.10.1 Once you open the configuration utility, you’ll need to enter a username and password, the defaults for which are generally “admin.” Note that you can (and should) change the username and password within the router’s settings, so that only you will be able to alter the router’s configuration.
 7) You should now have access to the router’s configuration utility. Start by setting up your Internet connection with the information that was provided by your ISP. Many routers offer a setup wizard area; from here you can click through the most common options to quickly configure your router. After you’ve entered the data, you’ll likely need to reboot the router for the settings to take effect.
8) Most routers begin broadcasting a Wi-Fi signal by default, but you’ll want to alter the settings with a network name and password that’s known only to employees and guests. To protect your network, it’s wise to encrypt it. Typically, these settings should be listed under a Wi-Fi or wireless settings area where you’ll change the network name. To change the network name, look for the SSID Service Set Identifier) field. Enter the name of the network you prefer, such as your business’s name or something that will help employees easily figure out what network they should join. As an extra security measure, consider setting the system so that it does not broadcast the SSID, in which case your employees (or family) will have to manually enter the name when they (or you) set up their computers to connect to the wireless network. (See the “Hide Your Network” sidebar.)
9) Next, configure the network’s encryption protocol. There are three common encryption standards: WEP (Wired Equivalent Privacy), WPA (Wi-Fi Protected Access), or WPA2. WPA2 is generally considered the strongest encryption method, and WPAPSK (pre-shared key) allows you to use a memorable password, rather than a long, random string of numbers and letters. To set up Wi-Fi encryption, choose the standard you want to use and enter the password into the available fields. Whatever you choose, come up with a good way to remember the network name and key or write it down (keep it in a secure location if you do so) to make it easy to give it to employees and important clients who need Wi-Fi access.
10) Now, you should be able to see and access the network on your office computers. If service still seems to be spotty or slow, check with your employees about what Web applications they are using during the workday. For example, video conferencing or social networking tools occasionally take up extra bandwidth, although they can be useful for meeting and interacting with clients and customers remotely.
We’ll be covering the following topics in this tutorial:
Why WPA2 Encryption
● Placing encryption on your network is important, because otherwise people within the wireless router’s range will be able to connect to your local network, which may lead to access to the shared files and folders on your network. WPA2 (Wi-Fi Protected Access version 2) is the strongest protocol, because it can utilize multiple encryption methods—AES (Advanced Encryption Standard) and TKIP (Temporal Key Integrity Protocol). To set up WPA2, enter your router’s settings and provide the username and password. Next, find and select the wireless network setup area. Under an encryption or security section, select WPA2 and enter the password you wish to use. You may also see options for AES, TKIP, or both. AES is the stronger of the two types, but select both if you’re unsure whether all the devices on your network support AES.
Hide Your Network
● If you want the Wi-Fi network to be harder to find, you should disable the router from broadcasting the SSID name. Those who know the network name will still be able to connect to it, but the network won’t come up when people scan the area for available networks. Note that disabling the SSID isn’t an alternative to wireless encryption, because it’s fairly easy for hackers to find non-broadcast SSIDs. The controls for disabling the SSID broadcast should be under the Wi-Fi or wireless network settings when you log in to the router management portal.
802.11a/b/g/n
● Nearly all new routers utilize the 802.11n Wi-Fi standard. That said, you may have in your office a number of older devices that only work with the older 802.11a/b/g standards. Fortunately, 802.11n is backward-compatible with the 802.11b/g standards, and most routers offer a Mixed Mode that allows the router to deliver Internet access to 802.11b/g/n devices. To support computers with 802.11a wireless adapters, you’ll need a dual-band router, which is one that supports both the 802.11a and 802.11b/g/n standards.
 Dinesh Thakur holds an B.C.A, MCDBA, MCSD certifications. Dinesh authors the hugely popular